
Introduction
Learning how to cure UV resin correctly is essential for creating strong, crystal-clear, and professional-looking resin projects. Many beginners experience sticky surfaces, soft spots, or uneven curing because they use the wrong UV lamp, apply thick resin layers, or do not cure the resin long enough. In this guide, you’ll learn how to cure UV resin correctly, the best curing techniques, common mistakes to avoid, and expert tips for achieving a smooth and fully hardened finish every time.
Table of Contents
What Is UV Resin and How Does It Cure?
UV resin is a liquid resin that hardens when exposed to ultraviolet light. It is widely used in jewelry making, crafts, coatings, and small DIY projects because it cures quickly and does not require mixing like epoxy resin.
The curing process happens through a chemical reaction called photopolymerization. When UV light hits the resin, special molecules inside the liquid react and turn the material from liquid into solid plastic.
Unlike traditional resins that take hours or days to harden, UV resin cures within a few minutes under a UV lamp. Sunlight can also trigger the process but a UV lamp gives more consistent and reliable results.
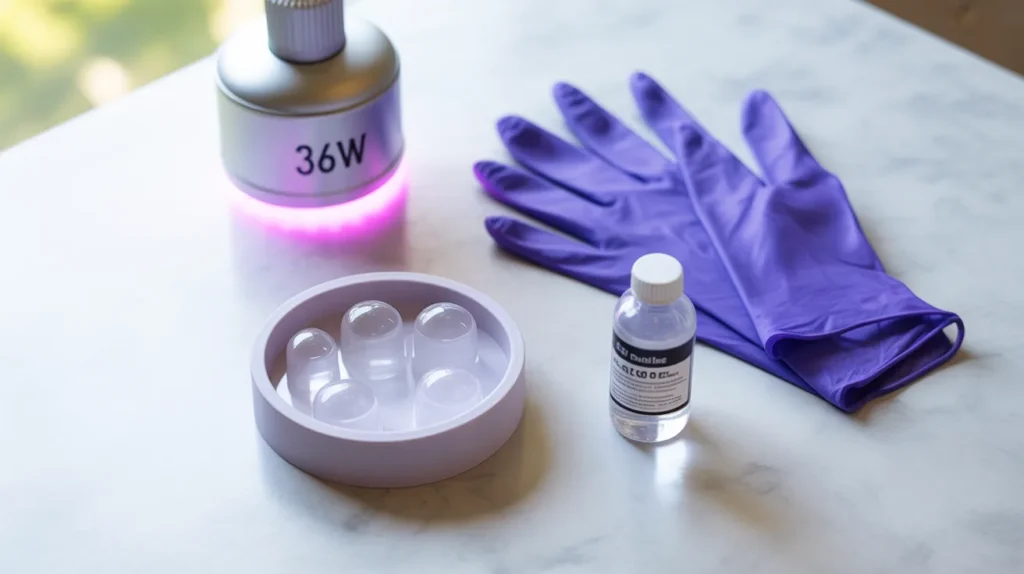
Tools Needed to Cure UV Resin Correctly
To cure UV resin properly you need a few basic tools. Using the right equipment helps the resin harden faster and gives a clear durable finish.
UV Lamp The most important tool. Choose a lamp with at least 36W for faster and more even curing. Anything under 36W risks leaving your resin soft and sticky. Check out our guide on the best UV light for resin to find the right one for your needs.
Silicone Mat Resin does not stick to silicone. It protects your table from spills and makes cleanup easy.
Silicone Molds Ideal for jewelry and decorative pieces. Resin releases cleanly from silicone once fully cured.
Nitrile Gloves UV resin can irritate skin with repeated contact. Wearing gloves every session protects your hands from UV resin skin sensitization.
Dust Cover Dust settling on wet resin leaves small bumps and imperfections on the surface. A simple cover keeps it clean during curing.
Step-by-Step Guide: How to Cure UV Resin Correctly
Follow these steps every time for a hard clear and durable finish.
Step 1: Prepare Your Workspace Work in a clean area with good lighting. Dust and dirt stick to uncured resin and ruin the surface finish.
Step 2: Apply Thin Layers Pour resin in thin layers — no more than 2mm at a time. Thick layers do not cure evenly and stay soft inside even when the surface feels hard.
Step 3: Remove Air Bubbles If bubbles appear gently pop them with a toothpick or wave a heat gun on low setting over the surface before curing. This gives a smooth clear finish.
Step 4: Place Under UV Lamp Put the resin piece directly under your UV lamp. Keep it a few inches away so the light covers the entire surface evenly.
Step 5: Cure for the Right Time Most resin cures in 60 to 120 seconds per thin layer under a 36W lamp. Always check the manufacturer instructions for your specific resin. For exact cure times by brand check our how long to cure UV resin guide.
Step 6: Check Hardness After curing touch the surface. It should feel completely hard with zero stickiness. If it feels tacky cure for another 30 to 60 seconds and check again.
Step 7: Repeat for Each Layer For thicker projects cure each layer separately before adding the next. This improves strength clarity and prevents soft spots.
Best UV Light Settings for Curing
Wattage Use a minimum 36W lamp for jewelry and small crafts. Higher wattage means faster more even curing. Anything below 36W is unreliable for consistent results.
Distance Keep the resin a few inches below the lamp. Too far and UV intensity drops. Too close and heat builds up and can cause yellowing.
Curing Time Small thin pieces cure in 60 to 120 seconds. Thicker layers need more time. Always check the surface before moving on.
Multiple Layers Cure each layer separately for deep or detailed projects. Never pour more than 2mm at a time.
Avoid Overexposure Leaving resin under UV light too long can cause yellowing. Stick to recommended times and check results before extending.
Common Mistakes When Curing UV Resin
Using Thick Layers The inside stays soft while the surface feels hard. Always apply in 2mm layers and cure each one separately.
Weak UV Lamp A low wattage lamp does not produce enough UV intensity. This results in sticky or partially cured resin. Upgrade to at least 36W.
Not Curing Long Enough If the surface still feels sticky it simply needs more time. Add 30 second intervals until it hardens completely.
Dust Contamination Dust settles on wet resin and creates bumps. Work in a clean area and cover your piece during curing.
Skipping Cleaning Uncured residue on the surface causes stickiness. Wipe gently with isopropyl alcohol and cure again for a few minutes.
Ignoring Manufacturer Instructions Different resins have different requirements. Always read the instructions for your specific brand before starting.
Why UV Resin Sometimes Does Not Cure
Insufficient UV Light Weak lamp or wrong positioning. Use a strong UV lamp and keep the piece at the correct distance.
Thick Layers UV light cannot reach the bottom of thick pours. Apply in thin 2mm layers always.
Expired Resin Old resin loses its photoinitiators and will not cure properly. Always check the resin expiry date before use.
Incorrect Cure Time Some pieces simply need longer. Add time in 30 second intervals until fully hardened.
Cold Environment Very cold temperatures slow the curing reaction. Work in a room at moderate temperature for consistent results.
Tips for Faster and Better Curing Results
- Apply resin in 2mm layers — thin layers always cure faster and more evenly
- Use a 36W or higher lamp for reliable results every time
- Rotate your piece halfway through curing so all sides get even UV exposure
- Work in a warm room — cold temperatures slow down the curing reaction
- Wipe your surface clean before curing — dust and oils interfere with hardening
- Cure in stages for thick projects — never rush by pouring everything at once
Safety Tips When Curing UV Resin
- Always wear nitrile gloves — uncured resin causes skin sensitization with repeated contact
- Open a window or run a small fan — good ventilation reduces fume exposure
- Never look directly at your UV lamp while it is on
- Wipe spills immediately with a paper towel then clean with isopropyl alcohol
- Keep resin away from children and pets at all times
- Let waste resin cure fully before disposing of it as solid waste
For a full breakdown of UV resin health risks read our complete UV resin safety guide.
Troubleshooting Common UV Resin Curing Problems
Resin Is Still Sticky After Curing
Sticky resin after curing almost always means one of four things: your lamp is under 36W, your layer is thicker than 2mm, you did not cure long enough, or your resin has expired. Start by adding 30 second cure intervals. If stickiness persists switch to thinner layers. If the problem continues after that your resin may be expired or your lamp may need replacing.
For a full breakdown of every cause and fix read our guide on why UV resin is sticky.
Resin Is Cloudy Instead of Clear
Moisture is almost always the cause of cloudy UV resin. Make sure your molds and all tools are completely dry before you start. Avoid working in humidity above 70%. If cloudiness continues after fixing moisture, slow down your pour to reduce trapped air bubbles — thousands of tiny bubbles create a milky white appearance rather than individual visible ones.
For every cause and solution read our guide on why UV resin turns cloudy.
Resin Has Soft Spots After Curing
Soft spots mean UV light did not reach that area evenly. Rotate your piece halfway through the cure time. For deep or complex molds cure in multiple thin layers instead of one thick pour. If soft spots keep appearing after following these steps your lamp bulb may be aging and losing UV intensity — replace it if it is over a year old.
Quick Troubleshooting Table
| Problem | Most Likely Cause | Fix |
|---|---|---|
| Sticky surface | Weak lamp or thick layer | Use 36W+ lamp, apply 2mm layers |
| Sticky all over | Expired resin | Replace with fresh resin |
| Cloudy finish | Moisture in tools or mold | Dry everything before use |
| Milky appearance | Trapped air bubbles | Pour slowly, pop bubbles first |
| Soft spots | Uneven UV exposure | Rotate piece, cure in thin layers |
| Yellowing | Over-exposure or sunlight curing | Use UV lamp only, stick to cure times |
Final Thoughts
Curing UV resin correctly comes down to three things: thin layers, a strong UV lamp, and enough time. Get these right and sticky surfaces, soft spots, and cloudy finishes become rare problems rather than regular ones.
If you are still having issues after following these steps check our full guide on the best UV resin for jewelry and crafts to make sure your resin brand is not the problem.
FAQs
Why is my UV resin still sticky after curing?
Sticky resin means it did not cure completely. The most common reasons are a lamp under 36W, layers thicker than 2mm, or not enough cure time. Add 30 second intervals under your lamp until the surface hardens. If stickiness persists your resin may have expired — check the date on the bottle.
Can sunlight cure UV resin?
Yes but it is unreliable. Clouds, time of day, and weather all affect results. Direct midday sunlight on a clear day can cure thin layers but it takes much longer than a UV lamp. For consistent professional results always use a dedicated UV lamp.
How long does UV resin take to cure?
Most thin layers cure in 60 to 120 seconds under a 36W lamp. Thicker layers need 3 to 5 minutes. Always check the surface after curing — if it feels tacky add 30 second intervals until completely hard.
What wattage UV lamp do I need for resin?
36W is the minimum recommended for reliable results. A 48W or 54W lamp cures faster and works better for larger pieces. Avoid anything under 24W — it simply does not produce enough UV intensity for consistent curing.
Why does my resin not harden completely
The three most common causes are thick layers, expired resin, and a weak lamp. Apply resin in 2mm layers, check your expiry date, and make sure your lamp is at least 36W. Cold room temperature can also slow hardening — work in a warm space.
Can I use a nail lamp to cure UV resin?
Some nail lamps work but most are too weak for resin. Nail lamps are typically 9W to 18W which is not enough for thorough curing. A dedicated 36W UV resin lamp gives far better and more consistent results.
Why is my UV resin cloudy after curing?
Moisture is almost always the cause. Make sure your molds and tools are completely dry before use. High humidity above 70% also causes cloudiness. Pouring resin too quickly can also trap air bubbles that create a milky appearance.
How many layers of UV resin can I apply?
There is no strict limit but each layer must be cured separately before adding the next. Keep each layer under 2mm thick. For deep projects build up gradually — 5 to 10 thin layers will always give better results than 2 or 3 thick ones.
Can I cure UV resin without a UV lamp?
Sunlight is the only natural alternative. However it is slow and unreliable — clouds and shade stop the process completely. For indoor crafting a UV lamp is essential. Regular LED lights and household bulbs do not emit enough UV to cure resin.
How do I know when UV resin is fully cured?
It should feel completely hard and dry with zero stickiness anywhere on the surface. Press gently in a hidden spot if it dents or feels soft it needs more time. A fully cured piece will also look crystal clear rather than cloudy or milky.