
1️⃣ Introduction
UV resin is popular in jewelry making, crafts, and small DIY projects because it cures quickly and creates a clear, glossy finish. However, many beginners struggle with problems like sticky surfaces, soft resin, or uneven curing. These issues usually happen when the curing process is not done properly.
Learning how to cure UV resin correctly is important if you want strong, durable, and professional-looking results. With the right UV light, proper curing time, and thin resin layers, you can avoid common mistakes and get a smooth finish every time.
2️⃣ What Is UV Resin and How Does It Cure?
UV resin is a type of liquid resin that hardens when exposed to ultraviolet (UV) light. It is widely used in jewelry making, crafts, coatings, and small DIY projects because it cures quickly and does not require mixing like epoxy resin.
The curing process happens through a chemical reaction called photopolymerization. When UV light hits the resin, special molecules inside the liquid react and start turning the material from a liquid into a solid plastic. This process is known as UV light curing.
Unlike traditional resins that may take several hours or days to harden, this material usually cures within a few minutes under a UV lamp. Sunlight can also start the curing process, but a UV lamp gives more consistent and faster results.
Because the reaction depends on light exposure, factors such as UV lamp strength, curing time, and resin thickness can affect how well the resin hardens. Using thin layers and proper lighting helps achieve a clear, smooth, and durable finish.
3️⃣ Tools Needed to Cure UV Resin Correctly
To cure UV resin properly, you need a few basic tools. Using the right equipment helps the resin harden faster and gives a clear, durable finish.
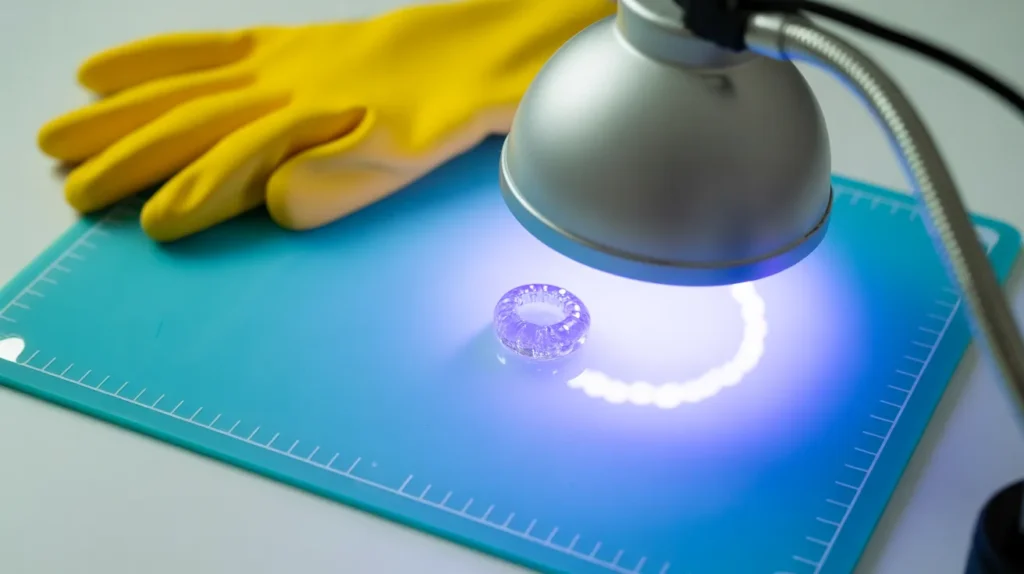
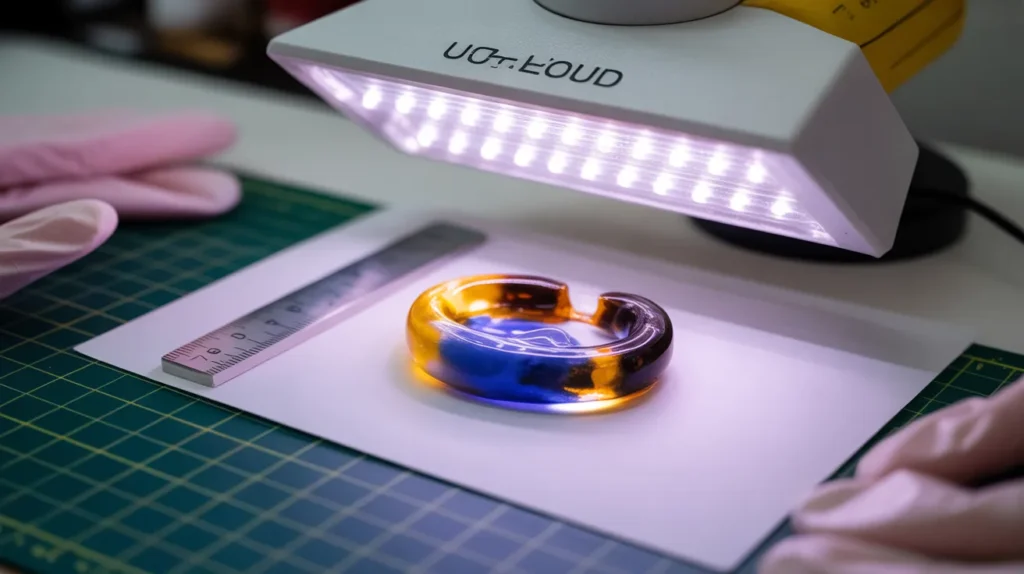
UV Lamp
A UV lamp is the most important tool. It provides strong ultraviolet light that activates the curing process. Choose a lamp with sufficient wattage (usually 6W to 36W) for faster and more even curing. Higher wattage lamps generally cure resin more quickly.
UV-Resistant Work Surface
A silicone mat or protective sheet is useful because resin does not stick to silicone. It also protects your table from spills.
Silicone Molds
If you are making jewelry or decorative pieces, silicone molds are ideal. Resin comes out easily from silicone molds once cured.
Protective Gloves
UV resin can irritate skin. Wearing nitrile gloves keeps your hands safe and prevents direct contact with uncured resin.
Dust Cover
Dust can settle on resin while it cures, leaving small imperfections. A simple dust cover helps keep the surface clean during curing.
Is Sunlight Enough?
Sunlight can cure UV resin, but it is less reliable than a UV lamp. Clouds, time of day, and weather can slow the process. A UV lamp gives consistent results.
4️⃣ Step-by-Step Guide: How to Cure UV Resin Correctly
Curing UV resin properly ensures a hard, clear, and durable finish. Follow these simple steps for best results.
Step 1: Prepare Your Workspace
Work in a clean area with good lighting. Dust and dirt can stick to uncured resin and ruin the surface.
Step 2: Use Thin Layers
Pour resin in thin layers instead of one thick layer. Thick layers may not cure evenly and can remain soft inside.
Step 3: Remove Air Bubbles
If bubbles appear, gently pop them with a toothpick or heat gun before curing. This helps create a smooth finish.
Step 4: Place Under UV Light
Put the resin piece under a UV lamp. Keep it at the recommended distance (usually a few inches) so the light reaches the entire surface.
Step 5: Cure for the Recommended Time
Most resin cures within 2–10 minutes depending on lamp strength and layer thickness. Follow the resin manufacturer’s instructions for best results.
Step 6: Check Hardness
After curing, touch the surface. It should feel hard and not sticky. If it is still soft, cure it for a few more minutes.
Step 7: Repeat if Necessary
For thicker projects, cure each layer separately before adding the next one. This improves strength and clarity.
5️⃣ Best UV Light Settings for Proper Curing
UV light settings affect how well resin hardens. Using the right settings helps achieve a strong and clear finish.
UV Lamp Wattage
Most UV lamps range from 6W to 36W. Higher wattage lamps cure resin faster and more evenly. A 12W to 36W lamp is good for jewelry and small crafts.
Distance From the Lamp
Keep the resin piece a few inches below the lamp. If it is too far, the light may not reach the surface properly. If it is too close, heat can build up and cause problems.
Curing Time
Curing time depends on lamp strength and layer thickness. Small pieces usually cure in 2–10 minutes. Thicker layers may need more time. Check the surface after curing—if it feels sticky, cure it for a few more minutes.
Multiple Layers
For deep or detailed projects, cure each layer separately. This prevents soft spots and improves overall strength.
Avoid Overexposure
Leaving resin under UV light for too long can sometimes cause yellowing. Use the recommended curing time and check the result before extending exposure. Proper UV light settings make the curing process faster and produce durable, professional-looking resin projects.
6️⃣ Common Mistakes When Curing UV Resin
Many curing problems happen because of simple mistakes. Avoid these issues to get better results.
Using Thick Layers
Thick layers may not cure properly. The inside can remain soft while the surface feels hard. Always apply resin in thin layers and cure each layer separately.
Weak UV Light
A low-power UV lamp may not provide enough light. This results in sticky or partially cured resin. Use a lamp with sufficient wattage for faster and more even curing.
Not Curing Long Enough
If the resin still feels sticky after curing, it needs more time under UV light. Extend the curing time in small intervals until the surface becomes hard.
Dust and Dirt Contamination
Dust can settle on wet resin and create bumps or imperfections. Work in a clean area and use a dust cover while curing.
Skipping Surface Cleaning
If resin becomes sticky after curing, it may have uncured residue. Wipe the surface gently with isopropyl alcohol and cure it again for a few minutes.
Ignoring Manufacturer Instructions
Different resins may have different curing requirements. Always check the instructions for recommended curing time and UV settings.
7️⃣ Why UV Resin Sometimes Does Not Cure
UV resin may remain soft or sticky for several reasons. Understanding these problems helps you fix them quickly.
Insufficient UV Light
If the UV lamp is weak or too far from the resin, the curing process may not complete. Use a strong UV lamp and keep the piece at the recommended distance.
Thick Resin Layers
Thick layers block UV light from reaching the bottom. The surface may feel hard while the inside stays soft. Apply resin in thin layers and cure each layer separately.
Low-Quality or Expired Resin
Old or low-quality resin may not cure properly. Always use fresh resin from a reliable source.
Incorrect Curing Time
Some pieces need more time under UV light. If the surface still feels sticky, cure it for additional minutes and check again.
Contamination on the Surface
Dust, oil, or fingerprints can interfere with curing. Clean the surface before curing and avoid touching the resin with bare hands.
Cold Environment
Very low temperatures can slow the curing process. Work in a room with moderate temperature for better results. By identifying these issues, you can solve curing problems and achieve stronger, clearer resin projects.
8️⃣ Tips for Faster and Better UV Resin Curing
Following simple tips can speed up curing and improve results.
Use Thin Layers
Thin layers cure faster and more evenly than thick ones. If your project needs depth, cure each layer before adding the next.
Choose a Strong UV Lamp
A higher wattage lamp reduces curing time and improves hardness. Lamps between 12W and 36W usually work well for crafts and jewelry.
Keep the Right Distance
Place the resin a few inches below the lamp. Too far and the light may not reach properly; too close and heat may build up.
Rotate the Piece
If possible, rotate the item during curing. This helps the UV light reach all sides and improves even hardening.
Clean the Surface
Dust and oils can interfere with curing. Wipe the surface gently before curing and avoid touching it with bare hands.
Cure in Multiple Sessions
For thicker pieces, cure in stages. Allow each layer to harden before adding or curing additional material.
Work in a Warm Room
Cold temperatures can slow the curing process. A moderate room temperature helps resin harden faster and more evenly. Using these tips will improve curing speed and result in clearer, stronger resin projects.
9️⃣ Safety Tips When Curing UV Resin
Working with resin is safe when you follow basic precautions. These tips help protect your skin and health.
Wear Protective Gloves
Uncured resin can irritate skin. Use nitrile gloves to avoid direct contact.
Avoid Touching Uncured Resin
Do not touch liquid or sticky resin with bare hands. Even small amounts can cause irritation.
Work in a Ventilated Area
Although UV resin has low odor, good airflow reduces exposure to fumes. Open a window or use a small fan.
Protect Your Eyes
UV light can be strong. Avoid looking directly at the UV lamp and consider wearing protective eyewear.
Clean Spills Immediately
If resin spills, wipe it with a paper towel before it hardens. Use isopropyl alcohol for cleaning surfaces.
Keep Resin Away from Children and Pets
Store materials in a safe place where they cannot be reached.
Dispose of Waste Properly
Do not pour liquid resin down the drain. Let it harden first and dispose of it as solid waste. Following these safety tips ensures a better crafting experience and reduces potential health risks.
🔟 Final Thoughts
Learning how to cure UV resin correctly makes a big difference in the quality of your crafts and jewelry. Proper curing creates a hard, clear, and durable finish that lasts longer and looks professional.
The key points are simple: use thin layers, a strong UV lamp, and enough curing time. Avoid common mistakes like thick applications and dust contamination. With the right tools and techniques, resin projects become easier and more satisfying.
If you practice these steps, you will get smoother results and fewer curing problems. Resin crafting is a skill, and improvement comes with experience. Keep experimenting and refining your process for better outcomes.
1️⃣1️⃣FAQs
Q1: Why is my UV resin still sticky after curing?
Sticky resin usually means it did not cure completely. Common reasons are weak UV light, thick layers, or insufficient curing time. Cure it again under a stronger UV lamp for a few more minutes. Using thin layers helps avoid this problem.
Q2: Can sunlight cure UV resin?
Yes, sunlight can help with UV resin curing, but it is less reliable than a UV lamp. Clouds and time of day affect results. A UV lamp provides faster and more consistent curing.
Q3: How long does UV resin curing take?
Curing time depends on lamp strength and layer thickness. Most small projects cure in 2–10 minutes under a proper UV lamp. If the surface feels soft, give it extra time.
Q4: What is the best UV lamp for resin curing?
A lamp between 12W and 36W works well for crafts and jewelry. Higher wattage lamps generally speed up UV resin curing and produce better results.
Q5: Why does my resin not harden completely?
Incomplete hardening can happen due to thick layers, low-quality resin, or weak UV light. Apply thin layers and use a strong UV lamp for proper resin curing.