
1. Introduction
If you work with resin crafts, you’ve probably wondered: can you use alcohol ink in UV resin? Many beginners and even experienced crafters ask this question when trying to create vibrant, transparent color effects in jewelry, keychains, coasters, and other small projects.
UV resin is popular because it cures quickly under a UV lamp and is easy to use for detailed designs. On the other hand, alcohol ink is known for its rich pigments, smooth blending, and beautiful flowing patterns. Naturally, combining the two seems like a perfect idea. However, not all colorants behave the same way inside UV-curing resin.
Understanding whether alcohol ink is compatible with UV resin is important. Using the wrong amount or type of ink can affect curing time, cause a sticky surface, or reduce the durability of your finished piece. In this guide, you’ll learn how alcohol ink works in UV resin, when it’s a good choice, potential problems to watch for, and better alternatives if needed.
By the end of this article, you’ll clearly know can you use alcohol ink in UV resin safely and effectively for your resin art projects.
Table of Contents
2. What Is UV Resin?
UV resin is a liquid plastic that hardens when exposed to ultraviolet (UV) light. Unlike traditional epoxy resin, it does not require mixing two parts together. It comes ready to use and cures within minutes under a UV lamp or strong sunlight. This fast-curing feature makes it especially popular among crafters and jewelry makers.
The curing process works through a chemical reaction triggered by UV light. When exposed, the resin quickly changes from liquid to solid, creating a clear, glossy, and durable finish. Because of this rapid curing time, it is ideal for small projects such as pendants, charms, keychains, doming, and detailed decorative pieces.
One important thing to understand is that this type of resin works best in thin layers. Thick pours may not cure evenly because UV light cannot penetrate deeply. That is why it is mainly used for surface coatings and small molds rather than large castings.
Compared to epoxy resin, it offers:
- Faster curing time
- No measuring or mixing
- Less preparation work
- Convenience for beginners
However, it also has limitations. It is generally more expensive per ounce and not suitable for deep molds or large projects.
Overall, UV-curing resin is a convenient and efficient option for craft projects that require speed, clarity, and a high-gloss finish.
3. What Is Alcohol Ink?
Alcohol ink is a highly concentrated, fast-drying dye that is dissolved in alcohol. It is known for producing bright, transparent colors and smooth blending effects. Because it spreads easily on non-porous surfaces, it is widely used in art and craft projects.
Unlike acrylic paint or pigment paste, this type of ink is fluid and lightweight. It creates a stained-glass look rather than a solid, opaque finish. This makes it ideal for projects that require depth, layering, and vibrant color movement.
Crafters commonly use it on materials such as:
- Yupo paper
- Glass
- Ceramic tiles
- Metal
- Plastic surfaces
It is also popular in resin art for creating marbled effects, petri-style designs, and abstract patterns.
One important feature of alcohol-based dyes is their quick evaporation. The alcohol carrier dries rapidly, leaving the color behind. This allows artists to build layers and blend shades easily. However, because it is highly concentrated, only a small amount is needed to achieve strong color.
Overall, alcohol ink is valued for its transparency, rich pigmentation, and ability to create dynamic, flowing effects in creative projects.
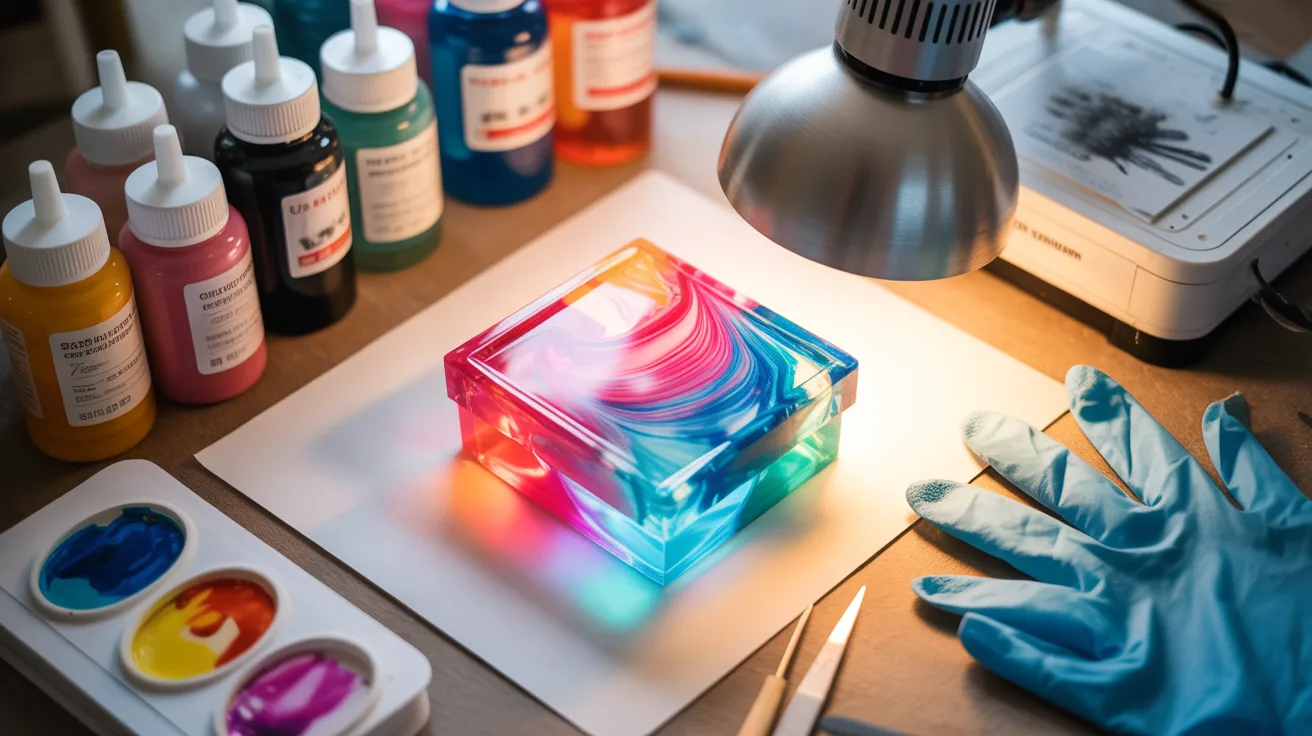
4. Can You Use Alcohol Ink in UV Resin?
Yes, alcohol ink can be used to color UV-curing resin but it must be added in very small amounts.
Because alcohol ink is highly concentrated and alcohol-based, adding too much can interfere with the curing process. UV resin hardens through a light-activated chemical reaction, and excess liquid dye can dilute the formula. This may result in soft spots, tacky surfaces, or incomplete curing.
When used correctly, it can create beautiful transparent effects, vibrant swirls, and layered designs. The key is control. A few drops are usually enough to tint a small batch. The more ink you add, the greater the risk of curing issues.
Here’s what you need to know:
- Use only a small amount — typically 1–2 drops for small projects
- Mix thoroughly but gently to avoid bubbles
- Cure in thin layers for best results
- Test a small sample before completing your final piece
For deeper or opaque colors, resin-specific pigments or UV resin dyes are often a better option because they are designed not to disrupt the curing process. In short, alcohol ink works well for light tinting and artistic effects, but it requires careful use to avoid curing problems.
5. How Alcohol Ink Affects UV Resin Curing
Understanding how alcohol-based dyes interact with UV-curing resin is important for achieving a fully hardened, durable finish.
UV resin cures when ultraviolet light activates photoinitiators inside the formula. This chemical reaction turns the liquid into a solid plastic surface. When alcohol ink is added, it introduces extra liquid and solvent into the mixture. If too much is used, it can dilute the resin and slow down or weaken the curing reaction.
Here’s how it can affect the curing process:
1. Slower Hardening
Excess ink may reduce the efficiency of UV light penetration, especially in darker or highly saturated colors. This can increase curing time.
2. Sticky or Tacky Surface
Too much dye can prevent the top layer from fully hardening. The result is a soft or sticky finish, even after extended UV exposure.
3. Uneven Curing
Heavy pigmentation can block UV light from reaching deeper areas. This may leave the bottom layer partially cured while the surface appears solid.
4. Reduced Strength
Overloading resin with alcohol-based colorant can slightly weaken the final piece, making it less durable over time.
To avoid curing issues:
- Use minimal amounts of ink
- Cure in thin layers
- Extend UV exposure if needed
- Test small batches before final projects
When used in moderation, alcohol ink creates beautiful transparent effects without major curing problems. The key is balance too much can disrupt the chemical reaction, while a small amount maintains both color and structural integrity.
6. Best Type of Alcohol Ink for UV Resin
When choosing alcohol-based dyes for use with light-curing resin projects, selecting the right type can make a big difference in color quality and overall results. Not all inks perform equally, and some are better suited to crafting applications than others.
Here’s what to look for when picking alcohol ink:
✅ 1. High-Quality Craft Brands
Premium craft alcohol inks are formulated with rich pigments and better consistency. These tend to blend smoothly and deliver vibrant results without needing large amounts. Popular artist-grade options also have fewer fillers, which helps reduce curing interference when used sparingly.
✅ 2. Transparent Shades
Since transparency allows light to pass through more easily, transparent inks work best for thin, layered pours. They provide beautiful depth without blocking the light needed for curing. Opaque or pearlescent inks can sometimes shade too heavily, requiring extra UV exposure.
✅ 3. Dropper-Style Bottles
Inks that come in dropper bottles offer better control over how much you add. Precise dosing reduces the risk of over-coloring and keeps the liquid ratio balanced.
✅ 4. Fast-Drying Formulas
Alcohol inks dry quickly on surfaces because the alcohol evaporates fast. This feature also helps them integrate into resin without long wait times. Slow-drying inks can remain liquid longer, increasing the chance of curing issues if overdosed.
✅ 5. Non-Clogging Consistency
Smooth, clog-free inks are easier to mix and less likely to create streaks or bubbles in your resin work. Avoid inks that separate easily or need frequent shaking, as these can introduce air into the mixture.
Quick Checklist Before You Use Any Alcohol Ink:
- Is the pigment vibrant and transparent?
- Does the bottle allow easy drop-by-drop dosing?
- Has the ink been tested in small resin batches first?
Does the color spread evenly without graininess?
7. Pros and Cons of Using Alcohol Ink in UV Resin
Using alcohol-based dyes in light-curing resin projects can produce beautiful artistic effects. However, like any colorant, it has both advantages and limitations. Understanding these will help you decide when it’s the right choice for your project.
✅ Pros
1. Vibrant, Transparent Colors
Alcohol inks are known for their rich and bright tones. They create a stained-glass effect that works well for jewelry and decorative pieces.
2. Easy Blending and Flow Effects
These inks spread smoothly, making them perfect for swirls, marble designs, and layered art styles.
3. Highly Concentrated
Only a small amount is needed to achieve strong color. This makes them cost-effective for small craft projects.
4. Great for Artistic Designs
They allow creative techniques like petri-style patterns and abstract effects that are harder to achieve with thicker pigments.
5. Widely Available
Alcohol inks are easy to find online and in craft stores, with many color options to choose from.
❌ Cons
1. Can Interfere with Curing
If too much ink is added, it may slow down or weaken the curing process, leading to sticky or soft surfaces.
2. Limited Opacity
These dyes are mostly transparent. If you need solid or opaque colors, resin-specific pigments may work better.
3. Risk of Fading
Some shades may fade over time when exposed to sunlight or strong UV light.
4. Not Designed Specifically for Resin
Unlike resin pigments, alcohol ink is not formulated specifically for light-curing systems, so it requires careful use.
5. Overuse Weakens the Final Piece
Adding excess liquid dye can slightly reduce durability or cause uneven hardening.
Final Thoughts
Alcohol ink is excellent for achieving vibrant, transparent, and artistic effects in resin crafts. However, moderation is key. When used carefully and in small amounts, it delivers beautiful results. When overused, it can create curing problems and affect durability.
8. How to Properly Mix Alcohol Ink with UV Resin (Step-by-Step Guide)
Getting vibrant color without curing problems depends on proper mixing. Follow these simple steps to achieve the best results.
Step 1: Prepare Your Workspace
Work in a well-ventilated area and protect your surface with silicone mats or plastic sheets. Wear gloves to avoid skin contact. Have your UV lamp ready before mixing.
Step 2: Pour a Small Amount of Resin
Start with a small batch. UV-curing resin works best in thin layers, so only pour what you need for one layer or a small mold.
Step 3: Add Ink in Tiny Drops
Add one drop at a time. Because alcohol ink is highly concentrated, even a single drop can create strong color. Avoid pouring directly or squeezing too hard.
Tip: For very light tints, you can dip a toothpick into the ink and mix that into the resin instead of adding a full drop.
Step 4: Mix Gently and Thoroughly
Stir slowly using a toothpick or silicone stick. Gentle mixing prevents air bubbles from forming. Make sure the color looks evenly distributed with no streaks.
Step 5: Check Color Strength
If the shade is too light, add another small drop and mix again. Do not rush this step. Too much dye can interfere with curing.
Step 6: Pour in Thin Layers
Pour the colored resin into your mold or onto your surface in a thin layer. Thick pours may not cure evenly because UV light cannot penetrate deeply.
Step 7: Cure Under UV Light
Place the piece under a UV lamp for the recommended time. If the color is darker, you may need slightly longer exposure. Rotate the piece if necessary to ensure even curing.
Step 8: Test Before Final Projects
Always test a small sample before starting important jewelry or craft pieces. This helps you confirm curing time and color strength.
Quick Tips for Best Results
- Use minimal ink for better hardening
- Work in layers for deep colors
- Extend curing time for darker shades
- Avoid overmixing to reduce bubbles
By following these steps, you can achieve vibrant color while maintaining a smooth, fully cured finish in your resin crafts.
9. Common Problems and How to Fix Them
Using alcohol-based dyes in light-curing resin can sometimes lead to issues if not handled carefully. Here are the most common problems and practical solutions to ensure smooth, professional results.
1. Sticky or Tacky Surface
Cause: Too much liquid dye or uneven curing.
Solution:
- Apply thinner layers of resin.
- Reduce the amount of ink added.
- Extend exposure time under the UV lamp to ensure full curing.
2. Cloudy or Hazy Finish
Cause: Air bubbles trapped during mixing or incompatible inks.
Solution:
- Stir gently to avoid introducing bubbles.
- Tap the mold or surface lightly to release trapped air.
- Use high-quality alcohol ink that is compatible with resin.
3. Uneven Color Distribution
Cause: Overmixing or adding too much dye at once.
Solution:
- Add ink in small drops and mix gently.
- Work in layers if a more intense color is desired.
- Test a small batch before large pours.
4. Resin Not Fully Curing
Cause: Excess alcohol from the ink dilutes the resin or blocks UV penetration.
Solution:
- Limit ink quantity.
- Cure in thin layers rather than thick pours.
- Ensure your UV lamp is strong enough and exposure time is adequate.
5. Fading Over Time
Cause: Some alcohol inks are not UV-resistant.
Solution:
- Choose inks labeled as lightfast or UV-resistant.
- Apply a clear UV-protective topcoat after curing to preserve colors.
By understanding these common problems and using careful techniques, you can enjoy vibrant and fully cured resin projects without frustration. Testing small batches and controlling the amount of ink are key to success.
10. Alcohol Ink vs Resin Pigment: Which Is Better?
When adding color to light-curing resin projects, crafters often debate between using alcohol-based dyes or resin-specific pigments. Both have unique advantages and are suited to different purposes. Understanding their differences can help you choose the right option for your project.
1. Color Vibrancy
- Alcohol Ink: Produces bright, transparent shades with a stained-glass effect. Ideal for swirls, layering, and marbled designs.
- Resin Pigment: Offers more solid and opaque colors. Pigments are available in a wide range of tones, including metallic and pearlescent finishes.
2. Impact on Curing
- Alcohol Ink: Adding too much can slow or interfere with the hardening process, especially in thicker pours.
- Resin Pigment: Formulated for resin, so it does not affect curing, even in deeper layers.
3. Durability
- Alcohol Ink: Transparent and delicate; colors may fade slightly over time, especially in direct sunlight.
- Resin Pigment: More stable and long-lasting. Provides consistent results for jewelry, keychains, and other crafts that are handled frequently.
4. Ease of Use
- Alcohol Ink: Requires careful dosing and testing. Small amounts go a long way.
- Resin Pigment: Easier to control and mix; beginner-friendly, especially for larger pours.
5. Artistic Effects
- Alcohol Ink: Ideal for flowing, marbled, and abstract patterns. Creates layered transparency and movement.
- Resin Pigment: Best for solid colors, gradients, and metallic or glitter effects. Less suitable for marbling without additional techniques.
Conclusion
If your goal is vibrant, transparent, and artistic effects, alcohol-based dyes are excellent for small projects and creative designs. For durability, consistency, and ease of use, resin pigments are the better choice.
Many crafters combine both in separate layers—using pigments for base colors and alcohol inks for accents—to achieve the best of both worlds. This approach ensures both visual appeal and structural reliability.
11. Best Alternatives to Alcohol Ink for UV Resin
If you want vibrant colors without the potential curing issues that alcohol-based dyes can cause, there are several alternatives specifically designed for light-curing resin. These options offer better control, durability, and consistent results.
1. Resin-Specific Liquid Dyes
These are concentrated liquid colorants made for resin. They mix easily, provide rich color, and do not interfere with the curing process. They are available in both transparent and opaque shades, making them versatile for various projects.
2. Mica Powder
Mica powder is a fine, mineral-based pigment that adds shimmer, metallic tones, or pearlescent effects. It is stable in resin, does not slow curing, and can create eye-catching effects like swirling, layering, and glittery finishes.
3. UV Resin Pigment Paste
Pigment pastes are thicker than liquid dyes and give strong, consistent colors. They are perfect for solid or opaque applications and work well for jewelry, keychains, and other small crafts.
4. Glitter and Shimmer Powders
Adding fine glitter or shimmer powders can enhance transparency and add sparkle without affecting the resin’s hardening process. They are best used in moderation to prevent clumping.
5. Resin Color Capsules or Ink Pens
Some brands offer ink capsules or resin pens specifically formulated for light-curing resin. These are convenient for precise coloring and detailing, especially in small molds or intricate designs.
Quick Tips for Choosing Alternatives:
- Ensure the product is resin-compatible
- Test small batches to check curing time and color strength
- Start with thin layers to avoid uneven hardening
- Use transparent options for layering effects and opaque for solid colors
By selecting one of these alternatives, you can achieve vibrant, long-lasting results while avoiding curing problems that sometimes occur with alcohol-based dyes. These options are safer for larger pours, professional projects, or pieces that need durability.
12. Safety Tips When Using Alcohol Ink with UV Resin
Working with alcohol-based dyes and light-curing resin can be safe if proper precautions are taken. Both materials contain chemicals that may irritate the skin, eyes, or respiratory system if handled carelessly. Here are essential safety tips to follow for a safe crafting experience:
1. Work in a Well-Ventilated Area
Both alcohol ink and resin release fumes during use. Make sure your workspace has good airflow or use a small fan to circulate air. Avoid confined spaces to minimize inhalation of vapors.
2. Wear Protective Gloves
Nitrile gloves are recommended to protect your skin from staining and chemical exposure. Alcohol ink can leave strong, persistent stains, and resin may cause irritation or allergic reactions.
3. Use Eye Protection
Safety goggles prevent accidental splashes from getting into your eyes, especially when pouring or mixing resin.
4. Avoid Direct Inhalation
Do not sniff bottles directly. If you’re sensitive to fumes, consider wearing a respirator mask rated for organic vapors, especially during extended crafting sessions.
5. Protect Your Work Surface
Cover tables with silicone mats, plastic sheets, or disposable paper to prevent staining. Alcohol ink is highly pigmented and difficult to remove once spilled.
6. Proper Storage
Store both alcohol ink and resin in a cool, dry place away from direct sunlight. Ensure bottles are tightly sealed to prevent spills, evaporation, or accidental exposure.
7. Clean Up Immediately
Wipe any spills promptly with a cloth and mild soap. For ink stains, rubbing alcohol can help clean surfaces and tools.
By following these safety measures, you can enjoy creating vibrant and professional-looking resin projects while minimizing risks. A little precaution goes a long way toward a safe and enjoyable crafting experience.
13. FAQs
1. Will alcohol-based dyes stop resin from hardening?
If too much is added, it can slow down or prevent complete curing. Using only a few drops in small batches and curing in thin layers usually avoids this issue.
2. How many drops of dye should I add?
Start with one or two drops per small batch. You can adjust gradually until the desired color is achieved. Less is always better to prevent sticky surfaces or uneven curing.
3. Can I use other types of inks instead?
Yes, resin-specific pigments, mica powders, or UV resin dyes are safer alternatives for stronger colors and better curing consistency.
4. Why does my resin turn cloudy after adding ink?
Cloudiness often occurs due to trapped air bubbles, overmixing, or using too much dye. Stir gently and tap the mold to release air, and use minimal ink for clarity.
5. Is it safe to use without gloves or ventilation?
No. Both alcohol-based dyes and resin chemicals can irritate skin and release fumes. Always work in a ventilated area and wear protective gloves and, if needed, goggles.
6. Can I layer colors for a marbled effect?
Yes, layering works well. Use thin layers, cure each one before adding the next, and add small amounts of dye to maintain transparency and proper curing.
7. Will the color fade over time?
Some dyes may fade if exposed to direct sunlight or strong UV for long periods. Using UV-resistant pigments or sealing finished pieces can help preserve color.
14. Conclusion
For crafters looking to add vibrant effects to their light-curing resin projects, the question of can you use alcohol ink in UV resin is very common. The answer is yes, but with caution. Alcohol-based dyes can produce beautiful, transparent colors and flowing patterns, making them perfect for small jewelry pieces, keychains, or decorative art.
However, using too much can interfere with the curing process, leaving sticky or uneven surfaces. To achieve the best results, it’s important to add ink sparingly, mix gently, and cure in thin layers. Testing a small batch before your main project ensures both color quality and a fully hardened finish.
For those who want more consistent results or stronger colors, alternatives like resin-specific pigments, mica powders, or UV resin dyes offer better durability and ease of use.
In summary, can you use alcohol ink in UV resin safely depends on moderation, careful mixing, and proper curing techniques. When done correctly, it allows crafters to create stunning, vibrant designs while maintaining a smooth, durable finish that lasts.