
1. Introduction
Learning how to polish UV resin jewelry is essential if you want your pieces to look clear, smooth, and professionally finished. Even when UV resin cures properly, the surface can turn dull, cloudy, or slightly scratched due to sanding, dust, or handling. Polishing is the step that brings back the shine and reveals the true depth and color of the design, especially in jewelry where small imperfections are easy to notice.
The right polishing method depends on the condition of your UV resin piece. Light cloudiness or fine scratches usually need gentle sanding followed by polishing, while deeper damage may require an extra resin top coat. When done correctly, polishing does not weaken the jewelry it enhances its appearance and durability. In this guide, you’ll learn how to polish UV resin jewelry the right way, using safe techniques that improve clarity without burning, scratching, or damaging the surface.
Table of Contents
2. Can UV Resin Jewelry Be Polished Like Epoxy Resin?
UV resin jewelry can be polished in a similar way to epoxy resin, but the results are not always identical. The main reason is the curing process. UV resin hardens quickly under a UV lamp, which often creates a surface that is slightly softer than fully cured epoxy. Because of this, UV resin reacts more sensitively to sanding pressure, heat, and aggressive polishing compounds.
Another key difference is thickness. UV resin is usually applied in thin layers, especially in jewelry making. This means there is less material to work with when sanding and polishing. Epoxy pieces, on the other hand, are often thicker and more forgiving. With UV resin, careful sanding using fine grits and light pressure is essential to avoid cutting too deep or creating uneven spots.
Despite these differences, UV resin can still achieve a smooth and glossy finish when handled correctly. Gentle wet sanding, controlled polishing, and proper curing between steps allow the surface to regain clarity and shine. The process simply requires more precision and patience compared to epoxy, making technique far more important than force.
3. When Polishing UV Resin Jewelry Is a Good Idea (and When It’s Not)
Polishing is a good option when UV resin jewelry has minor surface issues such as light scratches, dullness, or a slightly cloudy finish. These problems often come from sanding, dust settling during curing, or normal handling. In these cases, gentle sanding followed by careful polishing can restore clarity and improve the overall appearance without changing the shape or thickness of the piece.
However, polishing is not always the best solution. If the jewelry has deep scratches, uneven surfaces, sticky areas, or soft spots, polishing alone will not fix the problem. These issues usually point to incomplete curing or surface damage that goes beyond the top layer. Polishing such pieces can actually make the flaws more visible or thin the resin too much.
In situations where the damage is more severe, applying a fresh, thin layer of resin is often a better choice. This approach rebuilds the surface instead of trying to correct it. Knowing when to polish and when to recoat saves time, protects your jewelry, and leads to cleaner, more professional results.
4. Common Reasons UV Resin Jewelry Looks Dull or Scratched
One of the most common reasons UV resin jewelry loses its shine is incomplete curing. When the resin does not harden evenly or fully, the surface can appear cloudy or soft, making it more prone to marks and scuffs. This often happens when the UV light is too weak, the curing time is too short, or the resin layer is thicker than recommended.
Another frequent cause is improper sanding. Starting with sandpaper that is too rough or skipping grit levels can leave visible scratches that show through the final finish. Dry sanding can also create fine dust that gets pressed back into the surface, leading to a hazy look instead of a clear one.
Environmental factors play a role as well. Dust, lint, or fingerprints settling on the resin during curing can dull the surface. In addition, using too much pressure during polishing or allowing the resin to overheat can create swirl marks or a burned appearance. Understanding these causes makes it easier to prevent damage and achieve a smoother, more polished result.
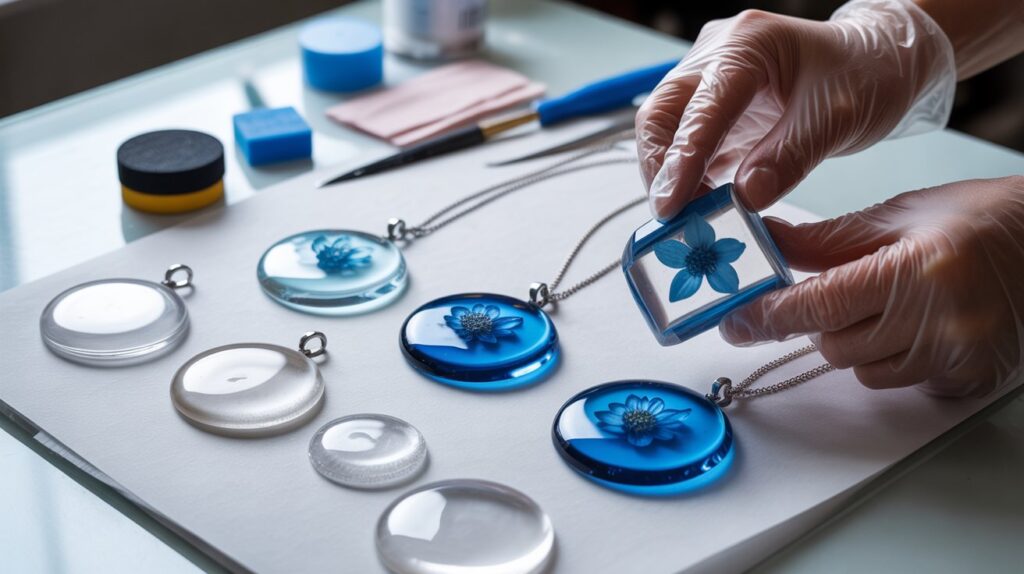
5. Tools and Materials Needed to Polish UV Resin Jewelry
Having the right tools makes a noticeable difference in the final finish of UV resin jewelry. For surface preparation, fine-grit sandpaper is essential. A gradual grit range, starting from around 800 or 1000 and moving up to 3000 or higher, helps smooth imperfections without cutting too deeply. Wet sanding is preferred because it reduces dust and creates a more even surface.
A polishing compound designed for plastic or resin is used to restore clarity and shine. These compounds are mild enough to smooth the surface while avoiding damage. To apply the polish, soft microfiber cloths work best, as they do not leave lint or add new scratches. For small or detailed pieces, foam pads or soft buffing wheels can also be helpful.
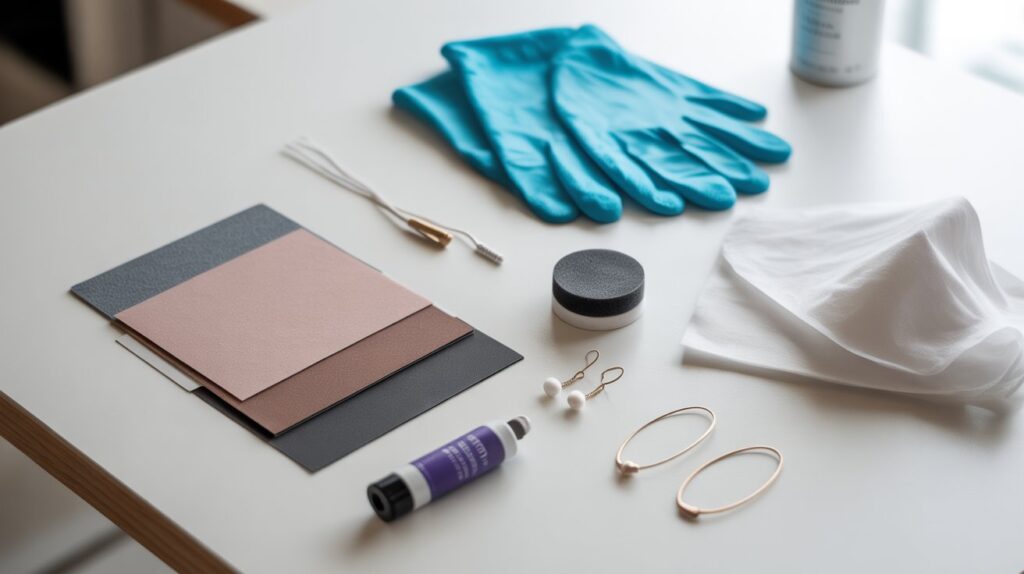
Basic safety and workspace items should not be overlooked. Nitrile gloves protect your hands from compounds and residue, while a dust mask is useful during sanding. A stable, clean work surface prevents accidental damage and keeps debris away from the jewelry. Using the proper materials not only improves results but also makes the polishing process more controlled and consistent.
6. Preparing UV Resin Jewelry for Polishing
Proper preparation is key to achieving a smooth and even finish. Start by cleaning the jewelry piece to remove dust, oil, or fingerprints. A soft cloth slightly dampened with water is usually enough. Any residue left on the surface can interfere with sanding and lead to uneven results later.
Next, inspect the surface under good lighting. Look for scratches, rough edges, or cloudy areas so you know where light sanding is needed. If sanding is required, wet sanding is the safest approach. Lightly moisten the sandpaper and use gentle, controlled strokes to level the surface without applying excess pressure. This helps prevent deep scratches and keeps heat buildup to a minimum.
After sanding, rinse the piece and dry it completely. Make sure no sanding particles or moisture remain, especially in small details or edges. A clean, dry surface ensures the polishing step works evenly and produces a clearer, more refined finish.
7. Method One: How to Polish UV Resin Jewelry Using Polishing Compound
The first and most common method for restoring shine is using a polishing compound. This technique works best for pieces that are lightly scratched or slightly cloudy. Polishing compounds help smooth the surface and bring out a clear, glossy finish without adding additional layers of resin.
Begin by applying a small amount of the compound to a soft microfiber cloth or a foam polishing pad. Spread it evenly over the surface using gentle, circular motions. Avoid pressing too hard, especially on thin or delicate pieces, as excessive force can create uneven areas or swirl marks.
Continue rubbing the compound in for one to two minutes, then check the results under good lighting. If the surface still appears dull, repeat the process with a fresh application. Once satisfied, wipe away any remaining residue with a clean cloth. This method is simple, effective, and perfect for maintaining clarity and shine on small jewelry pieces without risking damage to the original structure.
8. Method Two: Restoring UV Resin Jewelry with a Fresh Resin Top Coat
For pieces that are deeply scratched, cloudy, or uneven, a fresh layer of resin can restore the surface more effectively than polishing alone. This method adds a thin, protective coating that fills in imperfections and brings back a smooth, glass-like finish. It’s especially useful for jewelry with intricate designs or delicate embedded elements.
Start by cleaning the jewelry thoroughly and, if necessary, lightly sanding the surface to help the new layer adhere properly. Mix a small batch of clear UV resin according to the manufacturer’s instructions, making sure to avoid bubbles. Using a fine brush, carefully apply a thin coat over the entire piece, covering all imperfections evenly.
Next, cure the layer under a UV lamp, following the recommended time for the resin brand. Inspect the piece for any remaining bubbles or uneven spots, and apply additional thin layers if needed. Once fully cured, the jewelry will have a renewed shine, smooth texture, and improved durability. This method ensures long-lasting results, making the piece look almost like new.
9. Hand Polishing vs Machine Polishing for UV Resin Jewelry
When finishing resin jewelry, you can choose between hand polishing and using a machine. Both methods have advantages, and selecting the right one depends on the size, detail, and condition of the piece.
Hand polishing is ideal for small or delicate items. It gives precise control over pressure and movement, reducing the risk of over-sanding or uneven shine. Using a soft cloth or foam pad with a polishing compound, you can focus on intricate details, edges, and curves without damaging the surface. This method requires patience but often results in a smooth, consistent finish.
Machine polishing, such as using a rotary tool or Dremel with a soft buffing attachment, is faster and can produce a high-gloss finish on flat or simple shapes. However, it requires careful handling. High speeds or too much pressure can generate heat, creating burn marks or warping thin resin layers. Machines are better suited for larger pieces or multiple items, but beginners should practice on scrap resin first to avoid mistakes.
Combining both methods is also an option: hand polish for delicate areas and machine polish for larger, accessible surfaces. Choosing the right approach ensures a clear, professional-looking result without compromising the piece’s integrity.
10. How to Make UV Resin Jewelry Shiny Without Polishing Compound
It’s possible to achieve a glossy finish without using traditional polishing compounds. One effective method is applying a thin, clear layer of UV resin over the surface. This creates a smooth top coat that naturally enhances shine while filling in minor scratches or uneven areas. A small brush allows precise application, especially on detailed or intricate designs. Once applied, curing under a UV lamp produces a reflective, glass-like surface.
Another approach is careful buffing with a soft microfiber cloth or foam pad. By gently rubbing the surface in small circular motions, you can bring out natural clarity and smoothness. For best results, this should be done on a clean, fully cured piece and can be combined with light wet sanding beforehand to remove minor imperfections.
Using these methods avoids abrasive compounds while still restoring brilliance, making them ideal for delicate pieces or when a chemical-free finish is preferred. With patience and proper technique, jewelry can achieve a polished, professional look without traditional polishing products.
11. Fixing Common UV Resin Polishing Problems
Even with careful work, issues can arise during the finishing process. One common problem is a cloudy or hazy surface. This often occurs from insufficient sanding, leftover dust, or polishing too early. To fix it, lightly wet sand the affected area with very fine grit sandpaper, clean thoroughly, and then polish or apply a thin top layer of resin if needed.
Swirl marks or uneven shine can appear when too much pressure is applied during polishing or when abrasive compounds are used incorrectly. The solution is to gently buff the surface with a soft cloth or foam pad using circular motions, gradually restoring a uniform finish. For stubborn spots, applying a fresh, thin layer of resin can completely reset the surface.
Sticky or tacky areas usually indicate incomplete curing. In these cases, additional curing under a UV lamp is necessary before attempting any polishing. Patience is key—rushing the process can worsen the problem. By understanding these common issues and their fixes, it’s possible to achieve a smooth, clear, and professional-looking finish every time.
12. How Long a Polished UV Resin Finish Lasts
The longevity of a polished resin surface depends on both the quality of the material and how the piece is cared for. When properly cured and polished, a smooth resin finish can maintain its shine for months or even years under normal wear. Jewelry that is handled gently and stored carefully will retain its glossy appearance far longer than pieces that are exposed to harsh conditions.
Factors such as friction, exposure to chemicals, and sunlight can gradually dull the surface. For example, rubbing against hard surfaces or contact with lotions, perfumes, or cleaning products may cause minor scratches or cloudiness over time. Routine maintenance, such as gently wiping with a soft cloth and avoiding abrasive contact, can extend the finish significantly.
Ultimately, a well-polished piece that is properly cured and cared for can look almost new for a long period, making careful finishing and mindful handling key to preserving its beauty.
13. Safety Tips When Polishing UV Resin Jewelry
Working with resin requires attention to both personal safety and workspace setup. Fine dust from sanding can irritate the skin, eyes, and lungs, so wearing a dust mask or respirator is essential, especially during wet or dry sanding. Gloves, such as nitrile or latex, protect the hands from polishing compounds, resin residue, and oils that can interfere with adhesion.
A clean, stable workspace is also important. Ensure the surface is level and free of clutter to prevent pieces from falling or getting scratched. Adequate lighting allows you to see imperfections clearly, reducing mistakes that could damage the jewelry.
Avoid prolonged contact with polishing compounds or uncured resin, and never inhale fumes directly. Keeping a small brush or soft cloth nearby helps remove excess dust or residue safely. By following these precautions, you can work efficiently while minimizing health risks and protecting the quality of each piece.
14. Expert Tips for a Glass-Like Finish on UV Resin Jewelry
Achieving a flawless, glass-like surface requires both technique and attention to detail. One key tip is to ensure that the piece is fully cured before any finishing work. Attempting to polish or apply a top layer too early can create streaks, uneven areas, or a sticky surface. Patience during the curing process is essential for a smooth, durable finish.
Another tip is to use progressively finer grits when sanding. Start with a medium grit to level imperfections, then gradually move to ultra-fine grits for a smooth surface. Wet sanding is highly recommended, as it reduces dust, prevents scratches, and produces a more reflective finish.
When polishing, apply gentle, consistent pressure with a microfiber cloth or foam pad. For intricate designs, use a soft brush to reach corners and edges. If necessary, add a thin, clear resin layer to correct minor scratches and enhance clarity.
Finally, maintain a clean workspace, free of dust or debris, and handle the jewelry carefully throughout the process. Following these expert strategies ensures a professional-quality shine, giving each piece a striking, glass-like appearance.
15. FAQs
Q1: Can resin jewelry be polished immediately after curing?
No. Even when the surface feels hard, it’s best to wait until the resin is fully cured. Polishing too early can cause streaks, cloudiness, or stickiness. Fully cured resin ensures a smoother finish and reduces the risk of damage.
Q2: Is sanding necessary before polishing?
Yes, sanding is usually required to remove minor scratches or uneven spots. Start with a medium grit and gradually move to finer grits. Wet sanding is recommended to minimize dust and create an even surface for polishing.
Q3: Can polishing fix deep scratches?
Polishing alone works best for light surface scratches and dullness. Deep scratches or significant damage often require a fresh top coat of resin to restore clarity and a smooth finish.
Q4: What tools are safe for small or delicate pieces?
Soft microfiber cloths, foam pads, and gentle polishing compounds are safest for intricate jewelry. For larger or flatter areas, rotary tools with soft buffing attachments can be used carefully, but high speed and excessive pressure should be avoided.
Q5: How can I prevent resin from becoming cloudy after polishing?
Ensure the surface is clean, dust-free, and fully cured before polishing. Use fine sanding grits and gentle, circular motions. If needed, a thin layer of resin can be applied as a protective top coat to maintain shine.
16. Conclusion
Mastering how to polish UV resin jewelry ensures your pieces look clear, smooth, and professional. The key is understanding the condition of your jewelry and choosing the right method. Light scratches and dull areas can often be restored with careful sanding and a polishing compound, while deeper damage or uneven surfaces benefit from applying a fresh resin top coat.
Patience, proper preparation, and the right tools make a significant difference. Fully curing each layer, using fine grits for sanding, and polishing gently with a microfiber cloth or foam pad ensures a lasting, glass-like finish. With consistent care and attention to technique, your resin jewelry will maintain its shine for months or even years, keeping every piece vibrant and visually stunning.