
1. Introduction
Learning how to make resin mixture the right way is the foundation of every successful resin project. Whether you are creating jewelry, tabletops, molds, or decorative crafts, the final result depends heavily on how well the resin and hardener are mixed. Even high-quality resin can fail if the mixture is rushed, measured incorrectly, or stirred the wrong way. For beginners especially, understanding the basics of resin mixing helps avoid common problems like sticky surfaces, soft spots, or uneven curing.
Knowing how to make resin mixture also saves time, money, and materials. When resin is mixed properly, it cures evenly, looks clear, and performs exactly as intended. This knowledge allows you to work with confidence, experiment with designs, and achieve professional-looking results without frustration. By mastering this essential step, you set yourself up for consistent outcomes and long-lasting resin creations.
Table of Contents
2. What Is a Resin Mixture? (Basics Explained Simply)
A resin mixture is created when two main components resin and hardener are combined to start a chemical reaction. On their own, these materials remain in a liquid state, but once mixed together in the correct proportion, they begin to cure and gradually turn solid. This curing process is what gives resin its strength, clarity, and durability once it fully sets.
The key to a successful mixture lies in balance and consistency. Both components must be measured accurately and blended evenly so the chemical reaction can occur properly throughout the entire material. If the mixture is uneven, some areas may remain soft or tacky while others harden correctly. Understanding this basic concept helps explain why careful measuring and thorough mixing are essential before pouring resin into molds or onto surfaces.
3. Types of Resin You Can Mix (Choose the Right One)
What is epoxy resin?
Epoxy resin is a two-part material made up of a resin and a hardener. When these two components are combined, they react with each other and slowly cure into a solid, durable surface. It is valued for its clarity, strength, and long working time, which makes it easy to use for both beginners and experienced crafters.
Common uses
This type of resin is widely used in jewelry making, river tables, countertops, floor coatings, molds, and resin art. Its ability to self-level and cure to a smooth, glossy finish makes it ideal for projects where appearance and durability matter.
Mixing and curing characteristics
Epoxy resin is mixed in a specific ratio provided by the manufacturer, usually by volume. It cures more slowly than many other resins, giving you extra time to stir thoroughly, remove air bubbles, and add colors or inclusions. This slower curing process helps reduce mistakes and improves the final finish.
Why choose epoxy resin?
Epoxy resin is a popular choice because it is strong, versatile, and forgiving. It produces minimal odor, offers excellent adhesion to many surfaces, and delivers consistent results when handled properly. For most home and craft projects, it is often the most reliable and user-friendly option available.
4. Tools and Materials Needed Before Mixing Resin
Having the right tools and materials ready before you begin is essential for a smooth and stress-free resin project. Proper preparation helps prevent mistakes, reduces waste, and ensures the material cures evenly.
Measuring cups
Accurate measuring cups are crucial because resin and hardener must be combined in precise amounts. Use clear, graduated cups so you can easily see measurement lines and avoid guessing.
Mixing containers
Choose clean, smooth containers made of plastic or silicone. These materials allow easy stirring and make it simpler to scrape the sides and bottom, ensuring everything blends evenly.
Stir sticks
Wooden or silicone stir sticks work well for blending. A flat-edged stick helps reach the corners of the container, reducing the risk of unmixed material.
Protective gloves and safety gear
Disposable gloves protect your skin from direct contact, while a mask and safety glasses add extra protection. Working in a well-ventilated area is also recommended.
Work surface protection
Cover your workspace with plastic sheets, silicone mats, or disposable paper. Resin spills can be difficult to remove once cured, so protecting surfaces in advance saves time and cleanup effort.
By organizing these tools beforehand, you create a controlled setup that leads to cleaner results and a more confident working process.
5. Resin Mixing Ratios Explained (Most Important Step)
Correct mixing ratios are the most critical factor in achieving a successful cure. Resin systems are designed to work only when the resin and hardener are combined in the exact proportions specified by the manufacturer. Even small measurement errors can lead to soft spots, sticky surfaces, or a finish that never fully hardens.
Most resin products use ratios such as 1:1 or 2:1, measured either by volume or by weight. It is important to follow the instructions on the product label carefully, as different brands are not interchangeable. Using more hardener does not make the material cure faster and can actually weaken the final result.
To maintain accuracy, measure both components separately using proper measuring cups or a digital scale if weight is required. Take your time during this step and avoid estimating by eye. When the ratio is correct, the chemical reaction occurs evenly, resulting in a strong, clear, and durable surface.
6. Step-by-Step Guide: How to Make Resin Mixture Correctly
Step 1: Prepare your workspace
Before starting, make sure your work area is clean, level, and well ventilated. Lay down protective sheets and keep all tools within reach. Resin begins reacting as soon as the components are combined, so being organized is important.
Step 2: Measure both components accurately
Pour the resin and hardener into separate measuring cups according to the ratio stated by the manufacturer. Precision matters here—do not eyeball or guess the amounts, as inaccurate measurements can affect curing.
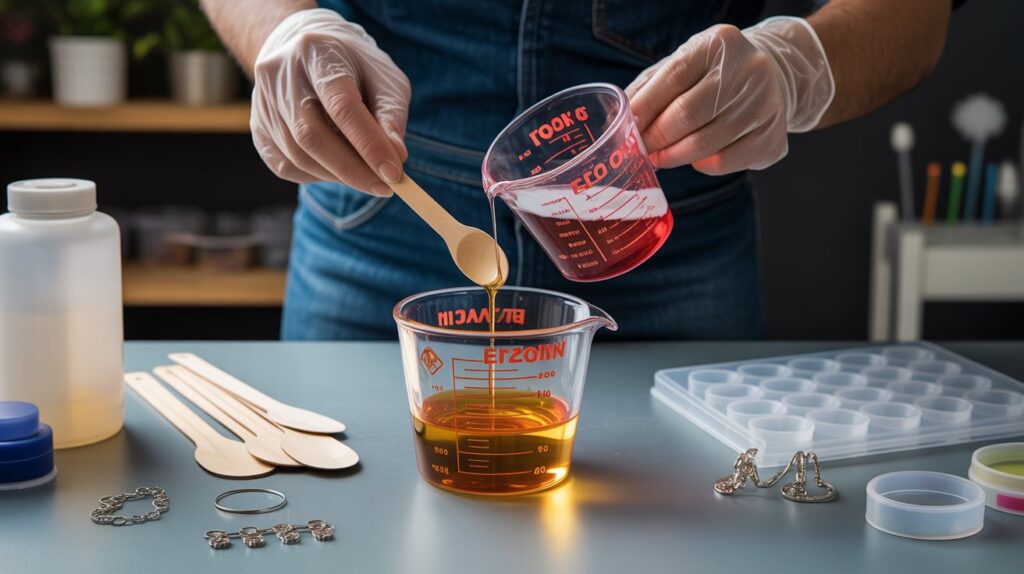
Step 3: Combine the components
Slowly pour the measured hardener into the resin (or follow the order recommended on the product label). Use a clean mixing container large enough to allow easy stirring without spilling.
Step 4: Stir slowly and thoroughly
Mix using a steady, slow motion for the recommended time, usually a few minutes. Scrape the sides and bottom of the container as you stir to ensure everything blends evenly. Avoid stirring too fast, as this can introduce air bubbles.
Step 5: Check consistency before use
Once mixed, the liquid should look clear and uniform, with no visible streaks or cloudy areas. If it appears uneven, continue stirring gently until the texture looks consistent throughout.
Following these steps carefully helps ensure the material cures evenly and delivers a smooth, professional-quality finish.
7. How Long Should You Mix Resin for Best Results?
Mixing time plays a major role in how well resin cures and performs. In most cases, resin should be stirred for 2 to 5 minutes, depending on the brand and quantity being used. This time allows the resin and hardener to fully combine and activate the curing process evenly.
While mixing, it’s important to scrape the sides and bottom of the container continuously. Unmixed material often clings to these areas and can cause soft or sticky spots later. A slow, steady stirring motion is more effective than mixing quickly, as it reduces the amount of air trapped in the liquid.
Once properly mixed, the resin should appear clear and uniform, with no visible streaks or cloudy swirls. If you notice inconsistencies, continue stirring gently for another 30 to 60 seconds. Taking a little extra time at this stage helps ensure a strong cure and a smooth, professional finish.
8. Common Mistakes When Making a Resin Mixture (And How to Avoid Them)
Even experienced crafters can make errors that affect the outcome of their projects. Being aware of common mistakes helps prevent wasted materials and ensures a smooth, professional finish.
1. Incorrect ratios
One of the most frequent errors is not measuring the resin and hardener accurately. Too much or too little of either component can result in sticky, soft, or unevenly cured surfaces. Solution: Always use proper measuring tools and follow the manufacturer’s instructions precisely.
2. Stirring too quickly
Mixing rapidly may seem faster, but it introduces air bubbles that can appear as small holes once cured. Solution: Stir slowly and steadily, scraping the sides and bottom of the container to ensure complete blending without trapping air.
3. Skipping the scraping step
Resin often sticks to the edges and bottom of the mixing container. Failing to scrape thoroughly leaves portions unmixed, leading to incomplete curing. Solution: Use a flat-edged stir stick and make sure every part of the container is incorporated into the mixture.
4. Ignoring temperature and environment
High or low temperatures can affect curing time and the final finish. Working in a room that is too cold can make resin thick and difficult to mix, while a very hot environment can cause it to cure too quickly. Solution: Maintain a stable room temperature, ideally between 20–25°C (68–77°F).
5. Rushing the process
Trying to pour or manipulate resin too soon after mixing can lead to streaks, bubbles, or uneven surfaces. Solution: Allow the mixture to rest briefly after stirring, giving bubbles a chance to rise to the surface before pouring.
Avoiding these mistakes ensures the mixture cures correctly, producing a smooth, glossy, and durable finish every time.
9. Tips for a Smooth, Bubble-Free Resin Mixture
Achieving a clear, bubble-free finish is one of the most important aspects of working with resin. Small air bubbles can ruin the appearance of your project if not addressed properly.
1. Stir slowly and steadily
Rapid mixing traps air into the liquid, creating bubbles. Use a gentle, continuous motion and scrape the sides and bottom of the container to ensure all material is fully blended.
2. Pre-warm the resin
If the resin is slightly thick or cold, it can trap more air while stirring. Placing the resin containers in warm water for a few minutes before mixing helps improve flow and reduce bubbles.
3. Use a heat source to remove bubbles after pouring
Once the resin is poured, small bubbles often rise to the surface. Gently passing a heat gun, torch, or even warm hairdryer over the surface helps them pop and creates a smooth finish.
4. Avoid over-stirring
While thorough mixing is essential, excessive stirring can introduce more bubbles than it removes. Mix only until the components are completely combined.
5. Work in a dust-free environment
Bubbles can sometimes cling to dust or debris. A clean workspace not only prevents surface imperfections but also reduces the chances of trapped air.
By following these simple tips, your projects will have a clearer, smoother surface, enhancing both appearance and durability.
10. Safety Tips When Mixing Resin at Home
Working with resin can be safe if proper precautions are taken. Since the chemicals involved can be irritating or harmful if mishandled, following safety guidelines protects both your health and your workspace.
1. Wear protective gear
Always use disposable gloves to prevent skin contact. Safety goggles protect your eyes from accidental splashes, and a mask helps avoid inhaling fumes, especially in enclosed areas.
2. Ensure proper ventilation
Mix and pour resin in a well-ventilated room. Open windows or use fans to maintain airflow, which helps reduce exposure to potentially irritating vapors.
3. Protect your workspace
Cover tables and floors with plastic sheets, silicone mats, or disposable paper to prevent resin spills from causing permanent damage.
4. Handle leftovers responsibly
Do not pour leftover resin down the drain. Follow local regulations for disposal of chemical materials or allow it to fully cure before discarding.
5. Avoid skin and eye contact
If resin comes into contact with your skin, wash immediately with soap and warm water. For eye exposure, rinse thoroughly and seek medical attention if irritation persists.
6. Keep out of reach of children and pets
Resin is not safe for ingestion or casual handling, so store all materials securely when not in use.
Following these safety practices ensures that resin crafting remains a fun, creative, and safe experience.
11. How to Know If Your Resin Mixture Is Ready to Pour
Knowing when the resin is properly mixed and ready for use is crucial for a flawless finish. The mixture should be uniform in color and texture, with no visible streaks or cloudy areas. Any unmixed portions can lead to soft spots or uneven curing after pouring.
Check the consistency by gently stirring and observing the flow. The liquid should move smoothly and evenly, without separating into layers. If it appears lumpy or streaky, continue stirring until fully blended.
Another indicator is the surface tension: when the mixture is ready, it should form a level, glossy layer when poured slowly. Bubbles that rise to the top can be removed with a gentle pass of a heat gun or torch before they have a chance to cure.
By ensuring the mixture looks clear, flows consistently, and is free of streaks, you can confidently proceed, knowing it will cure properly and produce a smooth, durable surface.
12. FAQs
Q1: Can I remix resin if it’s not curing?
No. If it’s not curing, it’s usually due to wrong ratios or poor mixing. The best solution is to discard it and start fresh with correct measurements.
Q2: Why is my resin sticky after mixing?
Sticky resin happens when it is under-mixed, the ratio is off, or the temperature is too low. Mix thoroughly and keep the room around 20–25°C (68–77°F).
Q3: Can I add color while mixing resin?
Yes. Add pigments or dyes slowly and stir well to get an even color. Don’t add too much, or it may affect curing.
Q4: What temperature is best for mixing resin?
A room temperature of 20–25°C (68–77°F) is ideal. Too cold makes it thick; too hot makes it cure too fast.
13. Conclusion: Mastering the Resin Mixing Process
Learning how to make resin mixture correctly is the key to achieving professional-looking results in any resin project. Accurate measuring, careful mixing, and attention to temperature and timing ensure the material cures properly, producing a smooth, clear, and durable finish.
By following the right steps preparing your workspace, using proper tools, mixing slowly, and avoiding common mistakes you can gain confidence in handling resin. Mastering this process not only improves the quality of your creations but also saves time, materials, and frustration. With practice, patience, and proper technique, every pour can turn into a successful, beautiful project.