
1️⃣ Introduction:
Resin earrings are very popular in 2026 because they are stylish, affordable, and easy to make. Many people love handmade jewelry that looks unique and colorful. With resin, you can create beautiful designs using glitter, dried flowers, pigments, or gold flakes.
One big reason for this trend is how simple it is to learn how to make resin earrings with molds. Silicone molds make the process easy, even for beginners. You just mix or pour the resin, add your design, let it cure, and remove it from the mold.
Resin crafting is also a great hobby and small business idea. It doesn’t require expensive tools, and every pair of earrings can be different. That’s why more people are searching for how to make resin earrings with molds and starting their own DIY jewelry projects at home.
2️⃣ Essential Supplies You Need to Make Resin Earrings with Molds
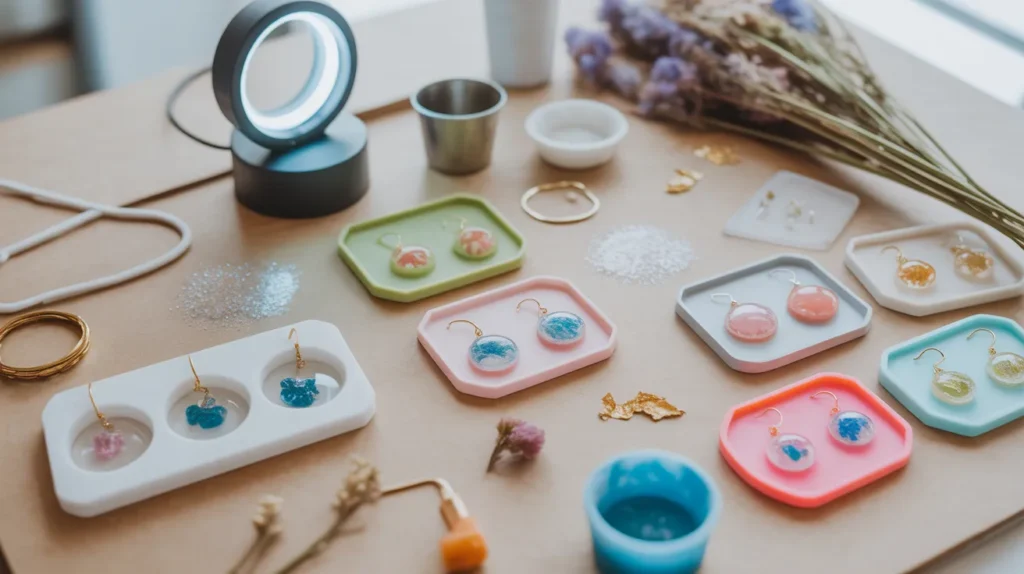
Before you start creating resin earrings, it’s important to gather the right supplies. Having quality materials will help you achieve clear, bubble-free, and professional-looking results.
1. Resin (UV Resin or Epoxy Resin)
You’ll need either UV resin or two-part epoxy resin.
- UV resin cures quickly under a UV lamp and is perfect for small projects.
- Epoxy resin takes longer to cure but is great for detailed designs and layered effects.
Choose a clear, jewelry-grade resin for the best finish.
2. Silicone Resin Molds
Silicone molds are flexible, reusable, and easy to demold. They come in many shapes such as studs, teardrops, circles, and geometric styles. High-quality molds prevent leaking and give smooth edges.
3. Mixing Tools
If using epoxy resin, you’ll need:
- Measuring cups
- Stir sticks
- Silicone or plastic mixing containers
Accurate measuring ensures the resin cures properly and does not stay sticky.
4. Colorants and Decorative Add-Ins
To customize your earrings, you can use:
- Mica powder
- Alcohol inks
- Glitter
- Gold or silver flakes
- Dried flowers
These materials add color, texture, and creativity to your designs.
5. Bubble Removal Tools
Air bubbles are common in resin projects. A heat gun, small torch, or even a toothpick can help remove trapped bubbles for a smooth finish.
6. Jewelry Findings
To turn resin pieces into wearable earrings, you’ll need:
- Earring hooks or studs
- Jump rings
- Eye pins
- Small pliers
Choose stainless steel or hypoallergenic findings for better durability.
7. Safety Equipment
Always protect yourself while working with resin. Wear gloves, work in a well-ventilated area, and use a mask if needed to avoid inhaling fumes. With these essential supplies ready, you can confidently start creating beautiful and long-lasting resin earrings at home.
3️⃣ Choosing the Right Resin: UV Resin vs Epoxy Resin
Choosing the right type of resin is important for getting the results you want. The two most common options for jewelry projects are UV resin and two-part epoxy resin. Each has its own benefits and limitations.
UV Resin
UV resin is a single-component resin that cures under a UV lamp. It does not require mixing, which makes it simple and beginner-friendly.
Pros:
- Fast curing time (usually 1–5 minutes under UV light)
- No measuring or mixing required
- Great for small, thin pieces
Cons:
- Requires a UV lamp
- Not ideal for thick or layered designs
- Can be slightly more expensive per use
UV resin is perfect if you want quick results and simple designs without waiting hours for curing.
Epoxy Resin
Epoxy resin comes in two parts: resin and hardener. These must be measured and mixed correctly before pouring.
Pros:
- Strong and durable finish
- Better for thicker pours and layered effects
- Often more cost-effective for larger batches
Cons:
- Requires accurate measuring and mixing
- Longer curing time (usually 12–24 hours)
- More chance of bubbles if not mixed carefully
Epoxy resin is a good choice if you plan to create detailed designs or make multiple pieces at once.
Which One Should You Choose?
If you prefer speed and simplicity, UV resin is a great option. If you want more flexibility in design and don’t mind waiting for curing, epoxy resin may be the better choice. The right option depends on your project style, budget, and experience level.
4️⃣ Step-by-Step Guide: How to Make Resin Earrings with Molds
Follow these simple steps to create beautiful, professional-looking resin earrings at home.
Step 1: Prepare Your Workspace
Work on a flat, clean surface. Cover the table with plastic or a silicone mat to protect it from spills. Make sure the area is well ventilated. Wear gloves to protect your hands.
Step 2: Prepare the Molds
Place your silicone molds on a level surface. If needed, clean them with tape to remove dust or small particles. A clean mold helps create a smooth and shiny finish.
Step 3: Mix or Pour the Resin
- If using UV resin, pour it directly into a mixing cup (no mixing required).
- If using epoxy resin, carefully measure equal parts of resin and hardener. Stir slowly for 2–3 minutes to avoid bubbles.
Mix gently to keep the resin clear.
Step 4: Add Color and Decorations
Add mica powder, alcohol ink, glitter, dried flowers, or gold flakes to the resin. Stir slowly until the color is evenly blended. You can also create layered or marble effects for a unique design.
Step 5: Pour into the Molds
Slowly pour the resin into the molds. Do not overfill. Leave a small space at the top to prevent overflow.
Step 6: Remove Air Bubbles
Use a toothpick to pop small bubbles. For epoxy resin, you can lightly pass a heat gun or small torch over the surface to remove trapped air.
Step 7: Cure the Resin
- UV resin: Place under a UV lamp for 1–5 minutes until fully hardened.
- Epoxy resin: Leave it on a flat surface for 12–24 hours to cure completely.
Avoid touching the resin while it is curing.
Step 8: Demold and Assemble
Once fully cured, gently remove the pieces from the molds. If needed, sand rough edges lightly. Attach earring hooks or studs using jump rings and pliers.
5️⃣ Design Ideas for Unique Handmade Resin Earrings
One of the best things about resin jewelry is the freedom to experiment with colors, textures, and creative elements. Here are some simple but eye-catching design ideas you can try.
1. Floral Earrings
Embed small dried flowers or petals inside clear resin for a soft, natural look. Light pastel backgrounds work beautifully with floral designs and create a delicate, elegant style.
2. Glitter and Gold Flake Designs
Add fine glitter, metallic flakes, or foil pieces for a bold and shiny finish. This style is perfect for statement earrings and festive collections.
3. Marble Effect
Mix two or three resin colors gently without fully blending them. This creates a smooth marble pattern that looks modern and artistic.
4. Transparent Minimalist Style
Keep the design simple with clear resin and small accents like tiny charms or subtle color swirls. Minimalist earrings are trendy and easy to match with different outfits.
5. Layered Color Blocks
Pour resin in layers using different colors. Allow each layer to partially cure before adding the next one. This creates depth and a clean, structured look.
6. Embedded Charms or Shapes
Place small metal charms, beads, or tiny shapes inside the resin before curing. This adds texture and makes each pair unique.
7. Geometric and Abstract Designs
Use bold colors in geometric molds such as triangles, arches, or circles. Abstract color combinations give a modern and creative feel. With these ideas, you can create earrings that reflect your personal style. Experimenting with different materials and techniques will help you develop unique designs that stand out.
6️⃣ Common Mistakes to Avoid When Using Resin Molds
Working with resin molds is simple, but small mistakes can affect the final result. Avoiding these common errors will help you create smooth, professional-looking earrings.
1. Incorrect Measuring and Mixing
If you are using two-part epoxy resin, inaccurate measurements can cause sticky or soft pieces that never fully cure. Always follow the exact mixing ratio mentioned on the product label and stir slowly for the recommended time.
2. Mixing Too Fast
Stirring too quickly creates air bubbles in the resin. Mix gently and slowly to keep the mixture clear. This reduces the need for heavy bubble removal later.
3. Overfilling the Mold
Pouring too much resin can cause overflow and uneven edges. Fill the mold carefully and leave a small gap at the top for a clean finish.
4. Not Removing Air Bubbles
Trapped bubbles can ruin the appearance of your jewelry. Use a toothpick to pop small bubbles and lightly pass a heat gun or torch over the surface if needed.
5. Using Low-Quality Molds
Cheap or damaged silicone molds may cause leaking or uneven surfaces. Always use high-quality, flexible molds to get smooth edges and easy demolding.
6. Demolding Too Early
Removing pieces before they are fully cured can bend or damage them. Make sure the resin is completely hard before taking it out of the mold.
7. Ignoring Safety Precautions
Working without gloves or proper ventilation can expose you to fumes. Always protect your hands and work in a well-ventilated space. By avoiding these common mistakes, you can improve the quality of your resin projects and achieve cleaner, more durable results.
7️⃣ How to Make Your Resin Earrings Look Professional
Creating resin earrings that look polished and high-quality requires a few extra steps beyond just pouring and curing. Here’s how to elevate your handmade pieces.
1. Sand and Smooth Edges
After demolding, gently sand any rough or uneven edges using fine-grit sandpaper. This helps create a clean, finished look that feels comfortable to wear.
2. Add a Glossy Finish
Apply a thin layer of clear resin or a resin-friendly gloss coat over the surface. This enhances shine, deepens colors, and gives your earrings a professional, glass-like appearance.
3. Secure Attachments Properly
Use high-quality jump rings, earring hooks, or studs. Make sure each attachment is firmly connected, so the earrings are durable and long-lasting.
4. Drill Holes Carefully
If your design requires holes for hooks, use a small, precise drill to avoid cracks. Drill slowly and support the resin piece to prevent breaking.
5. Create Symmetry
Match colors, glitter, or inclusions between pairs for a cohesive look. Consistent designs make the earrings appear professionally made rather than homemade.
6. Package Thoughtfully
Presentation matters. Use jewelry cards, small boxes, or pouches when gifting or selling. A neat, attractive package enhances perceived value.
7. Experiment with Layering and Embedding
Layered designs or embedded charms create depth and a complex, artistic finish. Thoughtful design choices make your pieces stand out and look high-end.
8️⃣ Safety Tips When Working with Resin
Working with resin is fun, but it’s important to follow safety guidelines to protect your health and ensure a smooth crafting experience. Here are the key tips to keep in mind.
1. Wear Protective Gear
Always use disposable gloves to prevent skin contact. Long sleeves can help protect your arms, and safety glasses are recommended to avoid splashes in the eyes.
2. Work in a Well-Ventilated Area
Resin can release fumes during mixing and curing. Open windows, use a fan, or work outdoors to keep the air circulating and reduce inhalation of chemicals.
3. Use a Respirator or Mask
For extended projects or when working with large quantities, wear a mask or respirator rated for chemical fumes. This provides extra protection for your lungs.
4. Keep Surfaces Clean and Protected
Cover your workspace with a silicone mat or plastic sheet to prevent spills. Resin can stick to surfaces and be difficult to remove once cured.
5. Store Resin Properly
Keep resin containers tightly closed and store them in a cool, dry place away from sunlight. This prevents premature curing and maintains the product’s quality.
6. Handle Tools Carefully
Mixing sticks, measuring cups, and molds should be used exclusively for resin. Avoid using kitchen tools to prevent contamination.
7. Dispose of Waste Safely
Do not pour leftover resin down the drain. Dispose of cured scraps in the trash and follow local regulations for chemical disposal.
9️⃣ FAQs
1. How long does resin take to cure?
Curing time depends on the type of resin. UV resin usually hardens in 1–5 minutes under a UV lamp, while epoxy resin takes 12–24 hours to fully set. Always follow the manufacturer’s instructions for the best results.
2. Why is my resin sticky after curing?
Sticky or tacky resin usually results from incorrect mixing ratios or insufficient curing time. Make sure to measure accurately and allow the resin to cure completely in a level, dust-free environment.
3. Can I use regular molds for resin?
Only use silicone or flexible molds specifically designed for resin. Hard plastic or metal molds may cause sticking, uneven surfaces, or damage the cured pieces.
4. How can I prevent bubbles in my pieces?
Mix the resin slowly and gently to reduce air bubbles. Use a toothpick to pop small bubbles, and lightly pass a heat gun or torch over the surface if needed.
5. Can I embed small objects in resin?
Yes! You can embed dried flowers, glitter, foil, beads, or charms. Place them carefully in the mold before pouring or layering the resin to achieve the desired effect.
6. How do I make my earrings durable?
Use high-quality resin, ensure proper curing, and attach findings securely. Sand and polish edges for a smooth finish, which reduces the risk of cracking or chipping.
🔟 Final Thoughts:
Creating resin earrings is a fun and rewarding craft that has gained popularity in 2026. Learning how to make resin earrings with molds allows you to produce unique, stylish, and personalized jewelry right at home. The process is beginner-friendly, requires minimal tools, and offers endless creative possibilities with colors, glitter, dried flowers, and other decorative elements.
Not only is it an enjoyable hobby, but it can also become a small business opportunity. Handmade resin earrings are in demand on online marketplaces, craft fairs, and among friends and family. Each pair can be customized to match trends, seasons, or personal styles, making your creations stand out.
Whether you’re looking for a relaxing DIY project or a way to start selling handmade jewelry, making resin earrings with molds is definitely worth the time and effort. With the right supplies, attention to detail, and creativity, you can create beautiful, durable, and professional-looking pieces that people will love.