1. Introduction
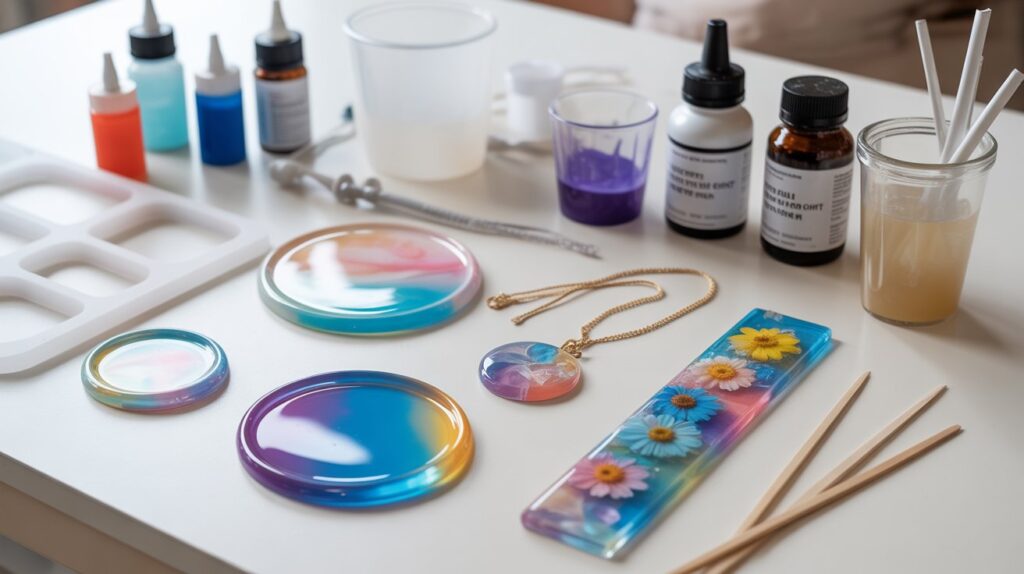
If you’re searching for how to do resin art, you’re in the perfect place! Resin art is a beautiful craft that transforms everyday materials into glossy, professional-quality pieces from coasters and jewellery to trays, bookmarks, and wall decor. Although resin creations often look complex, the process is very beginner-friendly once you know the basics: essential tools, proper mixing techniques, and safety steps.
In this guide, you’ll learn everything you need to confidently start creating resin art including supplies, a step-by-step method, helpful beginner tips, and common mistakes to avoid. Whether you’re brand-new to crafting or are exploring a creative new hobby, this beginner resin art tutorial will help you start with confidence and make your first stunning resin project with ease. Let’s jump in!
Table of Contents
2. What You Need Essential Resin Art Supplies
Before learning how to do resin art, it’s important to gather the right materials. Using the correct supplies will help you get a clear, smooth finish, avoid bubbles, and create strong, long-lasting resin pieces.
✅ Resin Types
There are two main types used in resin art:
| Type | Best For | Notes |
| Epoxy Resin | Coasters, trays, wall art, keychains, large pours | Ideal for beginners and most pouring projects |
| UV Resin | Jewelry, small charms, fast-cure projects | Cures fast under UV lamp; best for tiny designs |
Tip: Beginners usually start with epoxy resin since it’s easier for larger projects and more budget-friendly.
✅ Hardener
Epoxy resin requires a resin + hardener mix.
Follow the exact mixing ratio listed on your product (typically 1:1 or 2:1). Accurate measuring is essential for proper curing.
✅ Mixing Tools
- Silicone or plastic mixing cups
- Wooden or silicone stir sticks
- Protective mat or sheet for your workspace
Mix slowly to help reduce air bubbles.
✅ Safety Gear
Always work safely when handling resin:
- Nitrile gloves
- Mask or respirator
- Apron or old clothes
- Good airflow / open windows or fan
Never work in a poorly ventilated space.
✅ Bubble-Removal Tools
Used to clear bubbles after pouring:
- Heat gun (best for beginners)
- Torch (only for experienced users)
✅ Color & Decorative Add-Ins
To create custom designs, you can add:
- Alcohol inks
- Mica powder
- Resin pigments
- Glitter, flakes, beads
- Dried flowers, shells, gold leaf
✅ Molds & Pouring Surfaces
Choose based on your project:
- Silicone molds coasters, bookmarks, jewelry
- Wood or canvas boards — wall art and trays
- Tape — for sealing wood or preventing drips
✅ Finishing Tools (Optional)
- Sandpaper
- Polishing compound or resin top coat
Beginner Checklist
- Resin + hardener
- Measuring & mixing tools
- Heat gun
- Gloves & mask
- Pigments or inks
- Silicone molds or boards
Best Resin Kits for Beginners
Here’s a beginner-friendly comparison of popular epoxy resin kits:
| Brand / Kit | Why It’s Great for Beginners | Key Specs & Notes |
| ArtResin Epoxy Kit | Extremely popular, low-odor, easy 1:1 mix | Crystal-clear finish, great for art pieces, check cure time & UV resistance |
| Craft Resin Epoxy Kit | Highly rated for clarity & ease of use | Glossy self-leveling formula, good bubble release, follow mix ratio carefully |
| JANCHUN Epoxy Resin Kit | Affordable & beginner-friendly formula | Smaller kits available to reduce waste, generous working time |
| Let’s Resin Epoxy Kit | Trusted brand, great for multiple small projects | Longer working time ideal for layering; requires patience while curing |
| ProMarine Supplies Art Resin | Strong clarity & value for art pours | Ideal for coatings; check if you need deep-pour resin for bigger projects |
3. Safety Precautions for Resin Art
Before you dive into learning how to do resin art, it’s important to understand safety. Resin is a beautiful medium, but it contains chemicals that require proper handling. Following simple precautions will protect your skin, lungs, and workspace while ensuring a smooth and enjoyable crafting experience.
Work in a Well-Ventilated Area
Resin releases fumes while mixing and curing.
Always work in a space with:
Open windows or ventilation fan
Airflow that circulates fumes away from you
Avoid using resin in small, closed rooms.
Wear Protective Gear
To stay safe during resin art projects, use:
Nitrile gloves (best for chemical resistance)
Respirator mask if working for long periods
Safety glasses to protect your eyes
Apron or old clothing (resin does not wash out)
Tip: Never touch uncured resin without gloves it can irritate skin.
Protect Your Workspace
Resin can drip, spill, and stick to surfaces.
Use:
Silicone mat or plastic sheet under your workspace
Paper towels or wet wipes for quick clean-ups
Trash bin nearby for used cups/sticks
Avoid Food Areas
Do not mix or pour resin near:
Kitchens
Dining tables
Food prep areas
Always keep resin away from children and pets.
Mix Carefully
Stir slowly and gently to avoid splashing and air bubbles.
If resin gets on skin, wash with soap and water immediately not alcohol.
Heat Gun & Torch Safety
When removing bubbles:
Keep heat tools away from resin containers
Do not overheat (can cause smoking or yellowing)
Keep flammable items away
Never leave heat tools unattended.
✅ Safe Curing
Once poured, let resin cure in a dust-free, level area.
Use a resin cover or box to stop dust, hair, or insects from landing on your project.
✅ Disposal
Never pour leftover liquid resin down the sink.
Let excess resin harden completely and throw it in regular trash.
Final Note
Learning how to do resin art is exciting, but safety should always come first. By wearing protection, ensuring ventilation, and handling materials properly, you’ll enjoy a smooth and safe creative journey from start to finish.
4. Types of Resin Art
When you’re learning how to do resin art, it helps to understand the different styles you can create. Resin is incredibly versatile — you can pour it, mold it, layer it, or combine it with pigments and natural materials. Each style offers a unique look and creative experience, so beginners can experiment and find what they enjoy most.
Below are the most popular types of resin art:
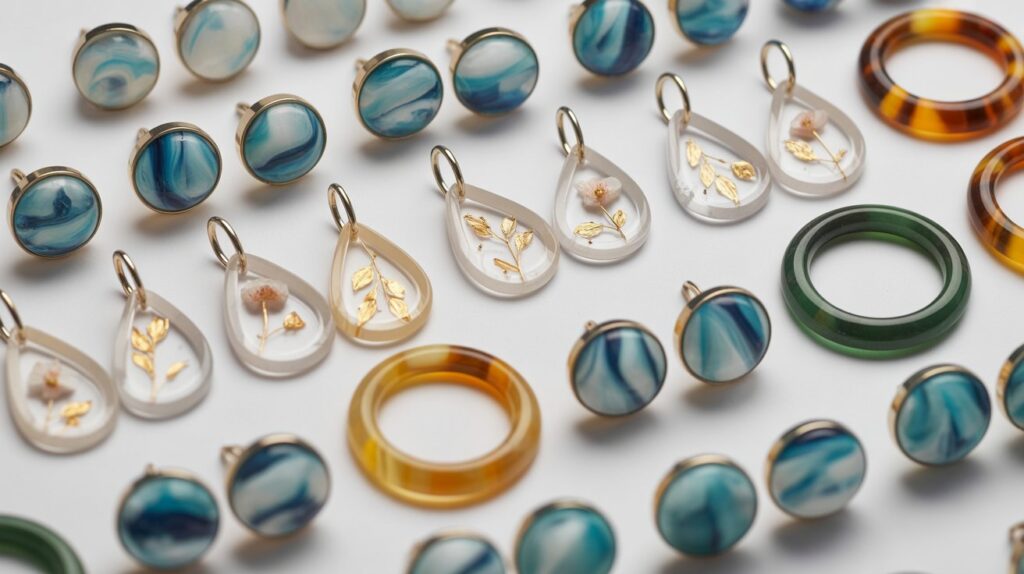
Resin Jewelry
Perfect for beginners and small projects.
You can create:
Pendants
Bracelets
Earrings
Rings
Jewelry molds allow you to embed flowers, glitter, and pigments.
Resin Coasters & Trays
One of the easiest and most popular resin projects.
Coasters can be round, hexagon, geode style, or custom shapes.
Resin trays are ideal for:
Serving trays
Vanity organizers
Candle trays
Resin Wall Art
This style allows you to pour resin onto surfaces like:
Canvas
Wood panels
MDF boards
Popular designs include:
Ocean wave art
Marble effects
Abstract color pours
Resin Molds
Silicone molds help beginners create clean shapes like:
Bookmarks
Keychains
Letter name initials
Decorative shapes
Resin River Tables
A larger, advanced project involving resin poured into wood slabs to create a “river” effect.
Features:
Stunning luxury furniture style
Requires deeper resin pours & longer curing
Not recommended for very first projects, but great to aim for later
Pressed Flower Resin Art
Embed dried flowers in resin to create:
Jewelry
Bookmarks
Coasters
Decorative pieces
This creates natural, organic designs loved by crafters and gift makers.
Which Type Should Beginners Start With?
Start with:
Coasters
Keychains
Bookmarks
Small jewelry pieces
These projects help you understand mixing, pouring, and curing while using less resin.
5. Step-by-Step Guide: How to Do Resin Art (Beginner Friendly)
Now that you know the supplies and project types, let’s walk through the exact steps of how to do resin art for beginners. This guide will help you mix, pour, color, and cure resin with confidence even if it’s your first time.
Step 1: Prepare Your Workspace
Before working with resin, set up your area:
Cover your surface with a silicone mat or plastic sheet
Ensure good ventilation
Gather all tools so you don’t have to stop mid-pour
Wear gloves and a mask
A clean and organized space makes pouring much easier.
Step 2: Measure Your Resin & Hardener
Most epoxy resins require a 1:1 mixing ratio (equal parts resin and hardener).
Always check the label for exact ratios.
Pour part A (resin) into a mixing cup
Accurate measuring is crucial when learning how to do resin art incorrect ratios lead to sticky or soft resin.
Step 3: Mix Slowly & Thoroughly
Stir slowly for 2–3 minutes to avoid air bubbles.
Scrape sides and bottom of cup
Mix until the liquid turns clear, not streaky
Avoid fast stirring it traps bubbles.
Step 4: Add Color or Pigments
Once mixed, divide resin into smaller cups if using multiple colors.
Add:
Mica powder
Alcohol inks
Liquid resin pigments
Glitter or flakes
Stir gently until smooth.
Use small amounts too much pigment can stop resin from curing properly.
Step 5: Pour the Resin
Pour resin slowly into your mold or onto your surface.
For beginners, try:
Coasters
Bookmarks
Simple jewelry pieces
You can pour one color at a time or swirl colors for creative effects.
Step 6: Remove Bubbles
Use a heat gun or a small torch to gently go over the surface.
Hold 2–3 inches away
Move quickly to avoid overheating
You’ll see bubbles rise and disappear.
Step 7: Let It Cure
Place your project on a level, dust-free surface to cure.
Cover with a box to protect from dust
Cure time usually ranges from 12 to 48 hours depending on resin type
Do not touch until fully cured fingerprints will ruin the surface.
✅ Step 8: Demold & Finish
Once fully cured:
Gently remove from mold
Sand rough edges if needed
Beginner Resin Tips
Start with small projects
Mix slowly to avoid bubbles
Use silicone tools resin peels off easily
Read your resin brand’s instructions carefully
6. Popular Resin Art Techniques
Once you understand the basics of how to do resin art, the next step is exploring different techniques to create unique designs and effects. Resin is incredibly versatile, and even beginners can achieve stunning results by trying simple methods. Below are some popular resin art techniques to help you experiment and find your favorite style.
1. Dirty Pour / Color Pour
This simple technique involves layering multiple colors in one cup and then pouring them out together.
How to do it:
Mix resin with different pigments in separate cups
Pour each color into one large cup without mixing
Pour onto your surface in a circular or flowing motion
Result: Marble-like swirls and fluid color patterns.
2. Geode Resin Technique
Inspired by real geode stones, this style uses crystals, metallic pigments, and layered colors.
How to do it:
Outline shapes with gold, silver, or black
Add stones/sparkle (like crushed glass) around the edges
Pour colored resin in layers
Result: Sparkling, gemstone-style artwork.
3. Ocean Wave Technique
Ideal for coasters, serving trays, and wall art.
How to do it:
Pour layers of blue, teal, and white resin
Use a heat gun to push white resin forward
Create foam-like wave effects
Result: Realistic beach and ocean scenes.
4. Alcohol Ink Resin Technique
Combining alcohol inks with resin gives beautiful translucent effects.
How to do it:
Add drops of alcohol ink into clear resin
Use a toothpick or stick to swirl colors
Let pigments naturally blend
Result: Stunning clouds, cells, and dreamy patterns.
5. Resin Embedding Technique
Used to preserve objects in clear resin.
You can embed:
Dried flowers
Gold flakes
Seashells
Photos (sealed first)
Small charms or beads
Result: 3D preserved decoration pieces or jewelry.
6. Resin Layering
Layering lets you build depth and dimension in your artwork.
How to do it:
Pour a thin resin layer
Let it partially cure
Add pigments or objects
Repeat until satisfied
Result: Multi-dimensional, professional finish.
7. Galaxy Resin Technique
Perfect for coasters, trays, keychains, and art panels.
How to do it:
Pour dark colors like black, purple, and navy
Add metallic pigments and glitter
Swirl lightly for star-dust effect
Result: Cosmic, galaxy-style resin art.
Beginner Tip
Start with simple techniques like colour pours or alcohol ink swirl effects. As you gain confidence in how to do resin art, you can try more advanced styles like geodes and ocean waves.
7. Common Resin Art Mistakes & How to Avoid Them
When you’re learning how to do resin art, mistakes are normal they’re part of the creative process. However, knowing the most common issues ahead of time can save you money, time, and frustration. Below are beginner mistakes and simple tips to avoid them for a smooth resin art experience.
Mistake 1: Incorrect Resin Mixing Ratio
If your resin stays sticky or soft, the ratio was wrong.
How to avoid it:
Always follow the brand’s instructions
Measure exact equal parts for 1:1 resins
Use proper measuring cups — not by “eye”
Mistake 2: Mixing Too Fast
Fast stirring creates air bubbles and cloudy resin.
How to avoid it:
Stir gently and slowly
Mix for the recommended time (usually 2–3 minutes)
Scrape the sides and bottom of the cup
Mistake 3: Working in a Dusty or Humid Environment
Dust, hair, and moisture can ruin the finish.
How to avoid it:
Cover your project while curing
Work in a clean, dry room
Avoid high humidity it can cause cloudiness
Mistake 4: Overheating the Resin
Too much heat can burn resin, cause yellowing, or create ripples.
How to avoid it:
Use a heat gun lightly
Keep 2–3 inches away
Never leave the heat in one spot too long
Mistake 5: Pouring Resin Too Thick
Deep pours can trap bubbles or overheat resin.
How to avoid it:
Pour in layers for deeper projects
Mistake 6: Touching Resin Too Early
Touching resin before it fully cures leaves fingerprints and dents.
How to avoid it:
Follow cure times (12–48 hours depending on brand)
If unsure, wait longer patience pays off
Mistake 7: Using Too Much Pigment
Too much color prevents resin from curing properly.
How to avoid it:
Start with small amounts of pigment
Follow the rule: no more than 10% pigment to resin ratio
Mistake 8: Pouring on an Uneven Surface
If your project cures unevenly, the surface wasn’t level.
How to avoid it:
Always check with a small level
Adjust your workspace before pouring
Final Tip
If you’re new to how to do resin art, start small and practice basic pours before trying complex layers or large pieces. With patience and practice, you’ll quickly see improvement and get consistent, beautiful results.
8. Curing & Finishing
Once you’ve learned how to do resin art, the next key step is understanding how to properly cure and finish your project. Even the most beautifully poured piece can lose quality if it isn’t cured and finished correctly. Here’s what you need to know.
Curing Resin What to Expect
Resin needs time to harden and reach a glossy, glass-like finish.
✅ Typical curing time:
- Touch-dry: 8–12 hours
- Fully cured: 24–72 hours (depending on brand & temperature)
✅ Ideal curing conditions:
- Temp: 70–75°F (21–24°C)
- Low humidity
- Dust-free space (cover your work with a box or container)
Do Not Move Your Piece While Curing — Moving it can cause ripples, dust, and uneven surfaces.
How to Get a Smooth, Glossy Finish
Once your resin has cured completely, you can add finishing touches to enhance its look and durability.
Sanding
Use wet-dry sandpaper if the surface has rough edges, uneven drips, or bumps.
Recommended grit progression:
Wet sanding keeps dust low and prevents scratches.
Polishing
To bring back shine after sanding:
- Use a resin polish or automotive polishing compound
- Apply a soft cloth or buffing wheel
- Buff in circular motions until glossy
Doming Coat (Optional)
For projects like jewelry, coasters, and keychains, apply a thin doming layer of resin on top:
Mix a small batch of resin
Spread evenly with a popsicle stick
Remove bubbles with a heat gun or torch
This step gives a smooth glass-like finish and hides minor sanding lines.
Sealing Edges & Backing
For certain projects (coasters, wood boards, wall art):
Seal edges with painter’s tape before pouring
Peel off tape after partial cure to prevent drips
Sand and polish edges if needed
Quick Checklist
| Task | Why It Matters |
| Protect from dust | Keeps surface flawless |
| Control temperature | Ensures proper curing |
| Wet sand rough spots | Smooths imperfections |
| Polish finish | Creates a glass-like shine |
| Optional extra coat | For flawless shine & durability |
Mastering curing and finishing is essential when learning how to do resin art. With the right environment and finishing steps, your resin pieces will look professional, durable, and crystal-clear every time.
Final Note
9. Beginner Resin Art Project Ideas
If you’re just learning how to do resin art, starting with simple beginner-friendly projects will help you build confidence and master the basics. Here are easy resin ideas that require minimal supplies and guarantee beautiful results.
1. Resin Coasters
Great for practicing pouring, swirling colors, and adding glitter or dried flowers.
Why it’s beginner-friendly:
Flat surface, simple mold, endless design options.
Ideas to try:
Gold leaf accents
Ocean-wave coaster
Marble swirl pattern
2. Keychains & Charms
Small and fast to cure perfect for testing pigments, molds, and embedding items.
Try filling with:
Dried flowers
Cute stickers
Mini beads or charms
3. Resin Bookmarks
Thin, quick projects for beginners learning how to do resin art.
Creative ideas:
Pressed flowers
Glitter layers
Metallic flakes
Add a tassel for a stylish finish
4. Jewellery (Pendants Earrings)
Practice using bezels or small silicone molds.
What you learn:
Layering
Adding inclusions
Clear bubble-free finishes
5. Resin Tray
Simple yet classy use a rectangular mold for a sleek, glossy tray.
Design ideas:
Black + gold luxury look
Shells for a beach theme
Preadolescent pigments
6. Resin Letters
Alphabet molds are perfect for name sets and nursery décor.
Popular uses:
Desk name plates
Baby room décor
Keychain initials
7. Wood & Resin Coasters
Combine natural wood slices with resin for a rustic look.
Why it’s fun:
Mix natural texture with glossy resin great gift idea!
8. Trinket Dish
Small bowls or molds create practical, pretty resin pieces.
Design ideas:
Opal effect
Embedded flowers
Multi-colour marble
Start Small Then Level Up
The key to learning how to do resin art is practising with simple projects before moving to larger ones like clocks, tables, or wall art. As you grow comfortable with mixing, pouring, and curing, you’ll naturally start experimenting with advanced designs and techniques.
Beginner Tip
Pick one theme or colour style at first like ocean blue, pastel, or gold so your early projects look coordinated and polished.
10. Best Resin Products & Tools for Beginners
When you’re learning how to do resin art, choosing the right products and tools makes a big difference. Good supplies help you get smoother finishes, fewer bubbles, and a better experience overall. Here are the main categories of products to look for + what to consider when buying them.
What to Look for in Beginner-Friendly Products
Based on expert advice:
Use epoxy resin (rather than more advanced or industrial resins) because it’s simpler and lower-odor. UltraClear Epoxy+2Carved+2
Look for a 1:1 mixing ratio (resin:hardener) — simpler and less mistake-prone. Reddit+1
Ensure you get basic tools: measuring cups, stir sticks, molds, gloves, and a heat device. Reddit beginners mention starter kits with these. Reddit+1
Choose brands or kits that include instructions or are marketed for beginners.
Recommended Product Types for Beginners (and What to Get)
Here are some product types you should consider when figuring out how to do resin art:
Starter resin kit – includes resin, hardener, maybe pigments, molds, tools
Measuring/mixing tools – cups, sticks, silicone mats
Pigments, alcohol inks, glitters – for creative color effects
Safety equipment – gloves, mask, protective coverings
Heat gun / torch – to remove bubbles after pouring
Molds or substrate boards – depending on project type
Top Product Suggestions
Here are some specific kits/products that match well with beginners (you’ll need to check availability/shipping in Pakistan).
Here’s a quick breakdown of each:
Arteza Epoxy Resin Starter Kit 16 oz: An all-in-one kit that includes resin + hardener, molds, mica powders, mixing tools. Good for trying the full process.
Piccassio Epoxy Resin Kit for Beginners: Includes multiple pigments/colors and a decent resin volume; popular among beginners. Amazon
Alumilite Amazing Clear Cast Epoxy Resin Starter Kit: A trusted brand noted in craft forums for easy use and low odor. Reddit+1
Let’s Resin All‑in‑One Epoxy Resin Kit: Marketed as beginner-friendly with lots of creative add-ons. Let’s Resin
Resin Pro iCrystal Resin Kit for Beginners: Good reviews for clarity, ease of mixing and beginner suitability. Resin for beginners
Silicone Mixing Cups & Sticks Starter Set: Mixing cups and sticks are essential; even simple sets improve your workflow.
Heat Gun for Craft Resin Bubble Removal: Removing bubbles is key in how to do resin art; a heat tool makes a big difference.
Beginner Resin Safety Kit – Gloves & Respirator: Safety gear should never be overlooked.
Final Tips for Buying (Especially in Pakistan)
Check the shipping/import cost and availability in Pakistan; some kits may ship slower or cost more.
Buy smaller sizes first so you can practice without large waste if mistakes happen.
Make sure instructions and product info are clear (ideally English or your preferred language).
Verify the brand’s curing time, mixing ratio, and suitability for your project type (e.g., small molds vs large pours).
Table 1: Beginner Epoxy Resin Brands
| Brand | Cure Time* | Finish Quality | Approx Cost** |
| ArtResin | ~24-48 hrs | High clarity, UV-resistant | Mid to high tier |
| **Alumilite Amazing Clear Cast | ~24-48 hrs | Clear cast, good for molds | Mid tier |
| **ProMarine Supplies Art Resin | ~24-72 hrs | Excellent clarity, deep pour options | Higher tier |
*Cure time refers to full cure under recommended conditions.
**Cost varies by region and kit size.
Table 2: Additional Beginner Resin Kits/Tools
| Product | Cure Time* | Finish Quality | Approx Cost** |
| Entry all-in-one beginner resin kit | ~24-48 hrs | Good clarity, beginner focused | Low to mid tier |
| Mixing/Measuring tool set (cups + sticks) | N/A | Tool quality affects result | Low tier |
| Heat gun for bubble removal | N/A | Indirect—improves finish | Low to mid tier |
*For the resin kit portion.
**Tools cost less than resin but affect workflow and finish.
11. Cleanup & Maintenance
Learning how to do resin art isn’t only about mixing and pouring — proper cleanup and maintenance are just as important. Keeping your workspace clean and tools in good condition makes future projects easier, safer, and more professional.
Cleaning Your Tools
Resin becomes difficult to remove once cured, so clean tools immediately after use.
How to clean tools properly:
Wipe excess resin with paper towels while still wet
Use isopropyl alcohol (90%+) or acetone to remove sticky residu
Wipe again with a clean cloth
✅ Best tools to reuse:
Silicone cups & mixing sticks
Silicone mats
Plastic spreaders
Avoid reusing:
Paper cups
Wooden sticks
Used gloves
Tip: If resin dries in silicone cups, simply peel it out after curing — no chemicals needed.
Cleaning Your Workspace
Resin can drip, spill, and harden quickly. Protect your table before you start.
Workspace protection ideas:
Silicone mat (best long-term option)
Plastic sheet or garbage bags
Freezer paper or baking paper
After working:
Wipe surfaces with alcohol while resin is still fresh
Remove cured drips later with a scraper or craft knife
Disposal & Safety
Never pour leftover resin down the sink it can harden and block pipes.
Proper disposal steps:
Let leftover resin cure in the cup
Throw cured resin in regular trash
Wipe mixing containers clean before washing
Maintaining Resin Supplies
To get consistent results when practicing how to do resin art, store your supplies correctly.
Storage tips:
Keep resin bottles sealed tightly
Avoid extreme temperatures heat can yellow resin, cold can thicken it
Shake pigments gently before use
Quick Cleanup Checklist
| Task | Why It Matters |
| Wipe tools immediately | Prevents permanent resin buildup |
| Use alcohol/acetone | Removes stickiness & film |
| Protect workspace | Avoids damaging surfaces |
| Let resin cure before disposal | Safe & drain-friendly |
| Store resin properly | Extends shelf life & quality |
✅ Final Note
Cleanup may feel tedious at first, but it’s a key part of mastering how to do resin art. With organized tools and a clean workspace, you’ll enjoy smoother pours, faster setups, and a more enjoyable creative experience every time.
13 Conclusion
Learning how to do resin art opens the door to a creative world where you can turn simple materials into glossy, eye-catching masterpieces. Whether you’re making coasters, jewelry, trays, or home décor, the beauty of resin art lies in experimenting, practicing, and discovering your own style.
By now, you’ve learned:
What resin art is and how it works
Essential tools and materials you need
Safety precautions to follow
Step-by-step instructions for beginners
Popular techniques to try
Common mistakes to avoid
Finishing and curing tips for professional results
Easy project ideas to start your resin journey
Remember your first piece won’t be perfect, but with patience and practice, each project will improve your skills and confidence. Every artist starts as a beginner, and consistency is what turns creativity into mastery.
Ready to Start Your Resin Art Journey?
Don’t wait your first resin creation is one pour away!
Gather your beginner-friendly supplies
Set up your workspace
Follow the steps in this guide
Start with small projects and enjoy the process
Join Thousands of New Resin Artists
If you found this guide helpful, keep going:
Bookmark this page for future reference
Share your resin creations on social media
Explore more DIY craft tutorials and beginner art guides
12. FAQs About How to Do Resin Art
Q 1: Is resin art beginner-friendly?
Yes! Resin art is beginner-friendly as long as you follow basic instructions and safety steps. Start with simple projects like coasters or key chains, then move to advanced pieces.
Q 2: What type of resin should beginners use?
Beginners should use epoxy resin because it:
Has a simple 1:1 mixing ratio
Low odor (depending on brand)
Works well for most beginner projects
Avoid polyester or polyurethane resin until you’re more advanced.
Q 3: How long does resin take to cure?
Cure time depends on the brand, but generally:
8–12 hours — surface dry
24–72 hours fully cured
Keep your project dust-free while curing.
Q 4: Do I need safety gear for resin?
Yes. Resin is a chemical, so safety matters.
You should use:
Nitrile gloves
Protective clothing
Safety glasses
A mask/respirator if working in low ventilation
Always work in fresh air.
Q 5: Why is my resin sticky or soft?
Sticky resin happens when:
Wrong mixing ratio
Poor mixing
Cold workspace
Low-quality resin
Mix slowly and accurately, and work in a warm room.
Q 6: How do I remove bubbles from resin?
To get rid of bubbles:
Use a heat gun or torch (quick, light passes)
Warm resin bottles before mixing
Stir slowly to reduce air bubbles
Q 7: Can I colour resin?
Yes! You can use:
Mica powder
Alcohol inks
Liquid resin dyes
Glitter + flakes
Avoid water-based colors they cause curing issues.
Q8: What surfaces can I use for resin art?
Suitable surfaces include:
Silicone molds
Wood
Ceramic
Canvas (sealed first)
Acrylic boards
Never pour resin directly on untreated paper or fabric.
Q 9: Does resin yellow over time?
Some resins may yellow, especially lower-quality ones.
Choose UV-resistant epoxy resin for long-lasting clarity.
Q 10: What’s the easiest first resin project?
The easiest beginner projects include:
Coasters
Keychains
Bookmarks
Pendants
Small moulds cure faster and waste less resin.
Q11: Can I reuse resin tools?
Yes especially silicone tools.
Once resin cures, you can peel it right off.
Disposable items like wooden sticks & paper cups should be thrown away.
Q12: How much resin do I need for a project?
It depends on mold size, but as a beginner, start with small resin kits (200ml–500ml) to practice.
Most brands provide resin calculators for accuracy.
Final Tip
The key to mastering how to do resin art is practice + patience. Each piece teaches you something new enjoy the process and have fun experimenting!