
Introduction
UV resin is a liquid plastic material that hardens when exposed to ultraviolet (UV) light. It is widely used in jewelry making, crafts, coatings, and small repairs because it cures much faster than traditional epoxy resin and does not require mixing multiple components. Many beginners ask how long does UV resin take to cure, but to understand the timing, it helps to first know how the curing process actually works.
Table of Contents
What Is UV Resin?
UV resin is a single-component resin, meaning it comes ready to use straight from the bottle. Unlike epoxy resin, it does not harden on its own over time. Instead, it contains photo-initiators special chemicals that react only when exposed to UV light.
This makes UV resin ideal for:
- Jewelry making and charms
- Resin coatings and doming
- Small molds and bezels
- Fast craft projects
How the UV Resin Curing Process Works
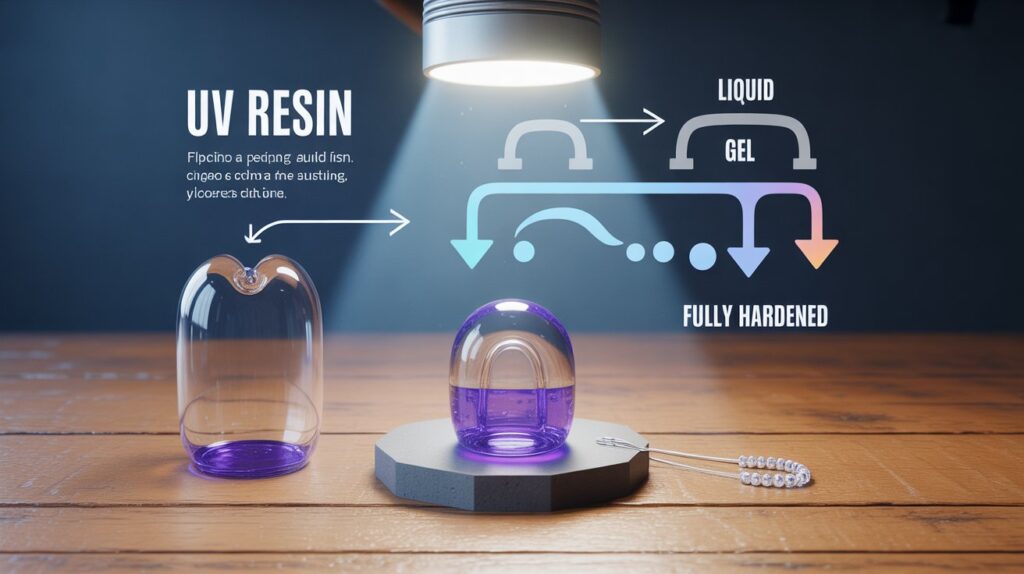
When UV resin is placed under a UV lamp or in direct sunlight, the photo-initiators activate and start a chemical reaction. This reaction causes the liquid resin molecules to link together, transforming the resin from a liquid into a solid plastic.
The curing process happens in stages:
- Initial exposure – UV light activates the resin
- Gel phase – resin thickens and begins to harden
- Full cure – resin becomes solid, clear, and durable
Because this reaction happens almost instantly under strong UV light, many people are surprised by how long does UV resin take to cure, especially compared to epoxy resin, which can take hours or even days.
Why UV Light Is Essential
UV resin will not cure properly without UV light. Regular indoor lighting is usually too weak to trigger the reaction. This is why curing time depends heavily on:
- UV lamp strength
- Distance from the light source
- Thickness of the resin layer
Under ideal conditions, UV resin can begin curing in seconds, but full hardness may take longer depending on these factors. Understanding what UV resin is and how it cures lays the foundation for accurately answering how long does UV resin take to cure in real-world crafting situations, which we’ll explore in the next sections.
Average Curing Time Under Ideal Conditions
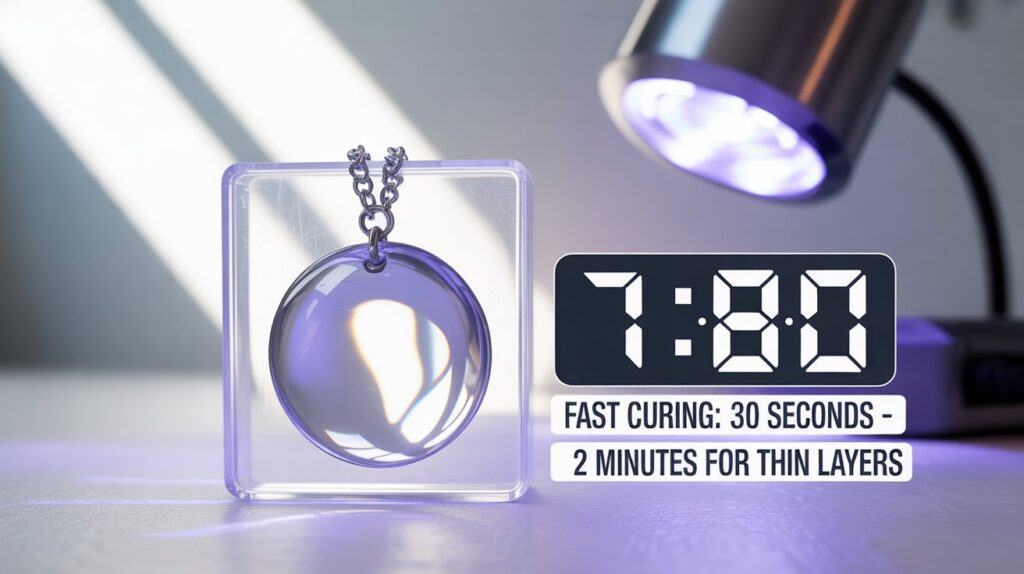
Under ideal conditions, UV resin cures very quickly compared to other resin types. When the correct setup is used, most projects can be hardened within minutes rather than hours. In a controlled environment using a high-quality UV lamp (36W–48W), a thin layer of clear resin typically hardens in 30 seconds to 2 minutes. This timing assumes the resin is spread evenly and placed close enough to the light source for proper exposure. For slightly thicker layers, curing usually takes 2 to 4 minutes. In these cases, it’s best to cure in short intervals, allowing the light to reach deeper into the resin without trapping uncured material underneath.
When using direct sunlight, curing still occurs but takes longer. On a bright, sunny day, most small projects harden within 5 to 15 minutes. Cloud cover, time of day, and the angle of sunlight can all affect results, making lamp curing more consistent and predictable.
Ideal conditions for fast and even curing include:
- Clear or lightly tinted resin
- Thin layers rather than deep pours
- A clean, dust-free surface
- Room temperature between 20–25°C (68–77°F)
Once fully cured, the resin should feel hard, smooth, and non-sticky. If the surface remains tacky, additional exposure time is usually enough to complete the curing process. These time ranges provide a reliable baseline, but real-world results may vary depending on materials, lighting, and environmental factors, which are covered in the following sections.
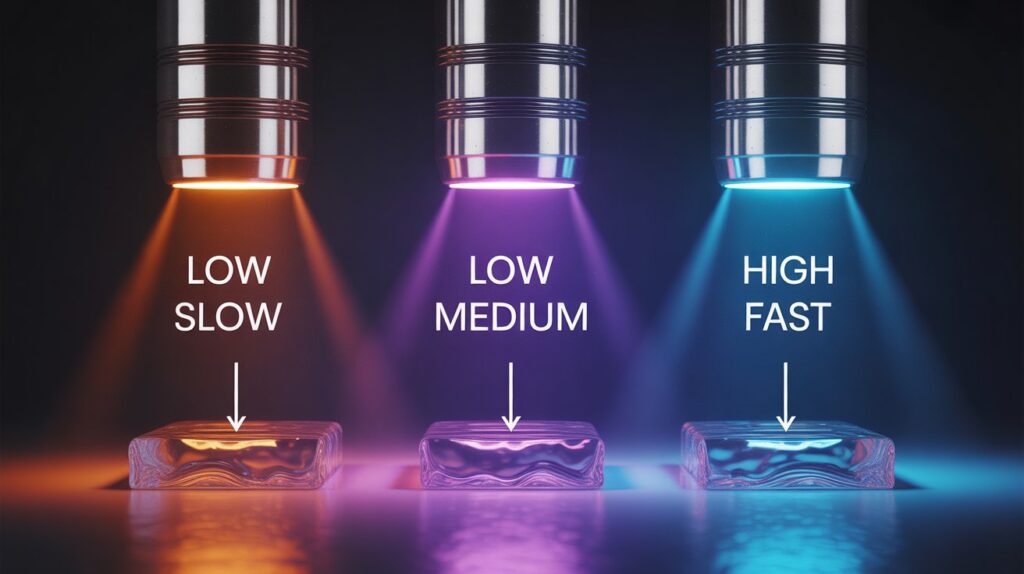
Effect of UV Lamp Wattage on Curing Speed
The wattage of a UV lamp plays a major role in how quickly resin hardens. Higher wattage means stronger UV output, which activates the resin’s photo-initiators more efficiently and reduces overall curing time.
Low-watt UV lamps (6W–12W) are commonly found in compact or portable units. While they can cure resin, the process is noticeably slower. Thin layers may require 3–6 minutes, and thicker areas often need multiple curing cycles to fully harden.
Mid-range lamps (24W–36W) are a popular choice for hobbyists and jewelry makers. These offer an ideal mix of fast curing and precise handling. Most small projects cure evenly within 1–3 minutes, making them suitable for bezels, molds, and doming applications.
High-watt lamps (48W and above) deliver faster and more consistent results. With these lamps, thin resin layers can harden in under a minute, and slightly thicker pours cure more reliably. They are ideal for frequent use or professional setups where time and consistency matter.
Lamp design also affects performance. Lamps with:
- Multiple evenly spaced LEDs
- Reflective interiors
- Proper wavelength output (typically around 365–405 nm)
tend to cure resin more uniformly, regardless of wattage.
Using the right lamp wattage helps avoid common issues such as soft spots, uneven curing, or a sticky surface. For best results, always match lamp power to project size and resin thickness rather than relying on exposure time alone.
Sunlight vs UV Lamp: Time Difference Explained
UV resin can harden using either direct sunlight or a UV lamp, but the time required and the reliability of results vary significantly between the two methods.
Direct sunlight contains natural UV rays that activate resin, making it a convenient option when a lamp is not available. On a bright, clear day, small and thin projects may harden in 5 to 15 minutes. However, sunlight is inconsistent. Factors such as clouds, season, time of day, and even window glass can reduce UV exposure and slow the process. This makes curing outdoors less predictable and harder to control.
In contrast, a UV lamp provides a stable and concentrated light source. Most lamps are designed to emit the exact wavelength needed for resin curing, which leads to faster and more even results. Thin layers typically harden within 30 seconds to 3 minutes, depending on lamp strength and distance from the surface.
Key differences between the two methods include:
- Consistency: UV lamps offer repeatable results; sunlight does not
- Speed: Lamps generally cure resin several times faster
- Control: Lamps allow precise timing and placement
- Weather dependence: Sunlight performance changes daily
For detailed or professional work such as jewelry making, a UV lamp is the preferred option. Sunlight can still be useful for simple projects or quick fixes, but it requires patience and careful monitoring to avoid uneven or incomplete curing.
Resin Layer Thickness and Its Impact on Cure Time
Resin layer thickness has a direct effect on how quickly and evenly the material hardens. UV light must penetrate the resin to trigger the curing reaction, and thicker layers naturally block or weaken that light as it travels deeper.
Thin layers (1–2 mm) cure the fastest and most reliably. UV light easily reaches the entire layer, allowing it to harden evenly from top to bottom. This is why thin pours are recommended for jewelry, doming, and surface coatings.
Medium layers (3–5 mm) take longer and may require multiple curing cycles. The top surface may harden first while the lower portion remains soft if the light does not reach it fully. Flipping the piece or curing in stages helps improve results.
Thick or deep layers are the most challenging. UV light struggles to penetrate deep pours, often leading to soft spots, bubbles, or uneven hardness. In many cases, thick layers should be built gradually using several thin pours instead of one deep application.
To achieve consistent results:
- Apply resin in thin, controlled layers
- Cure each layer fully before adding the next
- Use a stronger lamp for slightly thicker sections
- Avoid deep molds unless they are designed for UV resin
Managing layer thickness not only improves curing speed but also prevents common issues like tacky surfaces and incomplete hardening.
Type and Brand of UV Resin
Not all UV resins behave the same, and the type or brand you choose can significantly affect curing speed and final results. Manufacturers use different formulas, which influence how quickly the resin hardens and how well it performs under UV light.
Fast-cure UV resins are designed for quick projects and high efficiency. These formulas respond rapidly to UV exposure and are ideal for thin layers, doming, and small molds. They are commonly used in jewelry making where speed and clarity are important.
Standard or general-purpose UV resins may take slightly longer to harden but often provide better control and durability. These are suitable for beginners who want more working time before curing begins.
Brand quality also matters. Reputable brands typically:
- Use higher-quality photo-initiators
- Provide consistent curing results
- Reduce the risk of tacky or soft surfaces
Lower-quality or unbranded resins may appear to harden on the surface but remain soft underneath, even after extended exposure.
Another factor is resin age and storage. Older resin or resin stored improperly (exposed to heat or light) can lose effectiveness, leading to slower or uneven hardening. Choosing a reliable UV resin that matches your project type helps ensure predictable curing, better finish quality, and fewer problems during the crafting process.
Pigments, Dyes, and Additives
Pigments, dyes, and decorative additives can greatly influence how quickly and evenly UV resin hardens. While they enhance color and visual appeal, they also affect how UV light passes through the resin.
Transparent dyes allow more UV light to penetrate, so resin mixed with these usually hardens faster and more evenly. Light colors and translucent shades are especially suitable for UV-based projects.
Opaque pigments, on the other hand, block UV light. Dark or heavily pigmented resin often requires longer exposure and may still cure unevenly, especially in thicker areas. White, black, and metallic pigments are among the most challenging because they reflect or absorb light instead of letting it pass through.
Common additives also impact curing:
- Glitter and mica powders scatter UV light, slowing the hardening process
- Inclusions like dried flowers or foil create shadowed areas
- Too much pigment can prevent proper curing altogether
To avoid issues:
- Use pigments sparingly
- Cure in thinner layers when using opaque colors
- Extend exposure time as needed
- Rotate or flip pieces to improve light coverage
Balancing visual effects with proper curing ensures a strong, smooth finish without soft spots or incomplete hardening.
Temperature and Environmental Conditions
Temperature and surrounding conditions have a noticeable impact on how efficiently UV resin hardens. While UV light triggers the curing reaction, the environment determines how smoothly that reaction takes place.
Room temperature plays an important role. Resin cures best in a warm environment, ideally between 20–25°C (68–77°F). In colder conditions, the resin becomes thicker and reacts more slowly, leading to longer hardening times or uneven results.
Low temperatures can cause:
- Slower chemical reactions
- Cloudy or soft finishes
- Increased risk of incomplete curing
High temperatures, while less problematic, can sometimes cause the resin to cure too quickly on the surface, trapping uncured material underneath if the layer is thick.
Humidity and airflow also matter. High humidity may introduce moisture onto the resin surface, which can interfere with curing and leave a dull or sticky finish. Dust and airborne particles can settle on uncured resin, affecting clarity and smoothness.
For best results:
- Work in a clean, dry, well-ventilated space
- Allow resin and molds to reach room temperature before use
- Avoid curing near open windows or fans
Maintaining stable environmental conditions helps ensure consistent hardening and a professional-looking finish.
Clear vs Opaque Molds
The type of mold used has a significant effect on how quickly UV resin hardens and how evenly it cures. Molds are available in two main types: clear and opaque, each with its own advantages and limitations.
Clear molds allow UV light to pass through, reaching the resin from multiple angles. This helps thin and moderately thick layers cure evenly and reduces the risk of soft spots. Clear silicone or plastic molds are especially useful for intricate shapes, domes, or jewelry pieces where uniform hardening is important.
Opaque molds, such as dark silicone or metal molds, block UV light from reaching the resin in areas that are not directly exposed. In these cases, only the resin surface facing the light source cures properly, while deeper or shaded areas may remain soft. To address this, curing in stages or repositioning the mold under the lamp can help, but it requires more attention and time.
Tips for using different molds:
- Thin layers work best in opaque molds to ensure proper curing
- For complex shapes, clear molds provide better light penetration
- Consider flipping or rotating the mold for even exposure
Choosing the right mold type can make a big difference in achieving a smooth, fully hardened result, especially for detailed or multi-layered projects.
Signs That UV Resin Is Fully Cured
Knowing when resin is fully hardened is crucial to avoid sticky surfaces, fingerprints, or damage during handling. There are several clear indicators to determine if the curing process is complete.
1. Hard, Firm Surface
The resin should feel solid and resistant to gentle pressure. Pressing lightly with a fingertip should leave no indentation, and the surface should not feel soft or tacky.
2. Smooth and Glossy Finish
Fully cured resin has a clear, glossy appearance. Dull or cloudy areas may indicate incomplete curing or the need for additional light exposure.
3. No Stickiness
When touched, the surface should be completely dry. If any tackiness remains, the resin requires more exposure to UV light.
4. Sound and Flex Test
For thicker or larger pieces, gently tapping the surface produces a firm sound rather than a soft or spongy feel. Slight flexing should not cause cracks or deformation in hardened sections.
5. Even Color and Transparency
Any additives like glitter, pigments, or inclusions should be fully suspended and clear. Uneven or milky patches often indicate that the lower layers have not fully cured.
Paying attention to these signs ensures that your resin projects are durable, smooth, and ready for finishing or further crafting steps. When in doubt, a few extra minutes under a UV lamp or sunlight usually completes the hardening process safely.
Common Reasons UV Resin Takes Longer to Cure
Sometimes resin does not harden as quickly as expected, even under a UV lamp or sunlight. Understanding the common causes can help prevent delays and achieve a smooth, solid finish.
1. Insufficient UV Exposure
If the light source is too weak, too far away, or the exposure time is too short, resin may remain soft. Using a higher-wattage lamp or extending curing time usually resolves this issue.
2. Thick or Uneven Layers
Thicker pours block UV light from reaching the lower layers, leading to incomplete hardening. Building up the piece in thinner layers and curing each separately ensures better results.
3. Dark or Opaque Pigments
Heavily pigmented or metallic resins absorb or reflect UV light, slowing the curing process. Using lighter colors, reducing pigment concentration, or increasing exposure can help.
4. Low Temperature
Cold environments cause the resin to thicken and react more slowly, extending curing time. Working at room temperature or slightly warmer conditions improves results.
5. Old or Improperly Stored Resin
Resin that has been exposed to heat, light, or stored for too long may lose effectiveness. Always check the product’s expiration date and store it in a cool, dark place.
6. Poor Mold Choice
Opaque molds block light from reaching the resin evenly. Clear molds or repositioning opaque molds under the light can prevent soft spots.
By identifying and addressing these factors, resin projects can cure efficiently and consistently, reducing frustration and improving the final finish.
Tips to Speed Up the Curing Process Safely
Achieving a fully hardened resin piece quickly requires the right techniques and precautions. Following these tips ensures faster curing without compromising quality or safety.
1. Use a Strong UV Light Source
Higher-wattage lamps or professional-grade UV LED units cure resin more efficiently. Position the piece close to the lamp, but follow manufacturer recommendations to avoid overheating.
2. Apply Thin Layers
Thin layers harden faster and more evenly. For thicker projects, build them in multiple layers, curing each layer before adding the next.
3. Choose Light or Transparent Pigments
Light-colored or clear resins allow UV light to penetrate more effectively, reducing hardening time compared to dark or heavily pigmented mixes.
4. Maintain Optimal Temperature
Work in a room that is around 20–25°C (68–77°F). Avoid cold environments, which slow chemical reactions, and extremely hot conditions that may cause uneven curing.
5. Use Clear Molds When Possible
Transparent molds let light reach the resin from all angles, ensuring even and quicker hardening. For opaque molds, reposition the piece under the lamp to reach shadowed areas.
6. Minimize Additives That Block Light
Excess glitter, metallic powders, or thick inclusions can slow curing. Use them sparingly and in thin layers for faster results.
7. Rotate or Adjust the Piece During Curing
For larger or irregular shapes, adjusting the angle or turning the piece allows light to reach all areas uniformly, preventing soft spots.
Implementing these practices helps achieve smooth, fully hardened results in less time, while maintaining the quality and clarity of the finished project.
Conclusion
Understanding how long does UV resin take to cure is essential for creating smooth, durable, and professional-looking projects. The curing time depends on several factors, including layer thickness, lamp wattage, mold type, pigments, temperature, and environmental conditions. By managing these variables and following best practices, you can achieve consistent results and avoid common issues like soft spots or uneven surfaces.
Whether you are a beginner or an experienced crafter, knowing what affects curing speed allows you to plan your projects more efficiently and produce high-quality pieces every time. With the right techniques and materials, you’ll have fully hardened, beautiful resin creations ready in no time.
FAQs
1. How long does it take for UV resin to harden under a UV lamp?
Thin layers usually harden in 30 seconds to 3 minutes under a high-quality UV lamp. Thicker layers may require multiple curing cycles.
2. Can UV resin cure in sunlight?
Yes, sunlight contains natural UV rays that can harden resin, but curing is slower and depends on brightness, weather, and angle. Expect 5–15 minutes for small projects.
3. Does the color or pigment affect curing time?
Yes, dark or opaque pigments and heavy glitter can slow UV resin curing. Light or transparent colors allow faster hardening.
4. What is the best way to cure thick resin layers?
For thick pours, cure in thin layers, allowing each to harden fully before adding the next. This prevents soft spots and uneven curing.
5. How does temperature affect resin hardening?
Resin cures faster in room temperature (20–25°C / 68–77°F). Cold environments slow down the chemical reaction, while extreme heat can cause uneven results.
6. How can I tell if UV resin is fully cured?
Fully cured resin is hard, smooth, and non-sticky, with an even glossy finish. Any tackiness indicates it needs more exposure.
7. Do all UV lamps work the same for resin curing?
No. Higher-wattage lamps (36W–48W) cure resin faster and more evenly than low-power or small compact units.
8. Can additives like flowers or foil affect curing?
Yes, inclusions may block UV light, slowing hardening. Use thin layers and adjust light exposure for best results.
9. How can I speed up curing safely?
Use a strong UV lamp, work in thin layers, maintain room temperature, and minimize opaque pigments or heavy additives. Rotating pieces helps even curing.
10. Does the mold type impact curing time?
Yes. Clear molds allow light to penetrate and cure resin faster, while opaque molds may require repositioning or longer exposure.