Introduction
If you searched for “ best UV resin jewelry ideas for beginners”, welcome — you’ve landed in the perfect spot. UV resin is the fastest, glossiest, most beginner-friendly way to turn tiny treasures (pressed flowers, glitter, foil, or tiny charms) into wearable art. Unlike slow-curing epoxy, UV resin hardens in minutes under a UV lamp or bright sunlight, which makes DIY UV resin jewelry ideal for quick experiments, one-off gifts, or building a small side-hustle selling handmade pieces.
In this introduction you’ll get a clear snapshot of what makes UV resin so popular and why it’s a great starting point for new makers. Expect practical guidance on how to make UV resin jewelry, straightforward easy UV resin crafts to try first, and curated product picks—lamps, resins, and molds—that I’ll recommend throughout this guide (some links are affiliate picks to help you buy with confidence).
What this guide will cover (quick peek)
- A simple explanation of UV resin vs. epoxy and why beginners prefer it.
- Easy starter projects: pendants, earrings, rings, and keychains.
- UV resin pendant ideas and unique UV resin jewelry designs to spark creativity.
- A buyer-focused section on the best molds for UV resin jewelry and must-have tools.
- Practical UV resin jewelry tips and tricks to avoid bubbles, get perfect cures, and finish glossy pieces.
Table of Contents
Why UV Resin is Perfect for Jewellery Making
When it comes to crafting jewelry, beginners often feel overwhelmed by the number of materials out there. Should you start with clay, beads, or epoxy resin? The truth is, if you want quick, glossy, and hassle-free results, UV resin is the clear winner.
Unlike epoxy resin, which requires precise mixing of two components (resin and hardener) and long curing times (sometimes 24–48 hours), UV resin comes ready to use straight out of the bottle. No measuring, no messy mixing, and no waiting around. With a UV lamp, your jewelry is cured in just 2–5 minutes, making it perfect for anyone who loves instant results.
Key Benefits of UV Resin for Jewelry Making
- Fast Curing: Create a necklace or pair of earrings in less than 10 minutes. Perfect if you’re crafting gifts or running a small Etsy shop.
- Glossy Finish: UV resin naturally cures with a smooth, glass-like shine—no extra polishing needed.
- Beginner-Friendly: Just pour, decorate, and cure. It’s that simple.
- Durable & Lightweight: Great for making everyday jewelry that doesn’t feel heavy.
- Creative Freedom: Works with pigments, glitter, pressed flowers, and tiny charms, allowing you to design unique pieces.
UV Resin vs. Epoxy Resin: Quick Comparison
- Curing Time: UV resin = minutes | Epoxy = hours/days
- Mixing: UV resin = none | Epoxy = precise ratios
- Finish: UV resin = naturally glossy | Epoxy = often needs polishing
- Best For: UV resin = small jewelry & charms | Epoxy = larger projects like coasters or trays
If your goal is to make easy UV resin crafts like pendants, earrings, or rings, UV resin saves you time, reduces errors, and lets you enjoy the creative process without frustration.
In the next section, we’ll cover the essential tools and supplies you need to start your first UV resin jewellery project.
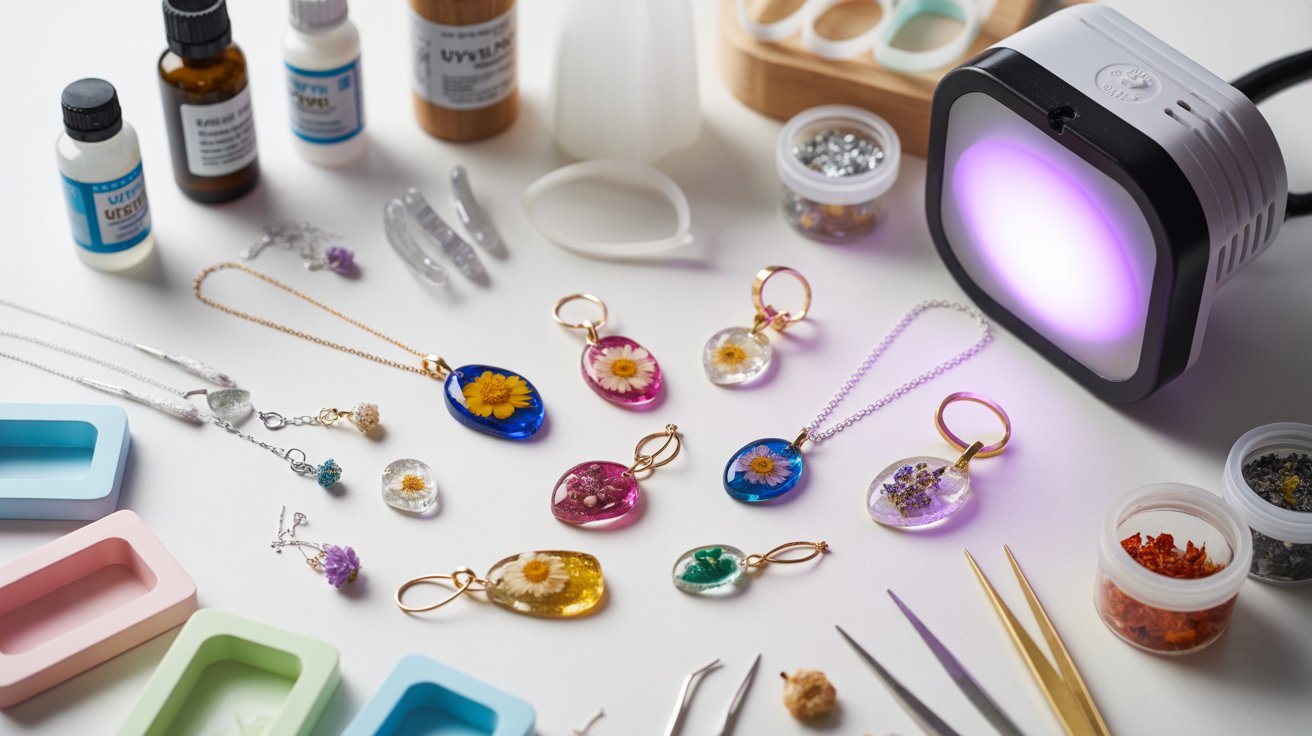
Essential Tools & Supplies for UV Resin Jewelry
Before you dive into creating your first shiny pendant or glittery earrings, you’ll need a small set of supplies. The good news? Getting started with DIY UV resin jewelry doesn’t require a huge investment. With just a few basic tools, you can begin crafting right away. Below, I’ve listed the must-haves along with some affiliate-friendly recommendations to make shopping easier.
1. UV Resin
Your main ingredient. Look for beginner-friendly UV resin brands that are clear, low-odor, and bubble-resistant. Some of the best options on the market cure quickly and stay glossy without turning yellow.
Affiliate Pick: [Best UV Resin for Beginners – Amazon Bestseller]
2. UV Lamp
While sunlight can cure UV resin, it’s not always reliable. A UV lamp ensures even, fast curing every time. Choose a lamp with at least 36W power for best results strong enough to cure jewelry in minutes.
Recommended Product: [Top-Selling 36W UV Resin Lamp]
3. Silicone Molds & Open Bezels
- Silicone Molds: Flexible, reusable, and available in countless shapes (circles, hearts, moons, etc.). Perfect for pendants, rings, and charms.
- Open Bezels: Lightweight metal frames you can fill with resin for beautiful earrings and necklaces.
Must-Have Kit: [Variety Pack of Silicone Molds + Open Bezels]
4. Decoration Materials
This is where creativity shines! Add:
- Dried flowers
- Glitter & pigments
- Foil flakes
- Mini charms or beads
Creative Starter Pack: [UV Resin Decoration Kit – Flowers, Glitter, and Foil Flakes]
5. Safety Gear & Basic Tools
Resin is fun, but safety matters. Always protect your skin and workspace.
- Nitrile gloves (to avoid skin contact)
- Face mask (for ventilation)
- Toothpicks & mixing sticks (for adding details)
- Silicone mat (to keep your table clean)
Starter Bundle: [Safety Kit + Mixing Tools for Resin Crafts]
✅ With these essentials, you’ll have everything needed to begin your UV resin journey. Whether you’re planning to make a unique UV resin jewellery design or a simple beginner pendant, the right tools will make your process smoother and your results more professional.
Up next: we’ll explore Easy UV Resin Jewellery Ideas for Beginners that you can try today.
Easy UV Resin Jewellery Ideas for Beginners
One of the best things about UV resin is how quickly you can turn an idea into a finished piece of jewellery. Even if you’ve never crafted before, these easy UV resin crafts will help you get started without feeling overwhelmed. Below are a few beginner-friendly projects, along with recommended supplies to make your crafting journey smoother.
1. Simple Pendants
Pendants are the easiest and most popular starting project for beginners. You just pour resin into a mold or bezel, add decorations, and cure. Want to capture a dried flower, a splash of glitter, or a tiny charm? Pendants are perfect for experimenting with different designs.
Recommended Product: [Beginner Pendant Mold Kit – Includes Multiple Shapes]
2. Earrings & Charms
Lightweight, glossy, and customisation UV resin earrings are a must-try. Start with small bezels, fill them with resin, add colour pigments or foil flakes, and cure. You can also make charms for bracelets, anklets, or zipper pulls.
Affiliate Pick: [Resin Earring & Charm Starter Kit – Bezels + Findings Included
3. Rings
Rings look fancy but are surprisingly easy to make with silicone ring moulds. You can embed glitter, tiny gems, or even create a layered marble effect for a stylish finish. Rings also make wonderful handmade gifts.
Top Pick: [Silicone Ring Mold Set for UV Resin Jewellery]
4. Keychains
If you want something practical, try making resin key chains. These can be personalised with initials, mini photo inserts, or glow-in-the-dark pigments. They’re budget-friendly and a great way to practice your skills before moving on to detailed jewellery.
Must-Have: [UV Resin Key chain Mold Kit with Hardware]
Beginner Tip: Start small. Work with simple shapes like circles, squares, or hearts before moving on to complex moulds. This will help you build confidence while still creating beautiful, wearable pieces.
Coming up: we’ll dive deeper into UV Resin Pendant Ideas, where you’ll learn how to make professional-looking designs like pressed flower pendants, glitter galaxies, and minimalist charms.
UV Resin Pendant Ideas (Most Popular Project)
When it comes to DIY UV resin jewellery, pendants are hands-down the most popular project. They’re small enough to finish quickly, yet versatile enough to showcase endless creativity. Whether you’re into nature-inspired pieces, bold glitter designs, or sleek minimalism, pendants let you experiment with different materials and styles.
Here are three beginner-friendly UV resin pendant ideas to spark your imagination—plus a few product picks to help you get started.
1. Pressed Flower Pendants
Capture a piece of nature forever by embedding dried flowers into clear resin. This style is timeless, delicate, and perfect for gifting. You can use wildflowers, rose petals, or even tiny leaves. The key is to press and dry them properly before adding to your pendant mold or open bezel.
Recommended Kit: [Pressed Flower & Resin Pendant Mold Set]
2. Glitter & Pigment Pendants
If you love bold and sparkly designs, glitter pendants are your go-to. Simply mix resin with glitter powder, metallic flakes, or mica pigments to create dazzling effects. For a celestial look, try dark blue resin with silver flakes—perfect for a galaxy-inspired pendant.
Affiliate Pick: [Glitter & Mica Powder Starter Pack for Resin Jewellery]
3. Minimalist Clear Pendants
Sometimes, less is more. Minimalist pendants made from clear resin with subtle accents (like a single gold flake or a drop of color) have a modern, elegant vibe. They’re lightweight, versatile, and match almost any outfit.
Must-Have Product: [Set of Open Bezel Frames – Ideal for Minimalist Pendants]
Beginner Tip: Always pour resin in layers when making pendants. This prevents bubbles and gives your piece depth and clarity.
With just these three pendant ideas, you already have a foundation to create dozens of designs. From romantic floral keepsakes to sparkling statement necklaces, pendants are where beginners often discover their unique style.
Up next: we’ll explore the Best Molds for UV Resin Jewelry, so you can pick the right shapes and frames for your designs.
Best Molds for UV Resin Jewelry (Buyer’s Guide)
One of the most exciting parts of making UV resin jewelry is choosing the right mold. The mold (or bezel) determines the shape, style, and overall vibe of your jewelry piece. The good news? There are plenty of options—whether you want classic shapes, open-frame pendants, or unique custom molds.
Here’s a quick buyer’s guide to help you pick the best molds for UV resin jewelry, along with some affiliate-friendly recommendations to make shopping easier.
1. Silicone Molds for Versatility
Silicone molds are a beginner’s best friend. They’re flexible, reusable, and come in countless shapes—circles, squares, hearts, moons, stars, and more. The flexibility makes it super easy to pop your jewelry out once cured without damaging it.
✅ Pros: Durable, reusable, great for beginners, endless shapes.
❌ Cons: Some molds may leave a matte finish (can be polished later).
Recommended Product: [Variety Pack of Silicone Molds for Resin Jewelry]
2. Open Bezels for Lightweight Jewelry
Open bezels are metal frames that you fill with UV resin. They’re perfect if you want delicate, lightweight pendants or earrings. Unlike silicone molds, bezels don’t enclose the resin fully, so you get a chic, see-through design. Great for minimalist pendants and pressed flower jewelry.
✅ Pros: Lightweight, elegant, great for layering flowers or glitter.
❌ Cons: Requires careful curing to prevent leaks.
Top Pick: [Gold & Silver Open Bezel Frames – 50-Piece Pack]
3. Unique & Custom Molds for Creativity
Want your jewelry to really stand out? Go for custom molds in shapes like seashells, animal silhouettes, or even letters. These molds allow you to create personalized gifts (like initial pendants or pet-inspired charms). Perfect for Etsy sellers or anyone looking to make unique UV resin jewelry designs.
✅ Pros: One-of-a-kind jewelry, highly customizable.
❌ Cons: Often pricier and harder to find.
Must-Have: [Custom Shaped Resin Molds – Letters, Moons & More]
Pro Tip: If you’re just starting out, grab a starter mold kit that includes both silicone molds and open bezels. This way, you can try different techniques and see which style suits your creativity best.
Coming up: we’ll dive into Tips & Tricks for Stunning UV Resin Jewelry, where I’ll share hacks to avoid bubbles, achieve crystal-clear finishes, and take your jewelry from beginner to pro level.
Tips & Tricks for Stunning UV Resin Jewelry
Even though UV resin jewelry is beginner-friendly, there are a few common issues that can make your first projects look less polished—like bubbles, uneven layers, or sticky finishes. Don’t worry! With the right techniques (and a few helpful tools), you can take your resin creations from okay to absolutely stunning.
Here are some tried-and-true UV resin jewelry tips and tricks every beginner should know.
1. Avoiding Bubbles
Bubbles are the #1 beginner frustration. They can ruin the clarity of pendants or trap unwanted air around decorations.
- Warm your resin bottle: Place it in warm water for a few minutes before using. This thins the resin, making bubbles less likely.
- Work slowly: Pour resin in thin layers instead of dumping it all at once.
- Use a heat tool: A small resin heat gun or mini torch can pop surface bubbles instantly.
Affiliate Pick: [Mini Resin Heat Gun for Bubble-Free Jewelry]
2. Layering for Depth
If you want your jewelry to look professional, layering is the secret. Instead of adding all decorations at once, build your design step by step.
- Pour a thin base layer and cure.
- Add decorations (like flowers, foil, or glitter).
- Seal with another thin resin layer and cure again.
This creates a 3D effect that adds depth and dimension to your pendants and charms.
Recommended Tool: [Set of Silicone Mixing Cups & Sticks – Perfect for Layered Resin]
3. Getting a Glossy, Non-Sticky Finish
Sometimes, resin pieces come out tacky or dull. Here’s how to fix it:
- Cure longer: Leave under the UV lamp for an extra minute or two.
- Flip & cure both sides: This ensures even hardening.
- Top coat method: Add a final thin layer of resin and cure for a glass-like finish.
Pro Tool: [High-Power 54W UV Lamp for Faster, Glossy Cures]
Extra Hack: Always cure your pieces on a silicone mat—this prevents sticking to your workspace and makes cleanup much easier.
With these simple tricks, your jewelry will look shop-quality, even if you’re just starting out. Next, we’ll cover Safety & Care for UV Resin Jewelry, so you can enjoy crafting without risks.
Safety & Care for UV Resin Jethwelry
The Best UV Resin Jewellery Ideas for Beginners crafting is fun, but like any DIY material, it comes with a few safety rules. Since UV resin is a chemical, it’s important to handle it with care so you can craft comfortably and safely. Beyond safety, knowing how to store resin and care for your finished jewellery will make your projects last longer and look professional. Here’s a simple beginner’s guide.
1. Ventilation & Gloves
Always work in a well-ventilated space. While UV resin is often marketed as low-odor, prolonged exposure can still cause irritation. Wearing nitrile gloves protects your skin from sticky spills, and a light crafting mask helps if you’re working indoors.
Affiliate Pick: [Nitrile Gloves + Protective Mask Bundle for Resin Crafts]
2. How to Store Resin
UV resin is light-sensitive, which means direct sunlight or even strong room light can cause it to harden in the bottle. To avoid wasting product:
- Store in a cool, dark place away from windows.
- Keep the cap tightly sealed to prevent contamination.
- If possible, store upright in a small craft organizer box.
Recommended Tool: [Resin Storage Organizer Case – Keep Supplies Fresh & Tidy]
3. Caring for Finished Jewelry
Once your UV resin jewelry is cured, it’s strong—but not indestructible. To keep it looking glossy and new:
- Avoid leaving pieces in direct sunlight for long periods (resin can yellow over time).
- Keep away from harsh chemicals like perfumes or cleaning sprays.
- Wipe with a soft, damp cloth to clean instead of abrasive materials.
- Store jewelry in a pouch or box to prevent scratches.
Must-Have: [Jewelry Storage Box – Protect Your Resin Pieces]
Quick Tip: If your jewelry does get scratched, you can apply a thin “top coat” of UV resin and cure again. It works like a polish and brings back the glassy finish.
Now that you know how to handle and protect your pieces, let’s wrap up with a Conclusion & Call to Action—where I’ll encourage you to start crafting and point you toward the best starter kits.
Conclusion + Call to Action
Starting your journey with UV resin jewelry doesn’t have to feel overwhelming. In fact, it’s one of the easiest and most rewarding crafts for beginners. With just a few tools—a bottle of resin, a UV lamp, and a couple of molds—you can create stunning pendants, earrings, rings, and keychains in minutes. Unlike epoxy, UV resin gives you fast results, a glossy finish, and endless creative options.
If you’re new, start small. Try making a simple pendant or charm keychain before moving on to layered, decorative designs. Each project will help you gain confidence, and soon you’ll be experimenting with pressed flowers, pigments, and unique molds to create one-of-a-kind jewelry.
Ready to get started?
Here are some of the best beginner-friendly products to kick off your UV resin journey:
- [Complete UV Resin Starter Kit – Resin, Lamp, and Molds Included]
- [Best-Selling UV Resin Lamp for Fast Curing]
- [Silicone Mold & Open Bezel Variety Pack]
With the right supplies, you can start creating jewelry that’s not only fun to make but also beautiful enough to wear, gift, or even sell online.
Your creativity is the only limit. The sooner you dive in, the sooner you’ll discover how enjoyable and addictive UV resin jewelry making can be. So grab your kit, follow the tips shared in this guide, and let your imagination shine through your jewelry designs.
Next up: Check out our FAQs section where we answer common beginner questions about UV resin jewelry, curing methods, and care tips.
FAQs – UV Resin Jewelry (Beginner & Buyer-Friendly)
If you’re just getting started with UV resin jewelry, you probably have a few questions before diving in. Here are some of the most common beginner FAQs—along with affiliate-friendly answers to help you choose the right tools and supplies.
1. Can I cure UV resin without a lamp?
Yes, but results may vary. UV resin cures in direct sunlight, but it can take longer and may leave an uneven or tacky finish. For consistent results, a UV lamp is strongly recommended—it cures resin in just minutes and gives a glossy, professional finish.
2. How long does UV resin jewelry last?
With proper care, UV resin jewelry can last for years. The key is to avoid prolonged sunlight exposure (which can cause yellowing) and keep pieces away from harsh chemicals or scratching surfaces. A simple jewelry pouch or box helps protect your handmade creations.
3. What’s the best resin for beginners?
For first-time crafters, a beginner-friendly UV resin with low odor and bubble resistance is best. Many starter kits come with resin, molds, and tools included—perfect if you’re still testing out the craft.
4. Can I use UV resin for large projects?
Not really. UV resin works best for small jewelry projects like pendants, earrings, and charms. Because it cures in thin layers, it isn’t ideal for big, thick projects (like trays or coasters). For larger items, epoxy resin is the better choice.
Quick Takeaway: UV resin is perfect for beginners because it’s fast, glossy, and easy to use, especially for jewelry and small crafts. With the right kit and a few tools, you can start making professional-looking pieces right away.