
1. Introduction: What Is Art Resin and Why It’s So Popular
Art resin has become one of the most popular materials in the creative world loved by artists, crafters, and DIY enthusiasts alike. Its crystal-clear, glossy finish transforms ordinary pieces into professional-quality artwork. Whether you’re coating paintings, making jewelry, or crafting home décor, art resin offers endless creative possibilities.
In this blog post, we’ll explore what art resin is, how it works, its price, and how beginners can get started. You’ll also learn about the best brands, common mistakes to avoid, and why art resin is becoming such a rewarding and profitable hobby.
Table of Contents
2. What Is Resin Art?
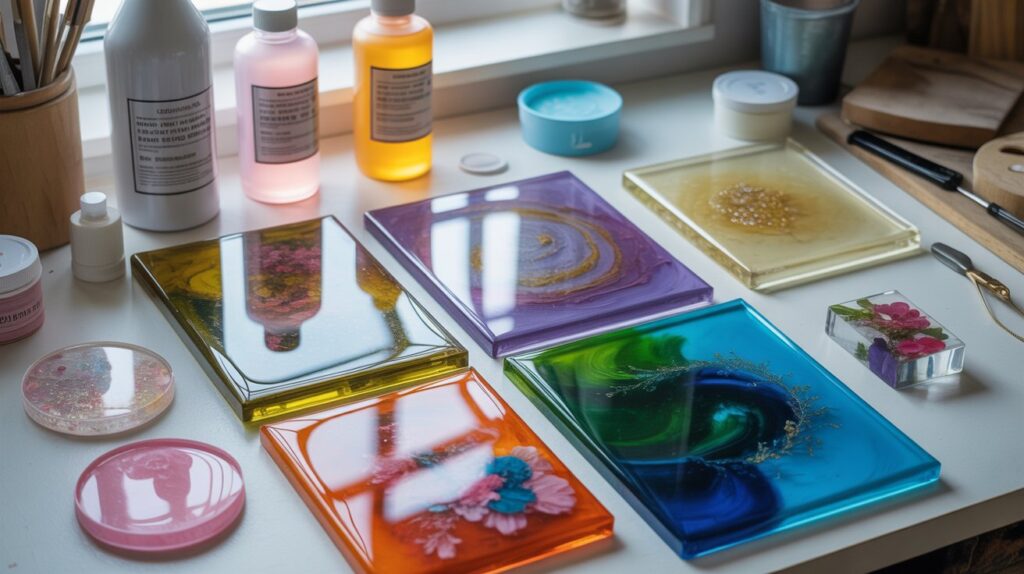
Resin art is a modern art form that uses liquid resin usually art resin mixed with color pigments, glitter, or other decorative elements to create glossy, three-dimensional designs. When poured onto a surface, the resin flows freely, allowing artists to create abstract patterns, ocean waves, geode effects, and other visually stunning pieces.
At its core, resin art is all about creativity and experimentation. Artists combine art resin with various additives such as alcohol inks, mica powders, or metallic flakes to achieve vibrant, glass-like finishes. Once the mixture cures (hardens), it forms a durable, waterproof surface that preserves the artwork’s shine for years.
This technique is widely used to make:
- Wall art and abstract paintings
- Jewelry, coasters, and trays
- Tabletops and counter tops
- Keychains, bookmarks, and decorative pieces
One of the main reasons art resin is preferred for resin art is its clarity and UV protection. It resists yellowing and ensures that the artwork remains glossy and color-rich over time. This makes it the perfect choice for artists who want professional results without needing complex tools or experience.
Whether you’re a beginner experimenting for the first time or a professional artist exploring new textures, resin art offers endless creative possibilities.
3. What Is Art Resin Made Of?
Art resin is a two-part formula made up of resin and hardener. When these two components are mixed together in the correct ratio usually 1:1 they create a chemical reaction that transforms the liquid mixture into a hard, glossy, and crystal-clear surface.
Let’s break it down a bit further:
- Resin (Part A): This is the viscous liquid that provides the base of the mixture. It contains epoxy polymers that determine the clarity and smoothness of the final finish.
- Hardener (Part B): This activates the curing process. When combined with the resin, it triggers a reaction that gradually solidifies the mixture, forming a tough and durable coating.
High-quality art resin is specially formulated for creative use. Unlike industrial epoxy resins, it’s non-toxic, UV-resistant, and designed to minimize bubbles and prevent yellowing. These properties make it perfect for preserving the true colors and details of artworks over time.
Manufacturers also include additives in art resin that help improve its self-leveling ability and gloss. This means artists don’t have to worry about uneven surfaces once poured, the resin naturally spreads to create a smooth, glass-like finish.
In short, art resin is made from a precise blend of safe, artist-grade materials that ensure clarity, durability, and ease of use everything you need to make your artwork shine.
4. Art Resin vs Regular Epoxy Resin
While art resin and regular epoxy resin may look similar, they’re not exactly the same. Both are two-part systems made of resin and hardener, but they’re designed for different purposes. Understanding these differences helps you choose the right type of resin for your project.
1. Purpose and Use
- Art Resin: Specially formulated for creative applications like paintings, jewelry, and decorative crafts. It’s made to enhance color, gloss, and clarity.
- Regular Epoxy Resin: Typically used for industrial or construction purposes such as flooring, sealing, or coating surfaces where aesthetics are less important.
2. Clarity and UV Resistance
- Art Resin: Offers a crystal-clear, high-gloss finish and is UV-resistant, meaning it won’t yellow or fade easily when exposed to sunlight.
- Regular Epoxy Resin: Often turns yellow over time, especially with UV exposure. It’s not designed for color stability or visual art projects.
3. Safety and Odor
- Art Resin: Made with non-toxic ingredients and minimal fumes, making it safer for indoor use.
- Regular Epoxy Resin: May contain harsher chemicals and produce strong odors that require ventilation.
4. Curing Time and Finish
- Art Resin: Cures slowly, allowing time for air bubbles to rise and pop naturally. The result is a smooth, bubble-free surface with a glossy finish.
- Regular Epoxy Resin: Usually cures faster but can trap bubbles or leave a slightly uneven texture.
5. Cost
- Art Resin: Slightly more expensive due to its premium quality, UV protection, and safe formula.
- Regular Epoxy Resin: Cheaper but less suited for detailed or artistic work.
In summary, art resin is the better choice for artists and crafters who want professional-quality results, color protection, and an easy, safe working experience. Regular epoxy resin works well for practical projects, but it can’t match the clarity and longevity that art resin provides
5. What Is the Price of 1kg Resin?
- The price of 1kg resin can vary depending on the brand, quality, and type of resin you choose. On average, art resin costs between $20 to $50 per kilogram, while regular epoxy resin may be slightly cheaper. The difference in price mainly comes down to the clarity, UV resistance, and safety of the formula.
A quick breakdown of typical price ranges.
| Type of Resin | Average Price (per 1kg) | Best For |
| Art Resin | $30 – $50 | Artwork, jewelry, coasters, paintings |
| General Epoxy Resin | $20 – $35 | Repairs, coating, and industrial use |
| Casting Resin | $25 – $45 | Deep pours, molds, and sculptures |
- Art resin tends to be more expensive because it’s designed specifically for artists. It has superior UV protection, stays crystal clear, and is non-toxic, making it ideal for indoor and decorative use. These premium qualities ensure your artwork won’t yellow or lose its shine over time.
- If you’re just starting with resin art, you can begin with smaller kits (500g to 1kg) to experiment. Many brands also offer starter bundles that include resin, hardener, mixing cups, and color pigmentsperfect for beginners learning how to use art resin effectively.
- You can find art resin at local craft stores, online marketplaces like Amazon, or directly from popular brands such as ArtResin, ProMarine, and Naked Fusion. Always check product details before purchasing to make sure you’re getting the right type of resin for your project.
6. How to Start Resin Art for Beginners
Starting with resin art may seem intimidating, but with the right materials and a few basic steps, anyone can create beautiful, glossy artwork. Art resin is beginner-friendly because it’s easy to mix, self-leveling, and designed for creative use rather than industrial work.
Here’s a step-by-step guide to help you get started:
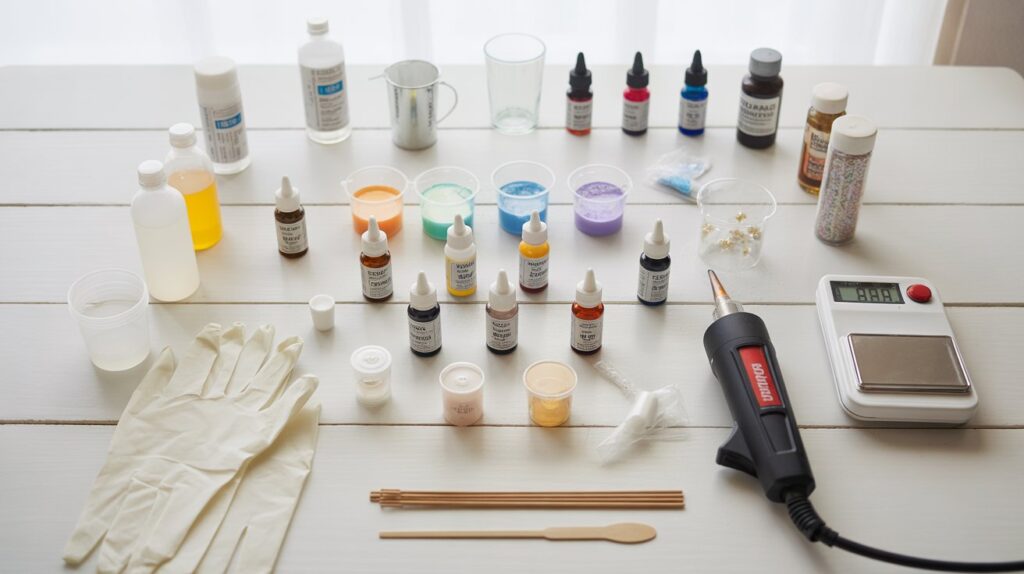
Step 1: Gather Your Supplies
Before you begin, make sure you have all the essential tools:
- Art resin (resin + hardener)
- Mixing cups and wooden stir sticks
- Silicone molds or a flat canvas
- Protective gloves and an apron
- Torch or heat gun (to remove bubbles)
- Color pigments, mica powders, or glitter (optional)
Step 2. Prepare Your Workspace
Choose a clean, dust-free, and well-ventilated area. Cover your surface with plastic or parchment paper to protect it from spills. Temperature matters art resin works best at room temperature (around 22–25°C or 72–77°F).
Step 3. Mix the Resin and Hardener
Measure equal parts of resin and hardener according to the brand’s instructions (usually 1:1). Stir slowly for at least 3–5 minutes, scraping the sides and bottom to ensure an even mix. Mixing too quickly can create bubbles, so take your time.
Step 4. Add Color and Pour
Add your preferred pigments or glitter into the mixture and stir gently. Then, pour the art resin onto your canvas, mold, or surface. You can tilt the surface or use tools to create swirls, waves, or layered effects.
Step 5. Remove Bubbles and Let It Cure
Use a heat gun or torch to pop any air bubbles on the surface. Allow the resin to cure for 24–72 hours, depending on the brand and room temperature. Avoid touching or moving the piece while it hardens.
Step 6. Finish and Display
Once the art resin is fully cured, remove it from the mold or display it as desired. You can polish the edges or apply another thin coat for an even glossier finish.
Pro Tips for Beginners
- Always mix equal parts of resin and hardener.
- Work slowly to avoid bubbles.
- Wear gloves and ensure proper ventilation.
- Start with small projects like coasters or keychains before moving on to large canvases.
Learning how to use art resin is a fun and rewarding experience. With practice, you’ll gain the confidence to create unique, professional-quality pieces that shine beautifully in any setting.
7. Safety and Precautions When Using Art Resin
Working with art resin is generally safe, but like any creative material, it’s important to handle it properly. Even though most modern art resins are non-toxic and low-odor, they still involve chemical reactions that require care during mixing and curing. Following a few simple safety steps ensures a smooth and worry-free creative experience
- Work in a Well-Ventilated Area
Always create your resin art in a space with good airflow. Open windows or use a small fan to keep fresh air circulating. Proper ventilation helps reduce any minor fumes that may form while the art resin cures - Wear Protective Gear
Use nitrile gloves, a long-sleeved shirt, and, if needed, a protective mask. Gloves prevent resin from sticking to your skin, while long sleeves keep your arms protected from spills and splashes - Avoid Skin Contact
If art resin gets on your skin, wash it off immediately using soap and warm water. Never use solvents or alcohol to remove it, as they can irritate your skin - Keep Your Workspace Clean
Cover your work surface with plastic, parchment paper, or a silicone mat. This helps prevent accidental spills and makes cleanup easier once you’re done - Measure and Mix Carefully
Accurate mixing is not only important for perfect results but also for safety. Always mix equal parts of resin and hardener according to instructions. Improper ratios can lead to sticky or improperly cured resin, which might release fumes or stay tacky - Store Art Resin Properly
Keep art resin bottles tightly sealed and stored in a cool, dry place, away from direct sunlight or heat. This preserves the quality of your resin and prevents accidental spills - Dispose of Waste Responsibly
Never pour leftover resin down the drain. Allow small amounts to cure completely before throwing them away. Follow local disposal guidelines for chemical materials if you have larger quantities - Keep Away from Children and Pets
Even though art resin is formulated for safe use, it’s not meant for ingestion or play. Always store your materials out of reach of kids and animals
Final Tip
By following these safety steps, you can enjoy the creative process without worry. Art resin is one of the safest resins available for artists, and when handled properly, it allows you to create stunning, long-lasting pieces with confidence and peace of mind
8. Is There a Market for Resin Art?
Yes there is a growing market for resin art, and it’s thriving both online and offline. Over the past few years, art resin has helped artists and craters turn simple creative hobbies into profitable businesses. The glossy, durable, and luxurious look of resin artwork appeals to buyers looking for unique, handmade pieces that stand out from mass-produced decor.
1. Why Resin Art Sells So Well
Resin art has a broad audience because it blends art and functionality. People love art resin creations such as:
- Custom resin coasters, trays, and jewelry
- Ocean-themed wall art and table designs
- Personalised gifts for weddings, birthdays, and home decor
These items have high perceived value due to their handcrafted nature and glossy, professional finish.
2. Where to Sell Resin Art
Artists can easily sell their work on various online platforms, including:
- Etsy: Perfect for handmade, one-of-a-kind resin pieces.
- Instagram & TikTok: Great for showcasing creative processes and reaching global audiences.
- Facebook Marketplace & Local Craft Fairs: Ideal for selling to local buyers or custom orders.
- Personal Websites or Shopify Stores: For artists who want to build their brand and sell directly.
Sharing behind-the-scenes videos or resin-pouring clips can attract potential customers and grow your audience quickly.
3. Profit Potential
The profit margin for art resin projects can be impressive. While materials may cost around $10–$20 per small project, finished pieces often sell for 2–5 times more, depending on design quality and branding. Items like resin tables or large wall art can sell for hundreds of dollars.
As demand for personalised and eco-friendly decor continues to rise, the resin art market is expected to keep expanding. Artists who focus on originality, quality, and presentation have excellent opportunities to succeed.
4. Final Thoughts
In short, there is a strong and growing market for resin art. Whether you’re a beginner experimenting with art resin or a professional artist building a business, there’s plenty of room to grow in this creative industry. With the right techniques and marketing, your resin art can easily turn from a hobby into a rewarding source of income.
9. Top Art Resin Brands to Consider
Choosing the right art resin brand is essential for achieving professional-quality results. The best brands offer crystal clarity, strong UV resistance, low odor, and a smooth finish that makes your artwork stand out. Whether you’re a beginner or an experienced artist, using a reliable art resin ensures consistent results every time.
Here are some of the top art resin brands trusted by artists around the world:
1. ArtResin
ArtResin is one of the most popular and trusted names in the resin art world. It’s non-toxic, BPA-free, and UV-resistant, helping your artwork stay clear and glossy for years. It mixes easily with a simple 1:1 ratio and self-levels beautifully, making it ideal for both beginners and professionals.
Best for: Paintings, jewelry, coasters, and tabletop art.
2. ProMarine Supplies Art Resin
ProMarine’s art resin delivers excellent clarity and durability. It’s food-safe once fully cured, making it great for kitchen-related projects like serving boards and trays. It hardens to a glass-like finish that resists scratches and yellowing.
Best for: Functional art such as trays, coasters, and cutting boards.
3. Naked Fusion
Naked Fusion is known for its ultra-clear formula and bubble-free finish. It’s non-toxic, odor-free, and offers a longer working time perfect for detailed work and large pours. Artists appreciate its smooth texture and professional-grade results.
Best for: Large art pieces, deep pours, and high-gloss finishes.
4. TotalBoat TableTop Epoxy
Originally designed for tabletops, TotalBoat has become a favorite among resin artists for its smooth finish and strong UV protection. It’s easy to use and cures quickly, making it suitable for both art and home décor.
Best for: Tabletops, bar tops, and decorative resin coatings.
5. Let’s Resin Epoxy
Let’s Resin offers beginner-friendly kits that include pigments, gloves, and measuring tools. The resin is crystal clear, low-odor, and easy to work with an excellent choice for hobbyists who want quality without complexity.
Best for: Beginners, jewelry making, and small art projects.
6. Stone Coat Countertops Art Resin
Stone Coat provides premium-grade art resin designed for both decorative and functional applications. It features strong UV resistance, excellent clarity, and a long working time, making it ideal for detailed designs.
Best for: Countertops, wall art, and furniture coatings.
Final Thoughts
Each art resin brand offers something unique some excel in clarity, others in working time or surface hardness. Consider your project type, desired finish, and skill level before choosing. Starting with a trusted brand helps you create professional-quality resin art that lasts.
10. Tips for Creating Professional-Looking Resin Art
Creating flawless and glossy resin art takes practice, patience, and attention to detail. Even small adjustments in your process can make a big difference in the final result. Whether you’re new to art resin or looking to improve your technique, these simple tips will help you achieve a professional, high-quality finish every time.
1. Measure Accurately
Always mix art resin and hardener in the exact ratio recommended by the manufacturer (usually 1:1 by volume). Inaccurate measurements can lead to soft spots, sticky surfaces, or uneven curing. Use measuring cups to ensure precision.
2. Mix Slowly and Thoroughly
Stir the mixture slowly for 3–5 minutes, making sure to scrape the sides and bottom of the container. Mixing too quickly traps bubbles, while inconsistent stirring can leave uncured areas. Smooth, steady mixing creates clear, even resin.
3. Work in the Right Environment
Art resin cures best at room temperature (22–25°C or 72–77°F) and low humidity. Avoid dusty or humid rooms, as moisture can cloud the resin or reduce its shine.
4. Use a Torch or Heat Gun to Remove Bubbles
After pouring, use a heat gun or small torch to lightly pass over the surface. The heat helps release air bubbles, giving your resin a sleek, glass-like finish.
5. Choose Quality Pigments and Additives
Use high-quality mica powders, alcohol inks, or resin pigments for vibrant color. Avoid water-based paints because they can interfere with curing and cause cloudiness.
6. Pour in Layers for Depth
For multi-layered effects, pour resin in thin layers and let each layer cure before adding the next. This technique creates depth, dimension, and more polished blending.
7. Protect Your Work While Curing
Dust and particles can ruin the finish. Cover your project with a box or plastic container to keep the surface clean while the art resin cures.
8. Sand and Polish for a Smooth Finish
After the resin fully cures, you can lightly sand to remove imperfections, then apply a thin final coat of art resin for a glossy, flawless surface.
9. Experiment and Practice
Every artist develops a unique style. Try different pouring methods, tools, and color combinations to learn what works best for you. Practice leads to better control and more professional results.
Final Tip
Professional-looking resin art comes down to preparation, precision, and patience. By using high-quality art resin and following these techniques, you can achieve a smooth, glossy finish that looks as impressive as any gallery-quality piece.
11. Common Problems and How to Fix Them
Even when you follow all the steps correctly, working with art resin can sometimes lead to small issues. The good news is that most problems have simple solutions. Understanding what causes these issues and how to fix them will help you achieve flawless, professional-looking resin art every time.
1. Cloudy or Milky Resin
Problem: Your resin looks hazy or not completely clear after curing.
Cause: This often happens due to moisture, cold temperatures, or incomplete mixing.
Fix:
- Work in a warm, dry environment (around 22–25°C or 72–77°F).
- Mix the art resin thoroughly and slowly to avoid trapped air.
- If moisture is the issue, use a heat gun gently to help clear the surface before curing.
2. Sticky or Soft Surface
Problem: The resin doesn’t harden properly and feels tacky even after curing time.
Cause: Incorrect resin-to-hardener ratio or uneven mixing.
Fix:
- Always measure equal parts of resin and hardener.
- Stir slowly for at least 3–5 minutes.
- If it remains sticky, lightly sand the surface and apply a fresh, correctly mixed coat of art resin.
3. Air Bubbles
Problem: Tiny bubbles appear on the surface after the resin has cured.
Cause: Stirring too fast, pouring too quickly, or working in a cold environment.
Fix:
- Mix gently and pour slowly.
- Use a torch or heat gun to pop bubbles right after pouring.
- Warm the resin bottles slightly before mixing to make the resin flow better.
4. Yellowing Over Time
Problem: Your cured art resin starts turning yellow.
Cause: Prolonged exposure to UV light or using low-quality resin.
Fix:
- Use a UV-resistant art resin from a trusted brand.
- Keep resin art out of direct sunlight when possible.
- Apply a clear UV-protective topcoat for extra durability.
5. Uneven or Wavy Surface
Problem: The surface looks uneven instead of smooth and level.
Cause: Working on a tilted surface or not using enough resin.
Fix:
- Make sure your workspace is perfectly level before pouring.
- Pour enough art resin to allow it to self-level naturally.
- Use a spatula or spreading tool to distribute resin evenly.
6. Dust or Hair in the Resin
Problem: Small dust particles or hairs get trapped in the surface while curing.
Cause: Open workspace or lack of protection during curing.
Fix:
- Work in a clean, dust-free area.
- Cover your project with a box or plastic container while it cures.
- If something sticks to the surface, lightly sand and recoat with a thin layer of art resin.
Final Tip
Small issues are common when working with art resin, especially for beginners. The key is patience and practice. Once you understand how to control your environment, mix properly, and protect your work, you’ll consistently achieve a smooth, clear, and professional finish every time.
12.Why Art Resin Is Worth Trying
If you’ve ever wanted to create glossy, durable, and eye-catching artwork, art resin is one of the best materials you can explore. It’s versatile, easy to use, and produces professional-quality results even for beginners.
Whether you’re coating paintings, making jewellery, or creating resin coasters, art resin helps bring your ideas to life with a clear, glass-like finish that enhances every colour and texture. Unlike regular epoxy resin, it’s specially designed for artists non-toxic, UV-resistant, and self-leveling making it safe and reliable for creative use.
What makes art resin especially worth trying is the balance it offers between creativity and practicality. You don’t need expensive tools or years of experience to start. With a few basic supplies and the right guidance, you can create stunning pieces that look professionally made.
Beyond personal enjoyment, resin art also has strong market potential. From home décor to handmade crafts and gifts, there’s a growing audience that appreciates the beauty and uniqueness of resin-based designs. That means your passion can easily turn into a profitable side business or even a full-time career.
In short, art resin is more than just a material it’s a creative gateway. It allows you to express yourself, experiment with colours and textures, and produce durable, high-quality pieces that stand out. Whether you’re a hobbyist or an aspiring artist, there’s no better time to start working with art resin and see where your creativity takes you.
13. FAQs
What is art resin?
Art resin is a clear, glossy epoxy used to create durable and professional-looking artwork.
How to use art resin for art projects?
Mix resin and hardener in correct ratios and pour onto surfaces to create resin art.
Is art resin easy for beginners?
Yes, art resin for beginners is easy to use with proper instructions and safety precautions.
Can you mix acrylic paint with art resin?
Yes, acrylic paint works with resin, but only in small amounts to avoid curing issues.
How to start resin art for beginners?
Start resin art for beginners with a starter kit, small molds, and practice pours.
Is art resin stronger than super glue?
Yes, epoxy art resin forms a stronger and more durable bond than super glue.
What is resin epoxy art?
Resin epoxy art is the technique of using epoxy resin to create glossy, three-dimensional artworks.