
1. Introduction
Creating resin crafts can be a fun and rewarding hobby, but one common challenge that many crafters face is bubbles forming during the mixing process. Knowing how to get bubbles out of resin when mixing is essential for achieving smooth, clear, and professional-looking results.
Bubbles can ruin the appearance of your project, making it look cloudy or uneven. Fortunately, with the right techniques, tools, and tips, you can minimize or completely remove them. This guide will walk you through practical methods to handle bubbles effectively, whether you are working on small jewelry pieces or larger resin projects, ensuring your creations turn out flawless every time.
Table of Contents
2. Why Do Bubbles Form in Resin?
Bubbles in resin occur when air gets trapped during mixing or pouring. Even a small amount of air can create tiny pockets that rise to the surface, affecting the clarity and smoothness of your project. Several factors contribute to bubble formation:
Mixing Technique:
Stirring too quickly or vigorously introduces air into the resin, which gets trapped as tiny bubbles.
Temperature:
Cold resin is thicker and more likely to trap air, while warmer resin flows better and allows bubbles to escape naturally.
Pouring Method:
Pouring resin from a great height or too fast can incorporate additional air, increasing the likelihood of bubbles.
Environmental Factors:
High humidity or dust can affect the curing process and cause air pockets to form.
Understanding why bubbles appear helps you take the right steps to prevent and remove them, ensuring your resin projects come out clear, smooth, and professional-looking.
3. Tools and Materials Needed
Having the right tools and materials makes it much easier to achieve smooth, bubble-free resin projects. While some items are essential, others are optional but helpful for advanced techniques.
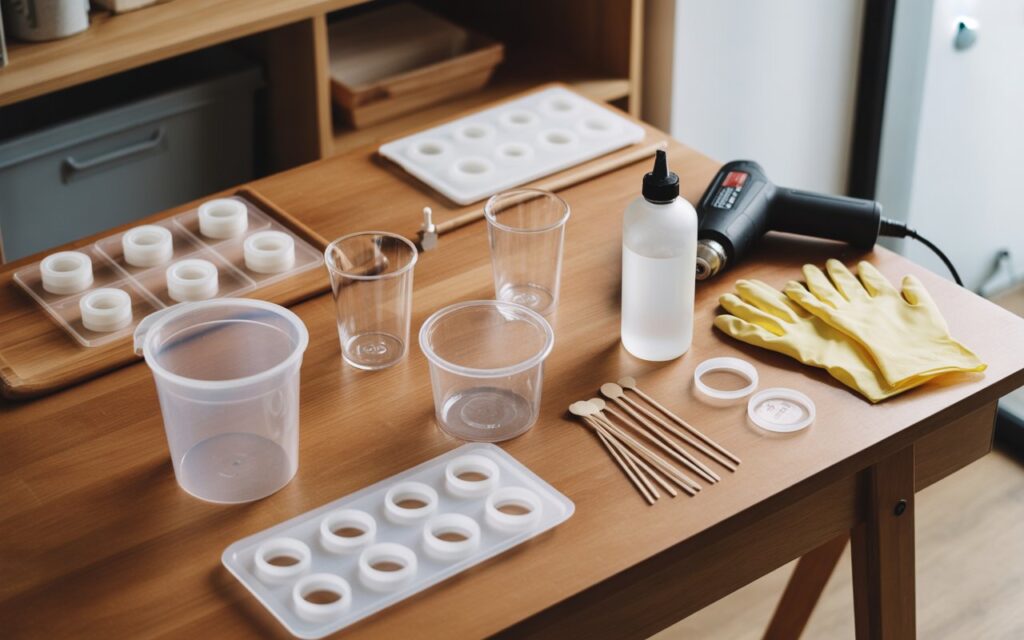
Essential Tools:
Mixing Cups and Stir Sticks: Use clean, disposable cups and stir sticks to combine resin and hardener thoroughly without introducing excess air.
Silicone Molds:
Flexible molds help release the resin easily and reduce the chance of trapped bubbles.
Protective Gear:
Gloves, masks, and aprons protect your skin and clothing while working with resin.
Helpful Accessories:
Heat Gun or Torch:
Gentle heat helps pop bubbles that rise to the surface after pouring.
Resin Bubble Remover:
Specialized sprays or tools can further reduce surface bubbles for a flawless finish.
Measuring Tools:
Accurate measurements of resin and hardener ensure proper curing and reduce imperfections.
Using these tools correctly provides better control over your project, minimizes air pockets, and helps you achieve professional-quality results every time.
4. Proper Mixing Techniques
Mixing resin correctly is one of the most important steps to prevent bubbles and ensure a smooth finish. Using the right technique reduces air trapped in the mixture and promotes even curing.
1. Stir Slowly and Steadily:
Mix the resin and hardener slowly, using a gentle circular motion. Avoid vigorous stirring, as this introduces air pockets that can form bubbles.
2. Scrape the Sides and Bottom:
While mixing, scrape the sides and bottom of your cup regularly. This ensures all components are fully blended and prevents pockets of unmixed resin that can trap air.
3. Use the Right Tools:
A flat or rounded stir stick works best, as it minimizes agitation. Avoid using tools with holes or uneven surfaces that can introduce extra air.
4. Minimize Pouring Height:
When transferring resin to your mold, pour close to the surface. Pouring from a height can trap air and create bubbles that rise to the top.
5. Work in Small Batches:
Mixing smaller amounts at a time allows for better control, reducing the likelihood of bubbles and making it easier to handle thicker pours.
By following these techniques, you can significantly reduce the formation of air pockets, creating a smoother, clearer finish for your resin projects.

5. Using Heat to Remove Bubbles
Applying gentle heat is one of the most effective ways to remove air bubbles from resin once it has been poured. Heat helps trapped air rise to the surface, where it can pop, leaving a smooth and clear finish.
1. Heat Gun Method:
A heat gun works well for larger surfaces. Keep it moving in a sweeping motion about 6–12 inches above the resin. Avoid holding it too close, as excessive heat can damage the resin or your mold.
2. Torch Method:
A small butane torch can also remove bubbles effectively. Pass the flame quickly over the surface without lingering in one spot. This method works especially well for shallow pours or jewelry pieces.
3. Using a Lighter:
For small projects or fine details, a lighter can be used to pop bubbles. Move it gently across the resin surface for a few seconds. Make sure to keep it at a safe distance to prevent overheating or burning the resin.
Tips for Best Results:
Always apply heat immediately after pouring while bubbles are still rising.
Avoid excessive heat, which can cause resin discoloration or uneven curing.
Work in a well-ventilated area to disperse fumes safely.
Using heat strategically ensures that most surface bubbles disappear quickly, giving your project a professional, glossy appearance.
6. Alternative Methods
In addition to using heat, there are several other techniques that can help reduce or eliminate bubbles in resin. These methods are particularly useful for delicate projects or situations where applying direct heat is not ideal.
1. Vacuum Chamber:
A vacuum chamber removes air from resin before pouring. By creating a vacuum, trapped bubbles expand and rise to the surface, leaving a smooth mixture. This method is highly effective for thick pours or professional-grade projects.
2. Pressure Pot:
A pressure pot compresses air bubbles in resin during curing, making them nearly invisible. This technique is commonly used in large or deep molds to achieve a flawless finish.
3. Silicone Molds with Smooth Surfaces:
Using high-quality silicone molds can reduce bubble formation. Smooth molds allow resin to flow evenly and release trapped air naturally.
4. Gentle Tapping and Shaking:
After pouring, lightly tapping or shaking the mold can help bubbles rise to the surface. This simple method works well for small pours and layered projects.
5. Layering Resin:
Pouring resin in thin layers instead of all at once allows bubbles to escape between layers, minimizing trapped air and creating a clearer final piece.
By combining these alternative methods with careful mixing and heat application, you can achieve professional-looking results even without specialized equipment.
7. Tips for Thick Resin Pours
Pouring resin in thick layers can be challenging because it increases the risk of bubbles, uneven curing, and heat buildup. Following these tips can help ensure a smooth, clear finish for deep or multi-layered projects.
1. Work in Layers:
Instead of pouring all resin at once, pour in thin layers and allow each to partially cure before adding the next. This prevents air from getting trapped and helps maintain clarity.
2. Control Temperature:
Warm resin flows more easily, which allows bubbles to rise and escape. Keep your workspace at a moderate temperature and avoid pouring resin that is too cold.
3. Use a Heat Source Between Layers:
Lightly passing a heat gun or torch over each layer after pouring helps pop any rising bubbles and ensures a smooth surface for the next layer.
4. Choose the Right Mold:
Deep, high-quality silicone molds allow resin to flow evenly and minimize bubble formation. Avoid molds that are too rigid or textured, as these can trap air.
5. Mix Slowly and Thoroughly:
Even for thick pours, take your time mixing resin and hardener. Scrape the sides and bottom of your mixing cup to ensure a uniform blend and reduce trapped air.
By following these steps, thick resin pours can be handled effectively, resulting in crystal-clear layers without bubbles or imperfections.
8. Preventive Measures
Preventing bubbles from forming in resin is often easier than removing them afterward. Taking a few simple steps before and during your project can save time and ensure a smoother, clearer finish.
1. Work in a Controlled Environment:
Keep your workspace at a stable temperature and low humidity. Extreme cold or high humidity can cause air pockets and affect the curing process.
2. Use Fresh Resin and Hardener:
Old or improperly stored resin may develop inconsistencies that trap air. Always check the expiration date and store materials according to the manufacturer’s instructions.
3. Stir Slowly and Carefully:
Mix resin and hardener gently to avoid introducing air. Scrape the sides and bottom of the mixing cup to ensure a complete, even blend.
4. Prepare Your Mold:
Make sure molds are clean and dry before pouring. Any dust, debris, or moisture can cause bubbles to form on the surface of your resin.
5. Consider Additives Carefully:
Certain additives, like flow enhancers or thinners, can help reduce bubbles, but use them sparingly. Too much can affect curing or clarity.
By incorporating these preventive measures into your workflow, you can significantly reduce bubble formation and achieve professional-quality results every time.
9. Common Mistakes to Avoid
Even small errors during resin projects can lead to bubbles, uneven surfaces, or other imperfections. Being aware of these common mistakes helps you achieve smoother and more professional results.
1. Over-Mixing:
Stirring too quickly or for too long introduces unnecessary air into the resin. Always mix slowly and steadily to avoid trapping bubbles.
2. Pouring Too Quickly:
Pouring from a high distance can incorporate air into the resin. Pour close to the mold’s surface to reduce bubble formation.
3. Ignoring Temperature and Humidity:
Cold resin or high humidity can cause trapped air and affect curing. Always work in a controlled environment for consistent results.
4. Using Improper Tools:
Rough or uneven stir sticks, dirty molds, or low-quality cups can all contribute to bubble problems. Use smooth, clean tools for better results.
5. Not Removing Surface Bubbles Immediately:
Waiting too long to pop bubbles allows them to harden into the resin. Use heat or gentle tapping right after pouring to maintain a smooth finish.
Avoiding these mistakes makes a significant difference in the clarity and quality of your resin projects, saving time and effort while producing polished results.
10. Final Thoughts
Knowing how to get bubbles out of resin when mixing is essential for achieving clear, professional-quality projects. By combining proper mixing techniques, gentle heat, and careful layering, you can prevent most air pockets and create smooth finishes every time.
Using tools like a heat gun, torch, or even a lighter can help pop bubbles immediately after pouring, while preventive measures such as controlling temperature, working in a clean mold, and mixing slowly minimize future problems. For thicker pours, working in layers and knowing how thick UV resin can be poured ensures a flawless result.
Whether you’re a beginner or an experienced crafter, following these tips and avoiding common mistakes will help you consistently produce beautiful, bubble-free resin creations. By understanding when to remove bubbles from resin and using techniques like resin bubble removers, your projects will have a polished, professional look every time.
FAQs
1. How to get rid of bubbles in resin mix?
Stir the resin slowly and scrape the sides and bottom of the mixing cup to minimize trapped air. You can also use a heat gun, torch, or lighter to pop bubbles after pouring. Working in thin layers helps reduce bubbles for larger projects.
2. How to get bubbles out of resin without a heat gun?
If you don’t have a heat gun, you can use a torch, a lighter, or simply let the resin sit for a few minutes. Gentle tapping or shaking the mold can also help bubbles rise to the surface naturally.
3. Does heat get rid of bubbles in resin?
Yes, applying gentle heat helps air bubbles rise and pop, creating a smooth, clear finish. Always keep the heat source moving and avoid overheating the resin to prevent discoloration or damage.
4. Will bubbles come out of epoxy?
Some bubbles will naturally rise and disappear as the epoxy cures, especially in thin pours. For thicker pours, you may need to use heat or other methods to ensure bubbles are removed before the epoxy hardens.
5. How to mix epoxy without air bubbles?
Mix slowly and steadily in a clean cup, scraping the sides and bottom frequently. Avoid vigorous stirring and pouring from too high, as these introduce more air into the mixture.
6. Are air bubbles in resin bad?
Yes, air bubbles can create cloudy or uneven surfaces and affect the clarity and finish of your resin project. Removing bubbles ensures a smooth, professional appearance.
7. How long to let resin sit to get rid of bubbles?
After mixing, let the resin rest for 5–10 minutes. This allows most trapped air to rise to the surface naturally before pouring or applying heat.
8. How to remove bubbles from resin with a lighter?
Move the flame quickly and carefully over the surface, keeping it a safe distance to avoid burning or overheating. This method works well for small pours and detailed projects.
9. How do you smooth out epoxy after it dries?
Lightly sand the cured epoxy with fine-grit sandpaper, then polish or apply a thin topcoat to restore shine and smoothness. This helps remove minor imperfections or bubbles on the surface.