
Introduction
Deep Pour Epoxy Resin is specially designed for thick pours and large casting projects like river tables and molds. Its slow-curing formula creates a crystal-clear, bubble-free finish with excellent depth and durability, making it a favorite for both beginners and professionals.
Table of Contents
What Is Deep Pour Epoxy Resin?
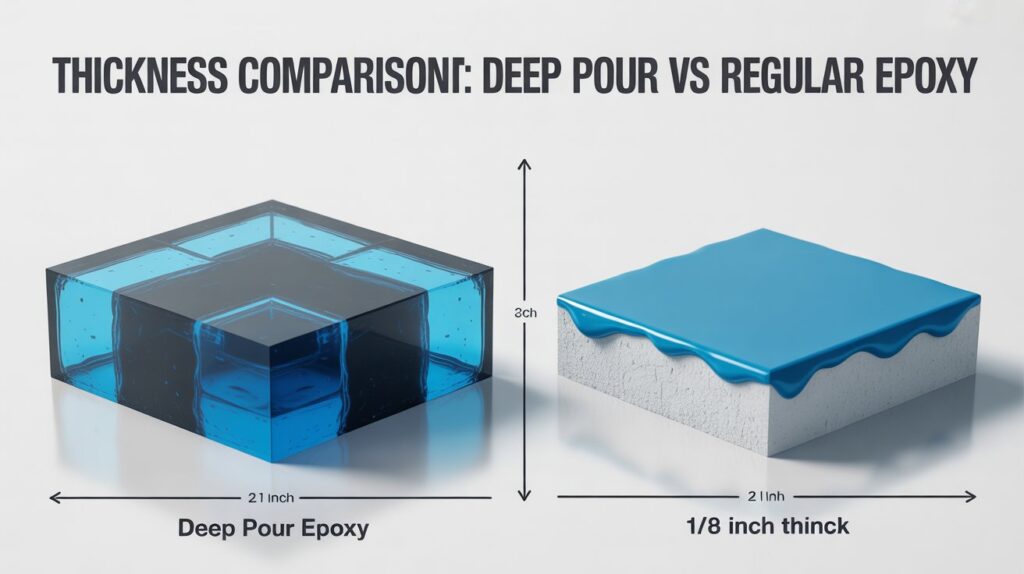
Deep pour epoxy resin is a specialised casting epoxy designed for thick pours typically between 1 to 4 inches in a single layer, depending on the brand. Unlike standard epoxy, which is made for thin coatings, deep pour epoxy resin has a low-viscosity formula that allows it to flow smoothly, self-level, release trapped air, and cure slowly without overheating.
This makes it ideal for projects like river tables, deep molds, and large casting art.Because it cures slowly and evenly, deep pour epoxy creates a crystal-clear, glass-like finish with fewer bubbles and minimal shrinkage. Its transparency and depth add a stunning dimensional look that can’t be achieved with regular epoxy coatings. Whether you tint it with pigments or leave it clear, deep pour epoxy resin offers impressive clarity, strength, and long-term durability.
Deep Pour Epoxy vs. Regular Epoxy: What’s the Difference?
Although they look similar, deep pour epoxy resin and regular epoxy are designed for very different purposes. The main difference comes down to viscosity, curing speed, and pour depth. Deep pour epoxy resin has a thin, low-viscosity formula, allowing it to be poured several inches thick without trapping bubbles or generating excess heat. This slow-curing design makes it ideal for river tables, thick molds, and casting projects where depth and clarity matter.
Regular epoxy, on the other hand, is a thicker, faster-curing coating epoxy made for thin surface applications usually no more than 1/8 to 1/4 inch per layer. Because it cures quickly, regular epoxy works best for tabletops, bar tops, and protective surface coatings, but will overheat, crack, or cloud up if poured too deep at one time.
To put it simply:
- Deep pour epoxy resin = best for thick pours and casting
- Regular epoxy = best for thin topcoats and surface finishes
Using the right type for the right project ensures clarity, strength, and a smooth curing process.
Best Uses for Deep Pour Epoxy Resin
Deep pour epoxy resin is ideal for projects that require thick, bubble-free pours with maximum clarity and depth. Because this formula cures slowly and flows easily into tight spaces, it’s the best choice for artistic and woodworking projects where regular epoxy would overheat, crack, or stop leveling. Below are the most common and practical uses for deep pour epoxy resin:
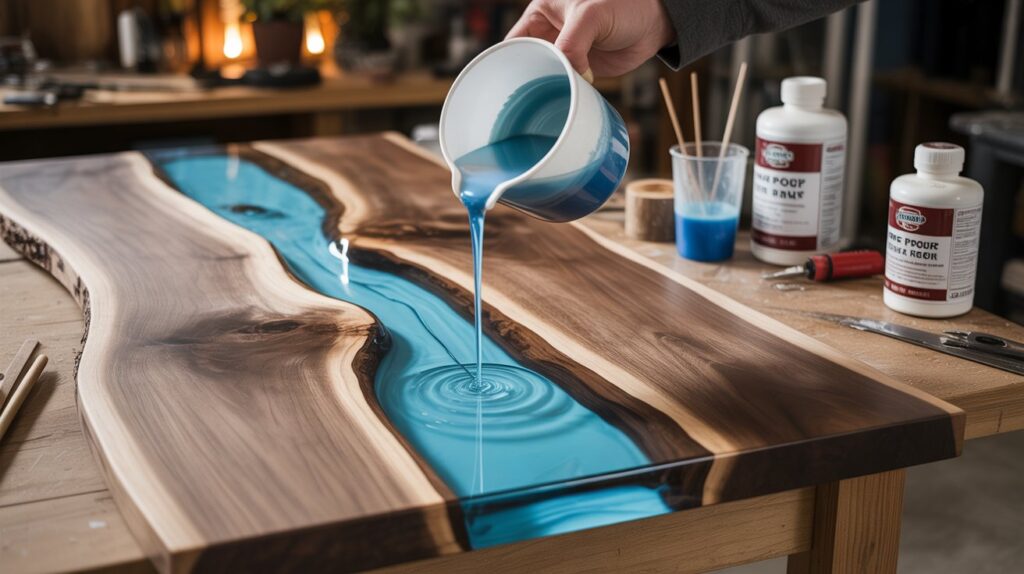
- River Tables The low viscosity allows the resin to flow between large wood slabs, fill voids, and harden into a crystal-clear centerpiece with rich dimensional depth.
- Casting and Deep Molds – Perfect for thick molds such as sculptures, blocks, paperweights, and custom décor pieces where a single, solid pour is needed.
- Embedded Objects – Deep pour epoxy resin makes it easy to encapsulate stones, shells, flowers, coins, and other keepsakes without trapping bubbles.
- Lamps and Resin Art – Its clarity and depth create stunning light diffusion, making it ideal for resin lamps, layered pigments, and 3D art designs.
- Live Edge Projects – Fills cracks, knots, and gaps in natural wood slabs, enhancing character while adding strength and a glass-like finish.
Because of its transparency and smooth flow, deep pour epoxy resin opens up design possibilities that standard epoxy simply cannot achieve. If your goal is thickness, depth, and clarity, this is the product made for the job.
Key Features to Look for in a Quality Deep Pour Epoxy
Not all deep pour products perform the same. When choosing a deep pour epoxy resin, it’s important to look for features that ensure clarity, durability, and a smooth pouring experience—especially for thicker projects. Here are the most important qualities to pay attention to:
- Low Viscosity A thin, easy-flowing formula helps the resin level out naturally and release trapped air, reducing the risk of bubbles during deep pours.
- High Pour Depth Rating Look for a product rated for 1–4 inches per pour, depending on your project needs. This is what separates deep pour epoxy resin from regular tabletop epoxy.
- Slow, Controlled Cure Time A longer curing process prevents overheating, cracking, or yellowing common issues with fast-curing epoxies when poured thick.
- Crystal-Clear Transparency A high-quality resin should cure clear with minimal clouding, giving your project a glass-like, professional finish.
- UV Resistance UV inhibitors help protect the resin from yellowing over time, especially for pieces exposed to sunlight.
- Strong Bonding & Durability The finished epoxy should be hard, scratch-resistant, and built to last, whether used in furniture, art, or decor.
- Simple Mix Ratio (Usually 2:1 or 3:1) – An easy mix ratio reduces errors and ensures a consistent cure, making the process more beginner-friendly.
Choosing a deep pour epoxy resin with these features will make your pours cleaner, clearer, and more reliable, no matter your project type or skill level.
Choosing the Right Deep Pour Epoxy Resin (Product Comparison Category)
With so many brands on the market, choosing the right deep pour epoxy resin can feel overwhelming. The best way to decide is by comparing a few key performance factors, including pour depth, viscosity, clarity, cure time, and price. A quality resin should be easy to work with, produce a bubble-free finish, and stay crystal clear over time.
Below are the most important features to compare when selecting a deep pour epoxy resin for your project:
- Pour Depth per Layer. Check how many inches the product can handle in a single pour. Some resins are rated for 1–2 inches, while others can handle up to 4 inches or more.
- Viscosity. A thinner, low-viscosity formula will flow better and release bubbles naturally, especially in thicker pours.
- Cure Time – Faster curing sounds convenient but may cause overheating or cracking. A slow-cure formula is safer for deep projects.
- Clarity & UV Protection – Choose a resin that cures crystal clear and includes UV inhibitors to reduce yellowing over time.
- Heat Resistance. Once cured, the epoxy should withstand normal surface heat without warping or softening.
- Price per Ounce. Comparing cost by volume helps you spot real value, especially for larger projects like river tables.
- Mix Ratio A simple and consistent ratio (like 2:1) makes mixing easier and helps ensure a proper cure.
By reviewing these categories before you buy, you can confidently choose the deep pour epoxy resin that matches your needs whether you’re pouring a large river table or working on smaller casting projects.
Comparison Summary
| Product | Why it stands out | Key Specs / Notes |
| MAS Deep Pour Epoxy Resin System | A well-known casting deep pour epoxy, great for thicker pours and river tables. (Cited by MAS site) Mas Epoxies | Mix ratio: 3:1 by volume, slow cure, depth recommended up to ~2-3″ depending on conditions. Mas Epoxies |
| UltraClear Deep Pour Epoxy | Premium option marketed for ultra-clear finish, good clarity and large pours. UltraClear Epoxy | Designed for thick layers (though exact depth depends on conditions); marketed as best deep pour epoxy. UltraClear Epoxy |
| MAS Deep Pour Epoxy (Alternate Size) | Same product line as first, but highlighting availability in different sizes for scalability. | Good for varying budget/project size, same performance specs. |
| MAS Deep Pour Epoxy Budget Kit | More budget-friendly size or volume from same trusted brand; useful for smaller deep pours. | Lower cost per unit, may be less ideal for huge pours but reliable for moderate depth. |
| UltraClear Deep Pour Epoxy Professional Kit | Larger kit version of UltraClear, good for big projects; emphasizes both clarity and professional performance. | Higher cost, better value for large quantities, strong clarity and finish. |
How to interpret & choose
- If you’re doing large pours (river tables, large molds), go with a product rated for higher depth per pour (e.g., MAS or UltraClear).
- If clarity is paramount (art pieces, high gloss finish), lean toward UltraClear.
- If budget or volume is a factor, check sizes and cost per ounce—brands like MAS provide multiple kit sizes.
- Always check mix ratio, pour depth rating, and cure time for your specific application.
- Keep in mind that real performance can vary depending on temperature, volume, mold/material, and ambient conditions (as cautioned by manufacturers).
How to Use Deep Pour Epoxy Resin (Step-by-Step Guide)
Working with deep pour epoxy resin is straightforward when you follow the right steps. A slow cure and low viscosity make it beginner-friendly, but proper preparation is the key to a smooth, bubble-free finish. Use this simple step-by-step guide for reliable results on river tables, molds, and casting projects.
Prepare Your Workspace
Set up in a clean, dust-free area with good ventilation. The ideal room temperature is typically 70–80°F (21–27°C). Make sure your project is level before you start.
Measure and Mix the Resin
Follow the manufacturer’s recommended mixing ratio (commonly 2:1 or 3:1). Pour the resin and hardener into a mixing bucket and stir slowly for several minutes. Avoid whipping air into the mixture.
Seal the Surface (Optional for Wood Projects)
If working with live edge slabs or porous materials, apply a thin seal coat of regular epoxy first. This prevents air from escaping and forming bubbles in your deep pour.
Pour the Resin in a Single, Even Layer
Slowly pour the deep pour epoxy resin into your mold or wood channel. Its thin viscosity will help it flow smoothly and self-level without trapping air.
Remove Bubbles
Use a heat gun or torch and lightly pass it over the surface. Most deep pour formulas release bubbles on their own, but a quick pass helps achieve a crystal-clear result.
Let It Cure Fully
Allow the resin to cure undisturbed. Deep pour epoxy typically has a long curing time—anywhere from 24 to 72 hours, depending on brand, room temperature, and pour thickness.
Sand and Finish (Optional)
Once fully cured, sand or polish as desired. You can add a thin tabletop epoxy coat on top for a flawless, glossy finish.
Quick Tips for Best Results
- Keep room humidity low to prevent surface imperfections.
- Pour in the depth recommended by the manufacturer never overfill in one layer.
- Always mix thoroughly, scraping the sides and bottom of your container.
Common Mistakes to Avoid with Deep Pour Epoxy
Working with deep pour epoxy resin is easier when you know what to avoid. Because it cures slowly and is designed for thick applications, a few simple mistakes can lead to bubbles, cracks, yellowing, or uneven surfaces. Here are the most common pitfalls and how to prevent them:
Pouring Too Deep at Once
Every deep pour product has a recommended maximum pour depth. Exceeding it can cause overheating, cracking, or cloudiness. Always follow the manufacturer’s pour limits for best results.
Mixing Too Fast or Incorrectly
Stirring too quickly introduces excess bubbles. Incomplete mixing can also leave soft or sticky spots. Mix slowly and thoroughly, scraping the sides and bottom of your container.
Pouring in the Wrong Temperature
Deep pour epoxy resin performs best in 70–80°F (21–27°C) environments. Lower temperatures slow the cure and trap bubbles, while higher temperatures can accelerate curing and cause overheating.
Skipping a Seal Coat on Wood Projects
Porous wood releases air bubbles during a deep pour. A thin seal coat prevents constant bubbling and results in a cleaner, clearer finish.
Ignoring Working Time
Deep pour epoxy has a limited working window. Delaying your pour or overhandling the surface can cause ripples, imperfections, or trapped bubbles. Plan your steps before you mix.
Using the Wrong Product for a Topcoat
Deep pour epoxy resin is designed for thick layers, not thin final finishes. For a smooth, glossy top layer, always apply a tabletop or coating epoxy instead.
Pro Tips to Avoid Problems
- Pre-warm resin bottles in lukewarm water (if allowed) for easier mixing
- Use a heat gun or torch to remove surface bubbles
- Keep dust away during the full curing period
Avoiding these mistakes will help you achieve a crystal-clear, professional finish every time.
Safety Tips for Working With Deep Pour Epoxy
Working with deep pour epoxy resin is generally safe, but it still requires proper precautions. The resin and hardener can release fumes and cause skin irritation during the mixing and curing process, so it’s important to follow basic safety practices. Taking a few simple steps will help protect your health and ensure a smooth, worry-free project from start to finish.
Wear Protective Gloves and Clothing
Epoxy can irritate the skin, so always wear chemical-resistant gloves and avoid direct contact. Long sleeves are also helpful when handling large pours.
Use Eye Protection
Splashes can happen while mixing or pouring. Safety glasses or goggles will protect your eyes from resin or hardener.
Work in a Well-Ventilated Area
Good airflow helps reduce exposure to fumes. If you’re working indoors, open windows or use a ventilation fan to circulate fresh air.
Avoid Breathing Fumes and Dust
During sanding or polishing cured resin, wear a dust mask or respirator. Fine epoxy dust can irritate the lungs if inhaled.
Keep a Clean, Organized Workspace
Clutter increases the chance of spills and accidents. Keep your tools, cups, and materials organized before mixing your deep pour epoxy resin.
Follow Manufacturer Instructions
Each brand has specific safety guidelines, including mix ratios, temperature ranges, and cure times. Following the instructions will keep your workspace safer and your results more predictable.
Protect Your Surfaces
Use plastic sheeting or drop cloths to cover floors and workbenches. Epoxy resin sticks to almost everything and can be difficult to remove once cured.
Store Resin Safely
Keep resin and hardener containers sealed when not in use and store them in a cool, dry place away from children and pets.
Dispose of Materials Properly
Cured epoxy can be thrown away normally, but liquid resin and hardener should be disposed of according to local waste guidelines. Never pour leftover resin down the drain.
Taking safety seriously ensures that your experience with deep pour epoxy resin stays enjoyable, clean, and risk-free whether you’re a first-time DIYer or a seasoned maker.
FAQS
Q: What makes deep pour epoxy resin different from regular epoxy?
A: Deep pour epoxy resin has a thinner, low-viscosity formula and a slower curing time, allowing it to be poured several inches thick without overheating or trapping bubbles. Regular epoxy is meant for thin topcoats and will fail if poured too deep.
Q: Can I use deep pour epoxy as a topcoat?
A: It’s not recommended. Deep pour epoxy cures soft on the surface and is designed for thickness, not thin finishing layers. For a glossy, durable topcoat, use a tabletop or coating epoxy instead.
Q: How long does deep pour epoxy take to cure?
A: Most deep pour epoxy resin products take 24 to 72 hours to cure, depending on temperature, humidity, and pour depth. Full hardness can take up to 7 days.
Q: Why is my epoxy turning yellow?
A: Yellowing can result from UV exposure or using a low-quality resin without UV inhibitors. Choose a UV-resistant deep pour epoxy and keep projects out of direct sunlight when possible.
Q: How do I prevent bubbles in deep pours?
A: Mix slowly, pour in a steady stream, and use a heat gun or torch on the surface. A seal coat on porous wood also helps stop air from escaping and forming bubbles.
Q: Can I add pigment or dye to deep pour epoxy resin?
A: Yes. Deep pour epoxy works well with mica powders, liquid pigments, and alcohol inks. Just avoid adding too much color, as it can affect curing or clarity.
Q: What is the maximum depth I can pour at one time?
A: Each brand is different, but most deep pour epoxy resin can handle 1 to 4 inches in one pour. Always check the manufacturer’s guidelines.
Conclusion
Choosing the right deep pour epoxy resin can make all the difference in your project’s clarity, strength, and overall finish. Whether you’re creating river tables, large molds, or artistic castings, this type of epoxy is designed to handle thicker pours with fewer bubbles and a crystal-clear result. By understanding how it works, using the proper pouring techniques, and avoiding common mistakes, you can achieve professional-quality results every time.
Deep pour epoxy resin offers endless creative possibilities just be sure to follow the manufacturer’s directions, work safely, and take your time during the curing process. With the right product and the steps you’ve learned in this guide, you’re ready to start pouring with confidence.
Final Thoughts
Working with deep pour epoxy resin opens the door to bigger, bolder, and more creative projects. Its ability to cure slowly, pour deeply, and maintain a crystal-clear finish makes it the best choice for river tables, casting, and thick artistic designs. By choosing a high-quality product, following proper mixing and pouring steps, and avoiding common mistakes, you can achieve professional results even as a beginner.
Whether you want a stunning centrepiece or a custom work of art, deep pour epoxy resin gives you the strength, clarity, and durability needed to bring your ideas to life. Take your time, plan ahead, and enjoy the process the results are worth it.